Top Down Shooter - Part 2
This tutorial explains you how to create a Top Down Shooter game in GDevelop. If you are a beginner or you have never used GDevelop before, this might be a great place to begin.
In this tutorial, you will learn how to :
- Create a player who can shoot
- Follow camera towards player
Series
You are reading Part 2 of the Top-Down Shooter Tutorial. If you haven't read Part 1, then you can read it by selecting it down below.
This tutorial will help you to begin to use GDevelop. You will create a Top-Down Shootergame where the player shoots and kills the Enemy. Note that you can read the Getting Started page to get an overview of the software. It explains the main concepts and describes the interface of GDevelop.
Previously
In Part 1, we made our Player and moved it. Today, we are going to make a Gun and aim it towards the mouse. We are also going to make a Camera follow our Player.
Step 1. Add an object
Now that we are going to make a Gun, we need to do this: Add an object Choose Sprite Name it "Gun" We have made our Gun. Now we need to make specify its centre. A centre is a point from where an object rotates.
- Double click the Gun to open Object Editor.
- Click on Add animation
- Click on Add
- Select "Gun 1.png"
- Select OK
- Click on Edit points
- Click on Edit button of the centre point
- Write 4 in X and 3 in Y
- Click on Close
- Click on Apply
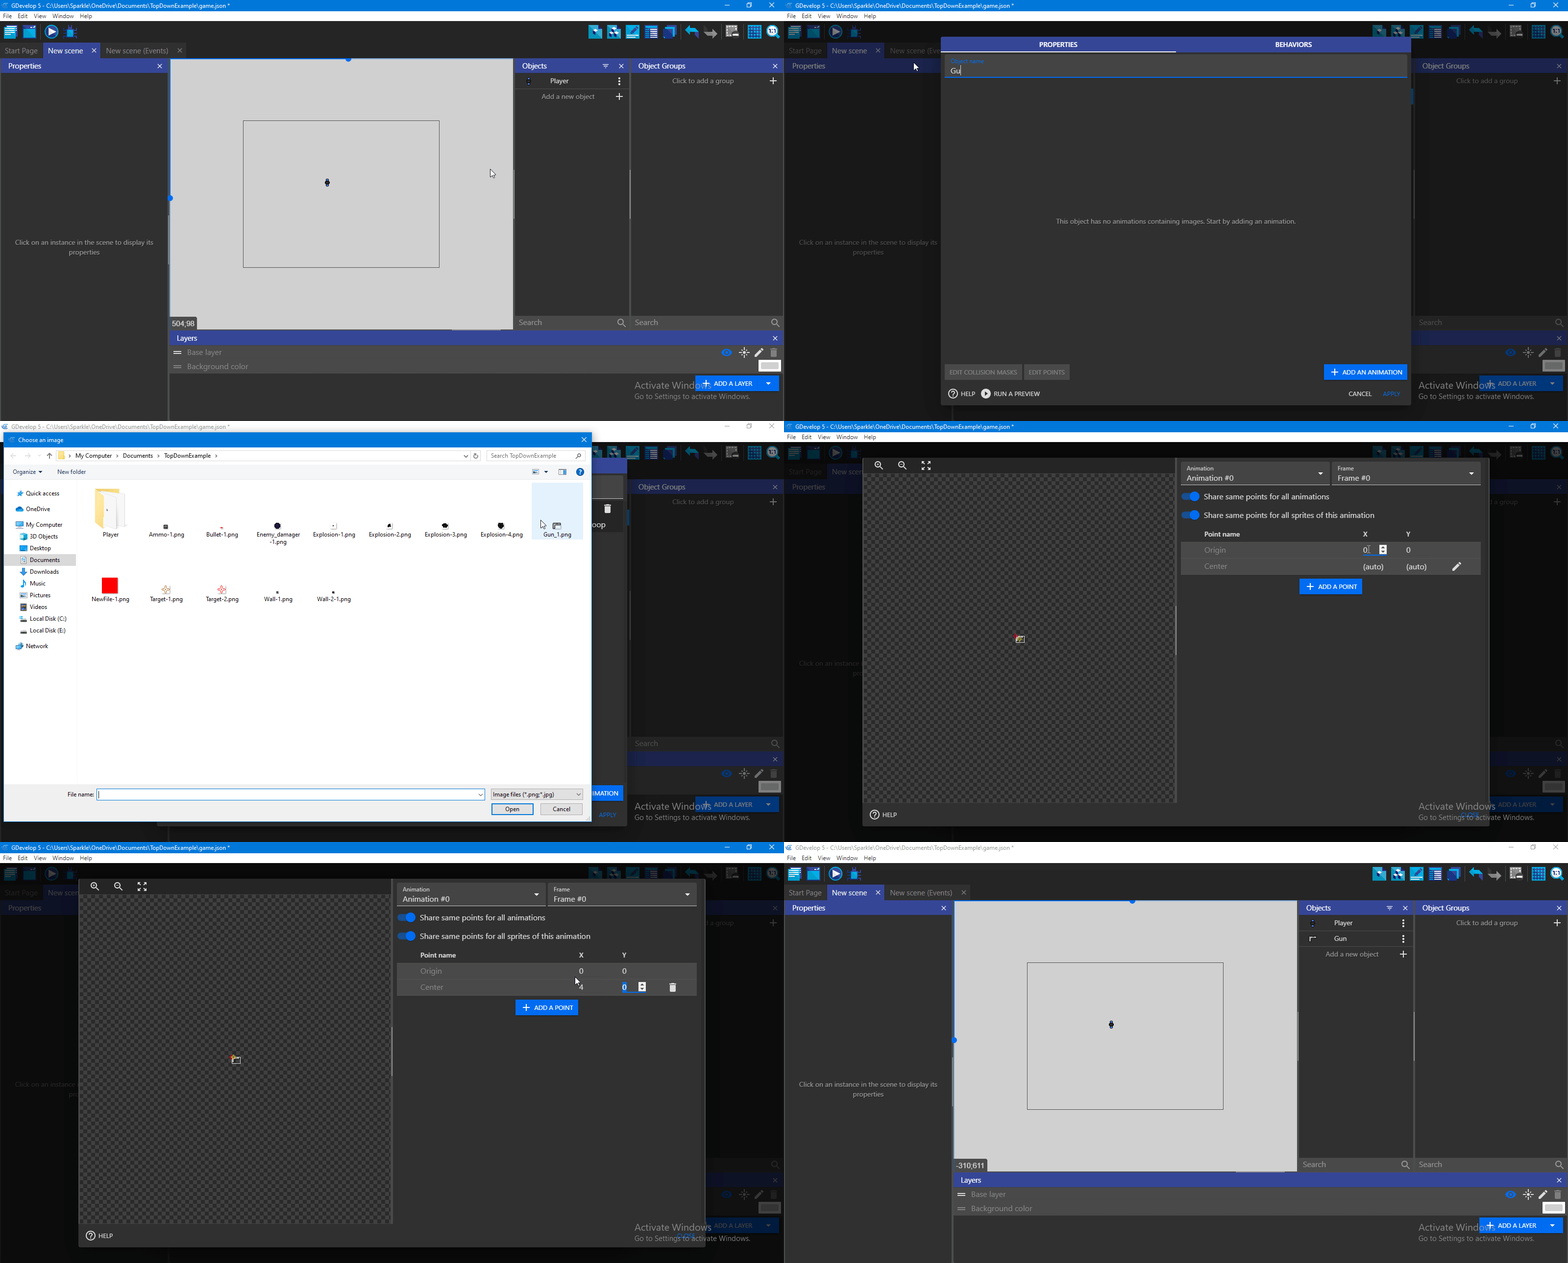 Now, we have specified our Centre of sprite we can now move on.
Step 2. Keep gun around player
We have created our Gun. Now, we should stick our Gun with Player. To do it:
- Go to the Events tab of the scene
- Click on Add a New Event
- Click on Add action
- Here you will have a list of your objects. Select Gun.
- Now, a new box appears. Here, you have the list of actions.
- Search for Position
- After finding, select Position
- A new box appears.
- In the X position textbox, write Player.PointX("Center") and in the Y position textbox, write Player.PointY("Center").
- Give both modification signs a sign of "=".
- Click on OK.
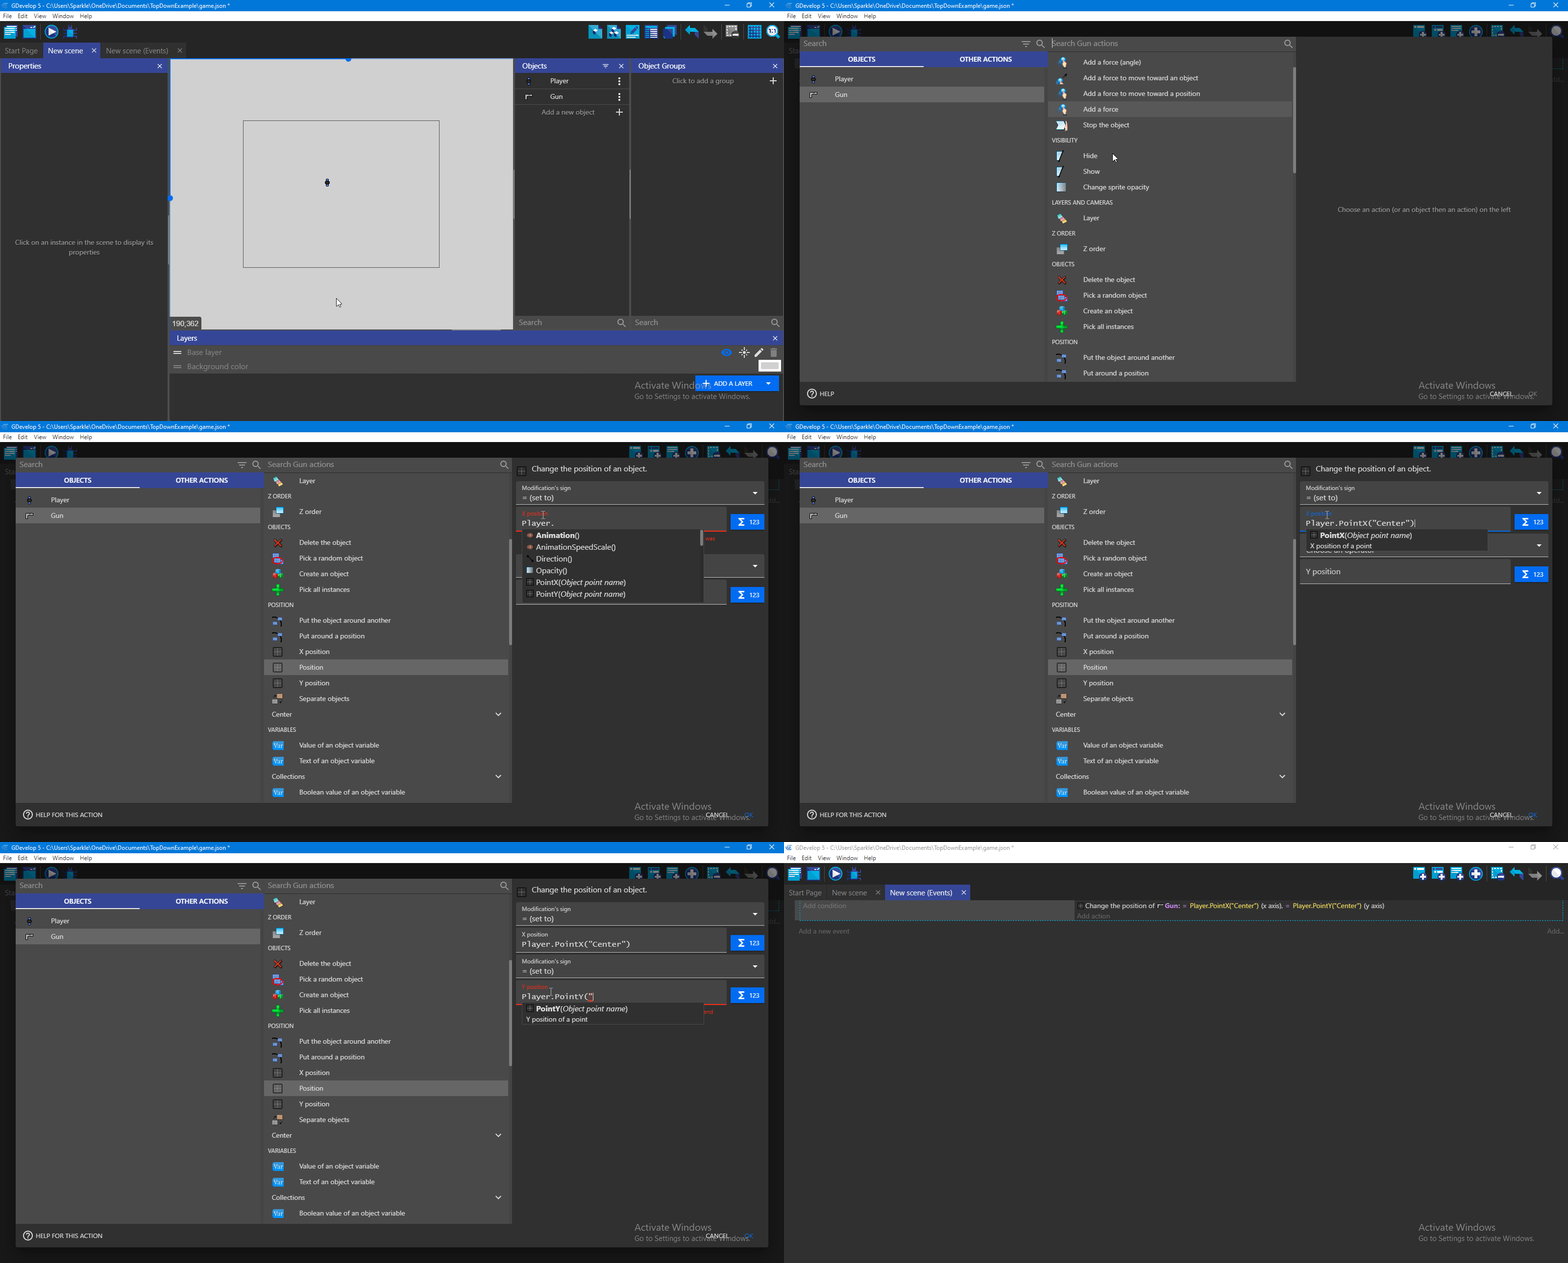 Now, the gun follows the Player or we can say it sticks to the Player.
Step 3. Aim towards mouse
It cannot be called a shooter game if we don't know how to aim. So to aim:
- Add a new action
- Select Gun
- Search for Rotate towards Position and click it
- In the X position textbox, write MouseX()
- In the Y position textbox, write MouseY()
- Click on OK
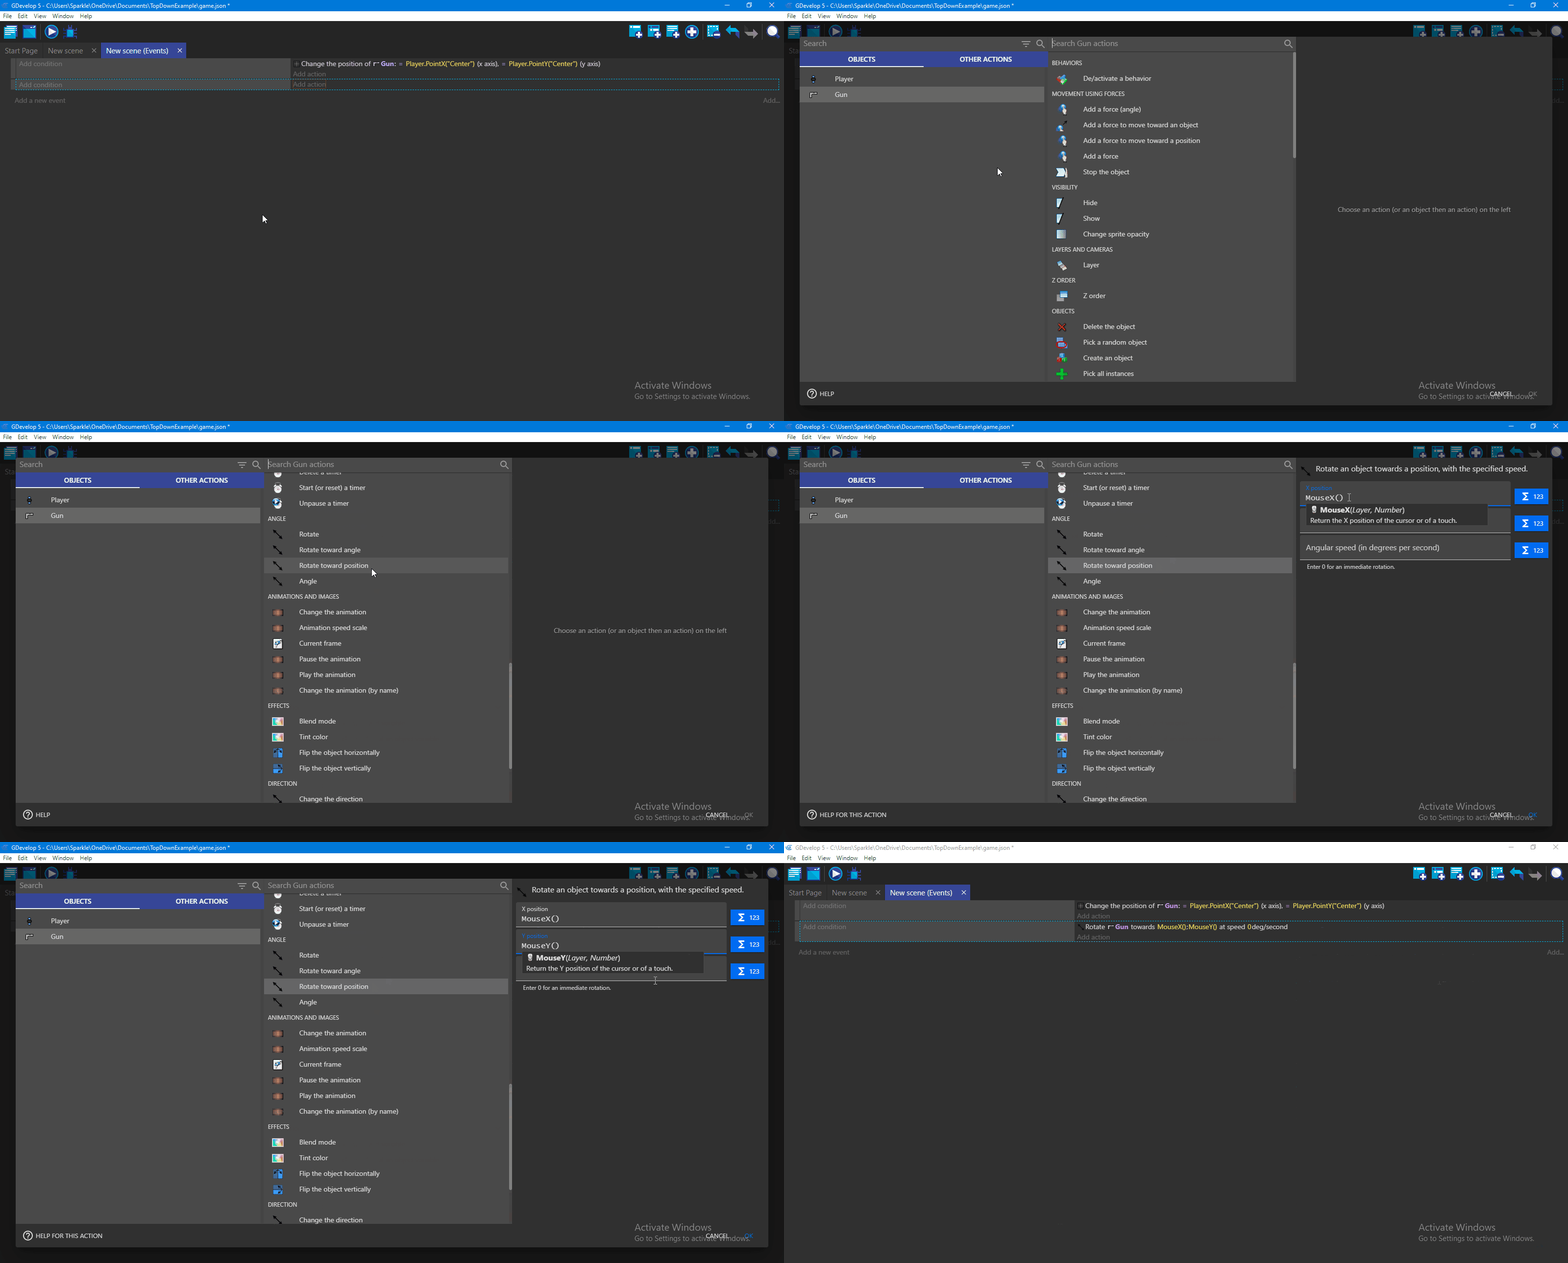
Step 4. Shoot
If we want to shoot, we need a bullet. So let's make a bullet:
- Click on Add a new object
- Select Sprite
- Name it "Bullet"
- Click on Add a new animation
- Click on Add
- Select "Bullet-1.png" asset
- Click on Apply
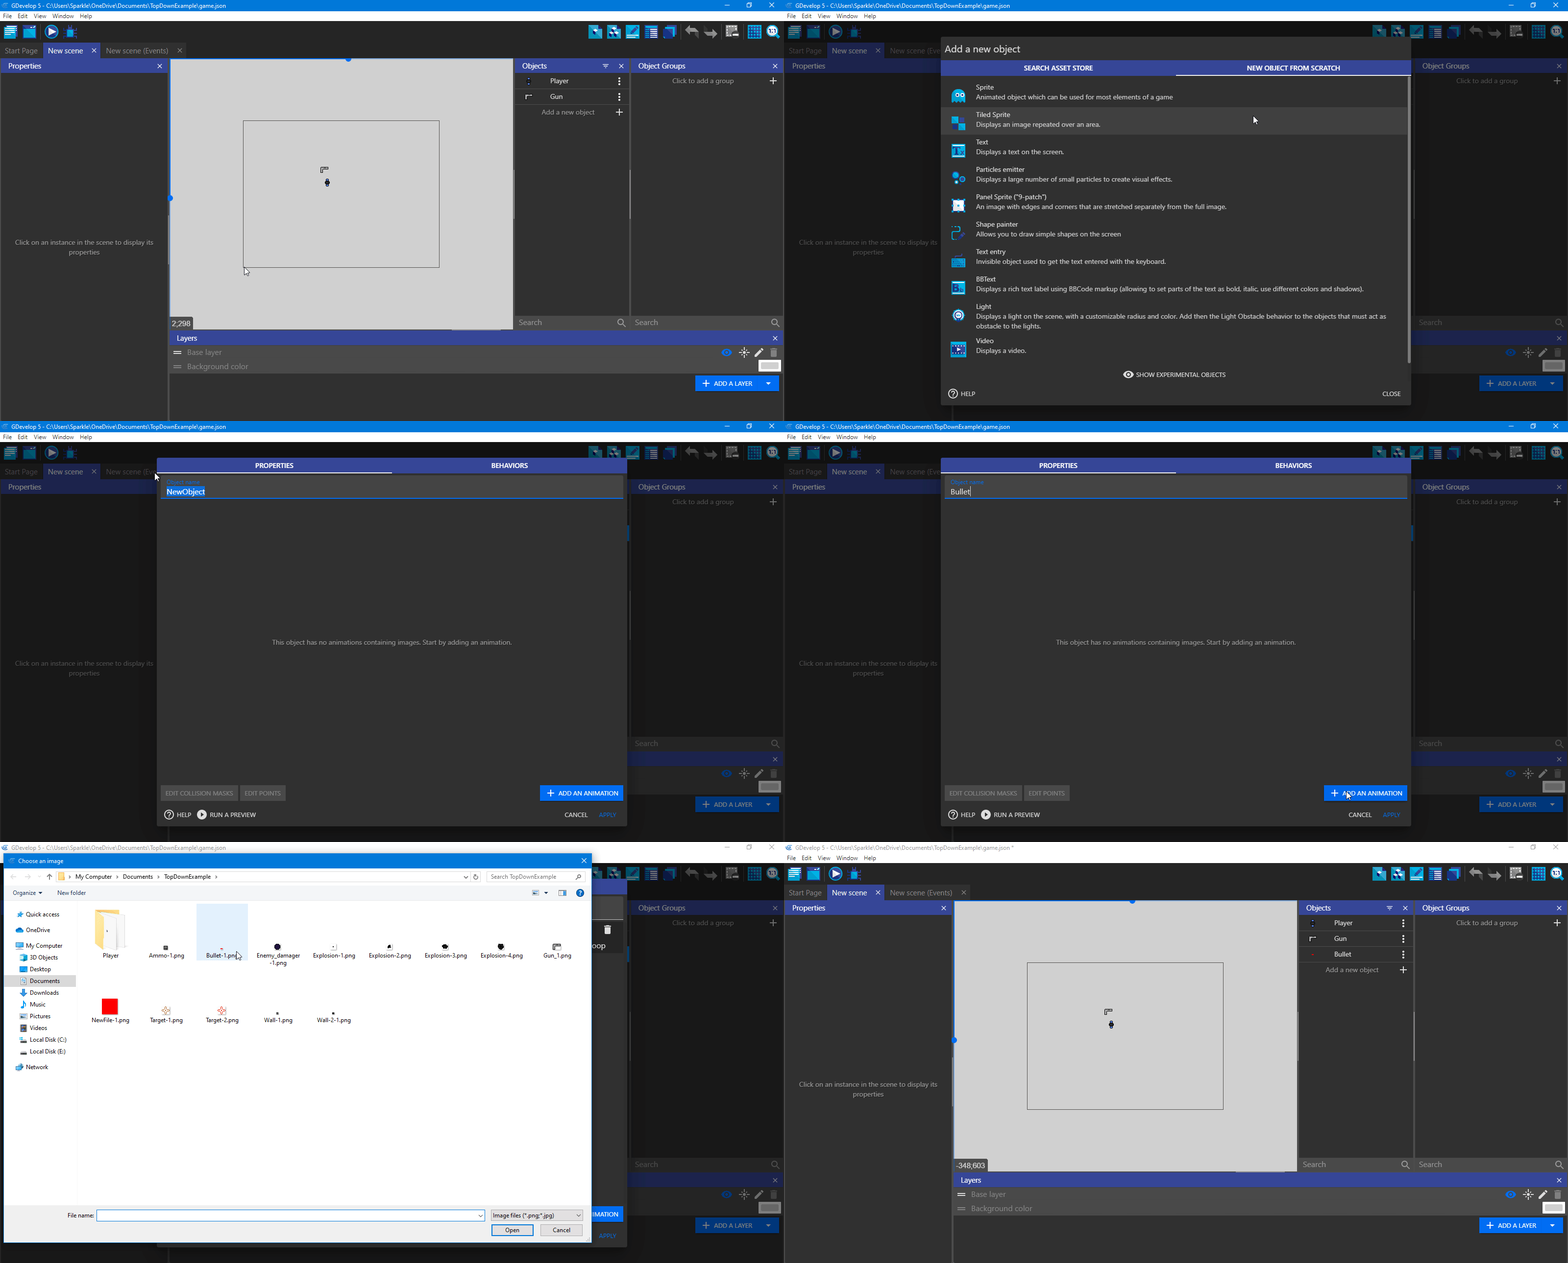
So we have made a Bullet sprite. But that's not enough. We also need to specify from where does the Bullet appears. And for that, we need a point in our Gun. To make a point:
- Double click on Gun
- Click on Edit Point
- Click on Add a new point
- Name the point "Bullet"
- Change its X position to 14 and Y position to 2.
- Click on Close
- Click on Apply
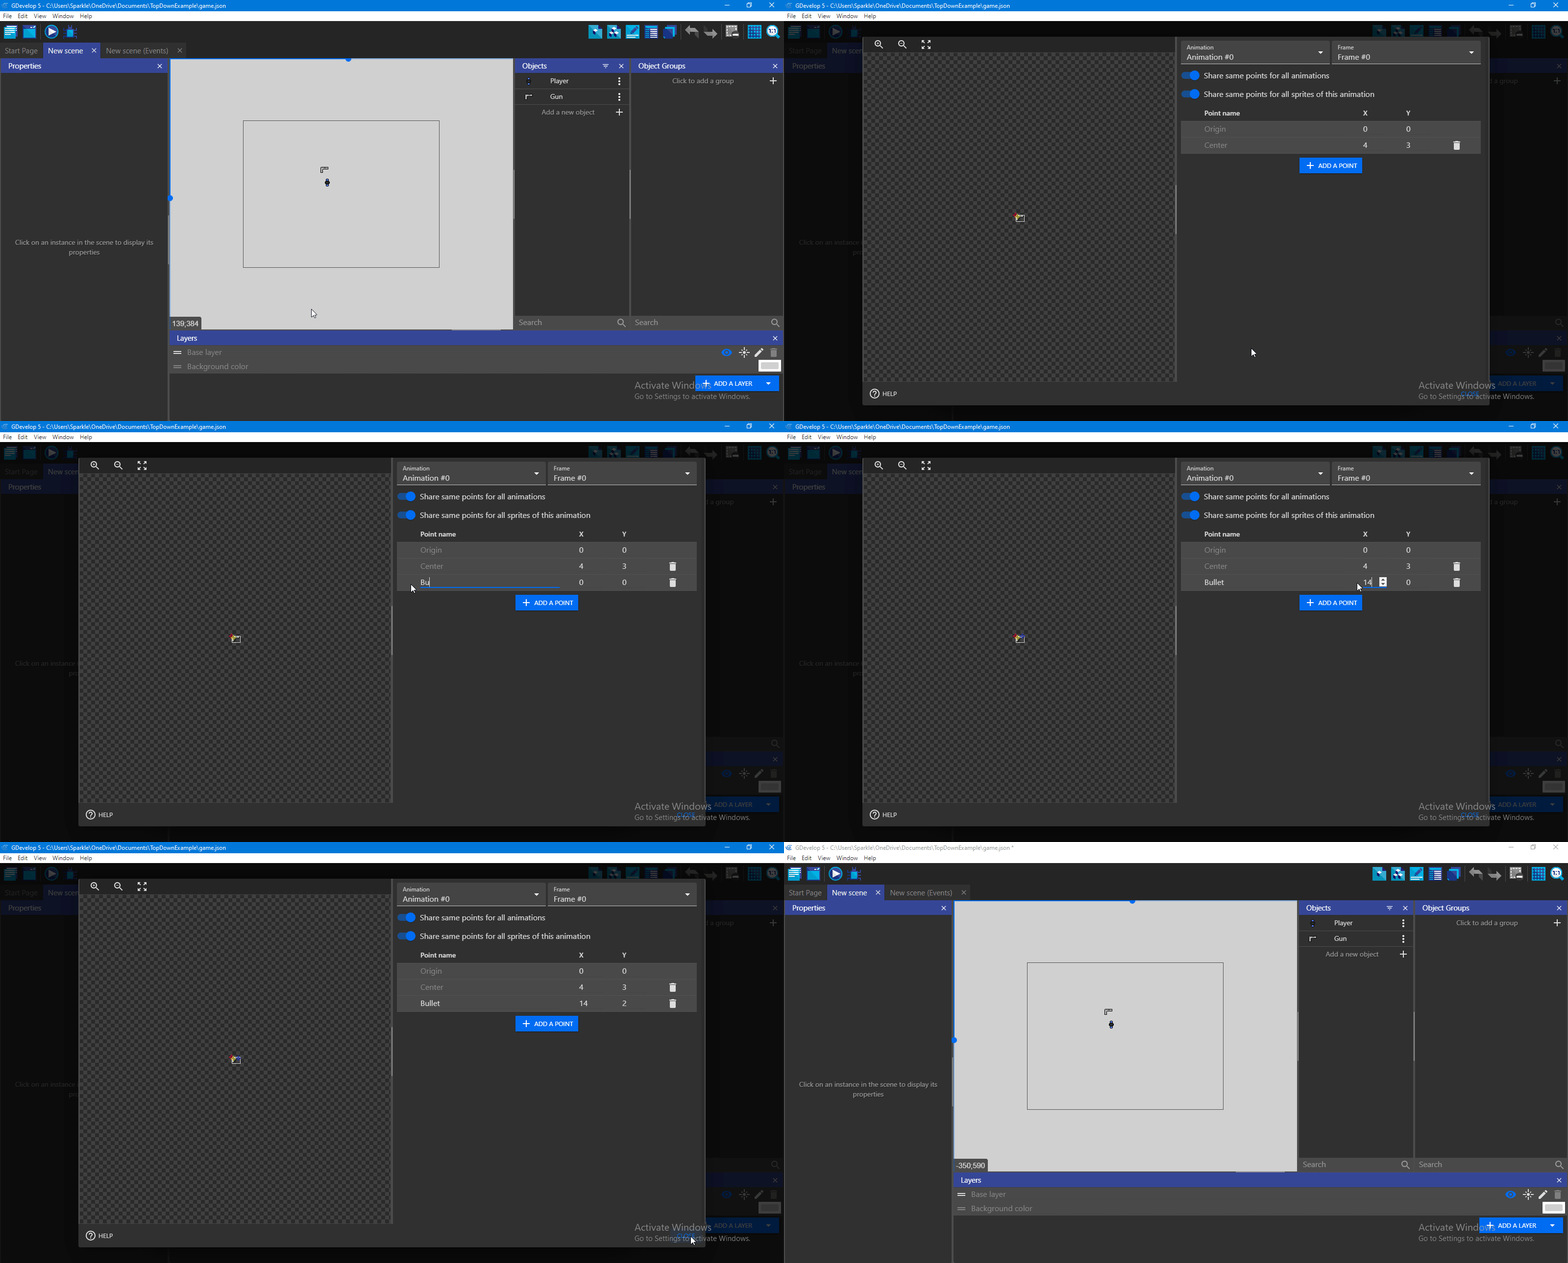
Now we need to shoot it. To shoot:
- Go to the Events tab
- Add a new event
- Add a new action
- Select Bullet
- Select Create a new object
- In X position textbox, write Player.PointX("Bullet")
- In Y position textbox, write Player.PointY("Bullet")
- Click OK
- Now, add a new condition
- Search for Mouse button pressed or touch held
- Select it
- Choose the mouse button you want the Player to press for shooting
- Click OK
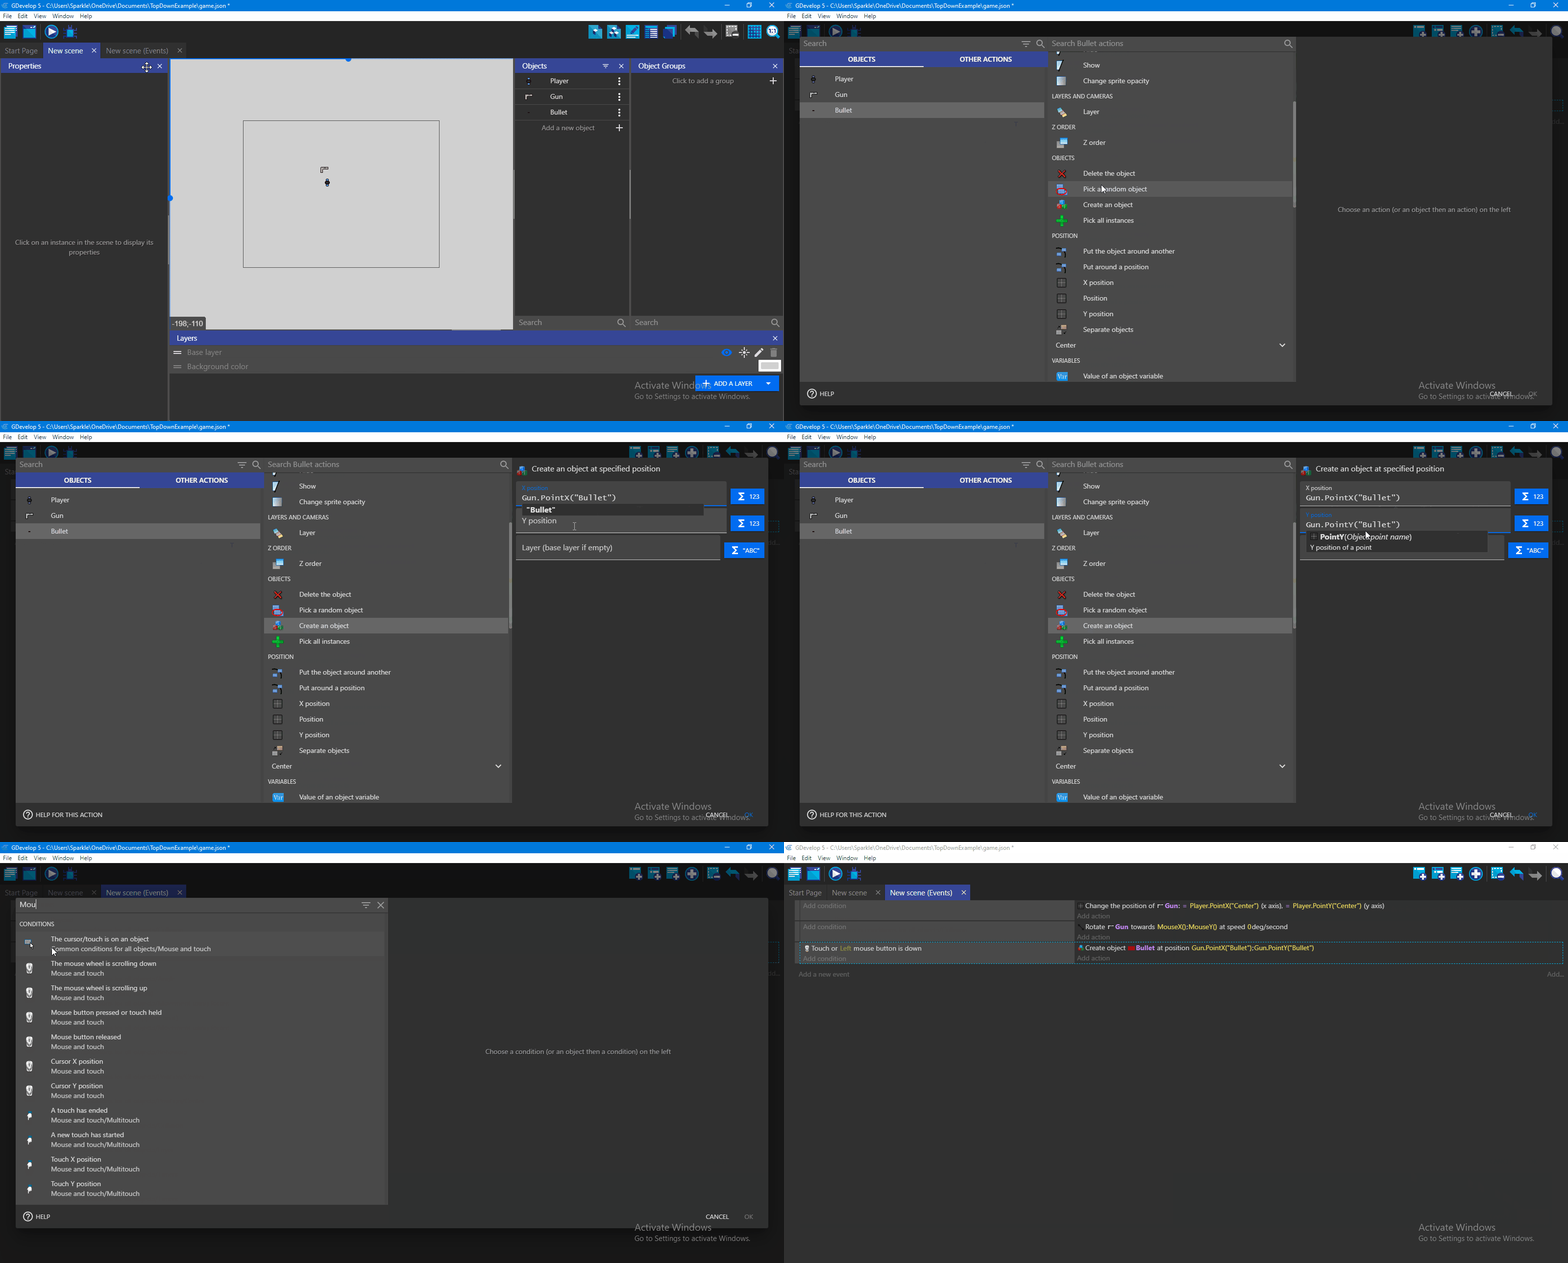
Now, we can shoot while we click.
Step 4. Following camera towards player
If we have a big map and want the Player to explore, we want the Camera to follow Player. So, we need to do this:
- Add a new action
- Search for Camera
- Select Centre the camera on an object
- In the Object textbox, select Player
- Click on OK
Step 5. Preview your game
To preview your game, click on the Preview button in the toolbar. We can now see that our Gun rotates towards the mouse. If we move our Player, it moves but we don't feel like it. That's because we don't have anything other than the Player to give us the sensation of movement.
Conclusion
In this part, we created a Gun which aims towards the mouse. We also made our Camera follow our Player. In Part 3, we will be creating a Health Bar for our Player.