Add enemies to your platformer game
Warning
This version of the tutorial is deprecated. Please refer to the new platformer tutorial for the completely revised version of the tutorial. The equivalent information to the current tutorial can be found in Part 6.
Let's add an enemy that will be moving left and right on platforms. The player can destroy it by jumping on the top of it.
Create and add the enemy object to your scene
Create a new "Sprite" object. Add the images slimeWalk1.png and slimeWalk2.png to the first animation and call this animation Walk.
Since our enemy is going to be constantly moving, we don't need an Idle or any other animation.
Set the animation to loop by clicking on the "Don't loop" button, to flip it to "Loop", and set its animation speed to 0.5 using the clock icon.
The window should look like this:
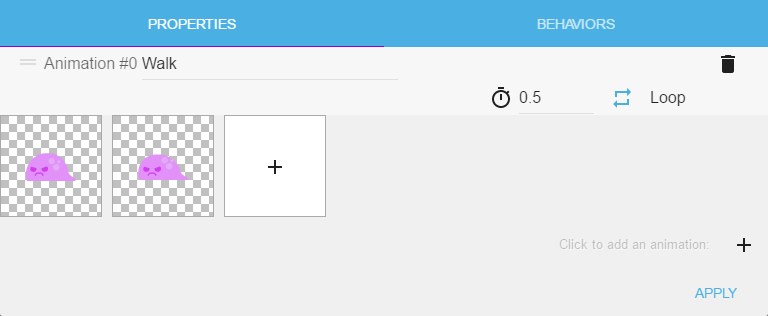
Confirm the changes by clicking on the "Apply" button.
Next, rename the object to Slime. Add a slime object to the scene, making sure it sits right on the top of a platform.
If we run the preview now, it doesn't do much. It just sits quietly on the top of the platform and plays the walking animation. Let's make it move.
Move the enemy left and right
In this tutorial, our slime is going to move left and right. We are going to do this by using invisible objects: when the slime will touch one of the object, it will reverse its direction.
Let's add two objects that will act as delimiters. Create a new sprite object and add the image Left.png. Name this object left. Then, create one more object and add the image Right.png. Name this object right.
Finally, put the object called left to the right side of the platform and the object called right to the left side of the platform.
It should look like this:

The idea is that, if the slime collides with the object called left, we set its direction to move to the left. And if it is colliding with the object called right, we set its direction to move right.
First, we are going to create an object variable called direction with the default value "left". We are going to use this variable to change the direction.
To add an object variable to our slime, right click on the slime object in the object list and choose "Edit object variables".
An empty window is displayed. It contains the list of object variables we have declared for our slime object. It is empty now as we have declared none. To add an object variable, click the plus sign in the bottom right corner.
This adds a variable called 'Variable' in the window. Click on the name and change it to 'direction'. Click on the value field and enter 'left'. The window should look like this:
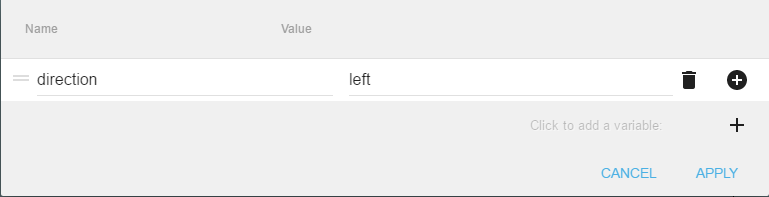
Confirm the changes by clicking on the Apply button. We now have an object variable called 'direction' with the default value 'left'.
Let's now use this variable to make our slime move.
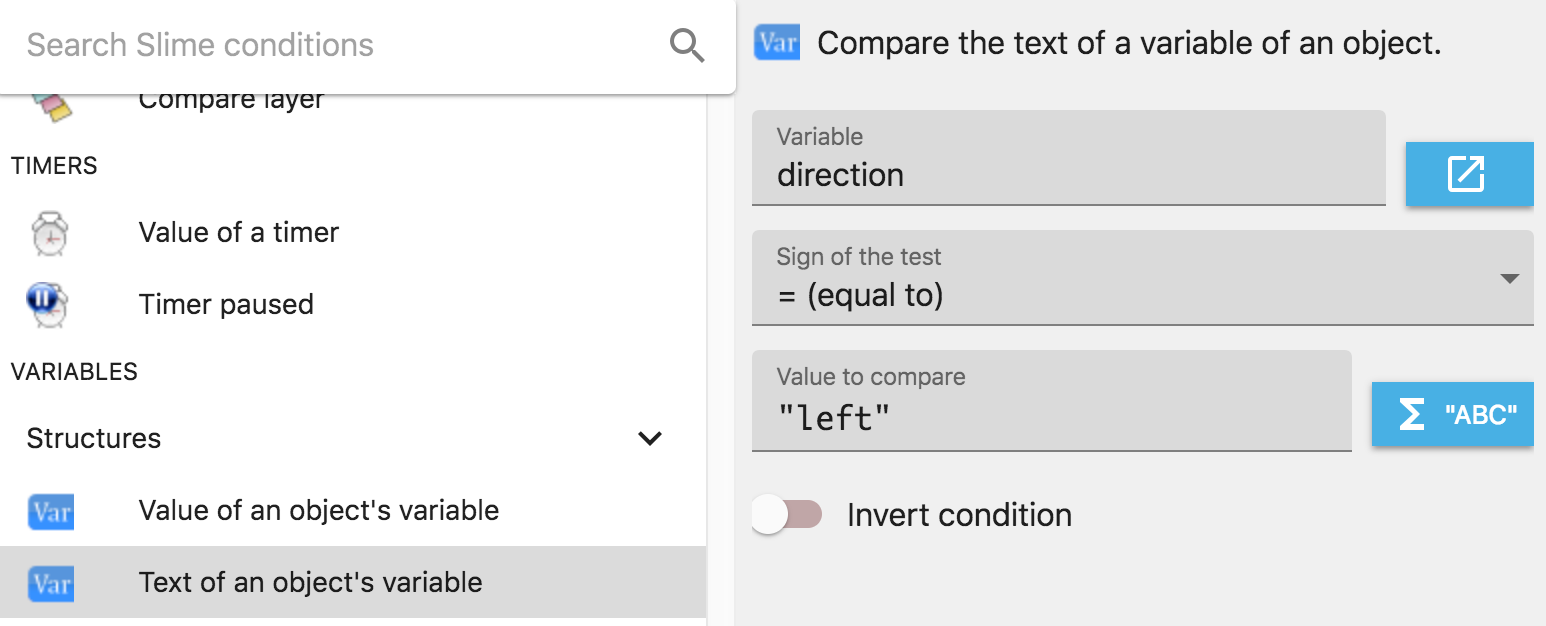
In the events editor, add a blank event and add a condition to check the Text of an object's variable. You can find it in Common conditions for all objects > Variables > Text of an object's variable.
In the parameters, for the object field select Slime. For the Variable field select direction (or write direction using the keyboard). For Sign of the test select equal to and finally, for the value, enter "left". Don't forget to put the value in between quotes.
The window should look like this:
Press OK to confirm and add the condition to the event. Now let's add the action to move the slime to the left.
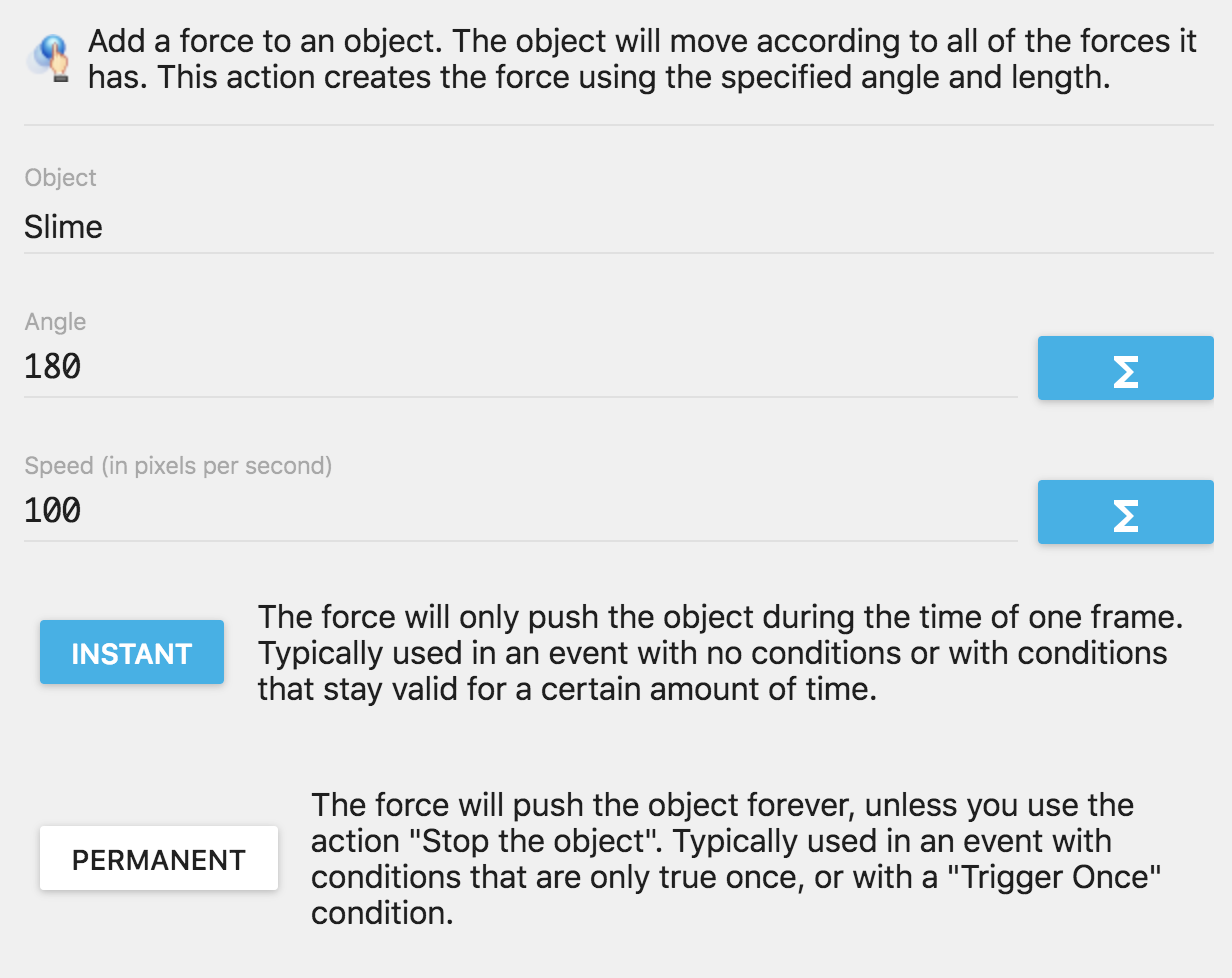
Click on "Add action" and select "Add a force (angle)" from Common conditions for all objects -> Movement -> Add a force (angle). Remember, you can always use the search box to find what you looking for.
In the parameters, for the object field select 'Slime' again. For the angle, enter "180" degrees (which is the left side in GDevelop coordinates system) and for speed enter 100 pixels. Choose "Instant" option for the force, as the force will be applied at every frame of the game, as a condition that stays valid for a certain time.
The window should look like this:
Press OK to add the condition to the event.
If we run the preview now, our slime should start to move to the left but you probably notice that it keep moving, and never change direction.
This time we are going to check the collision between the Slime object and the object called 'right' and we are going to change the value of the direction variable to 'right'.
Add a blank event and add a condition to check collision between the Slime and the object called 'right'. You should already know how to do this. Next, add an action to 'Modify the text of a variable of an object'.
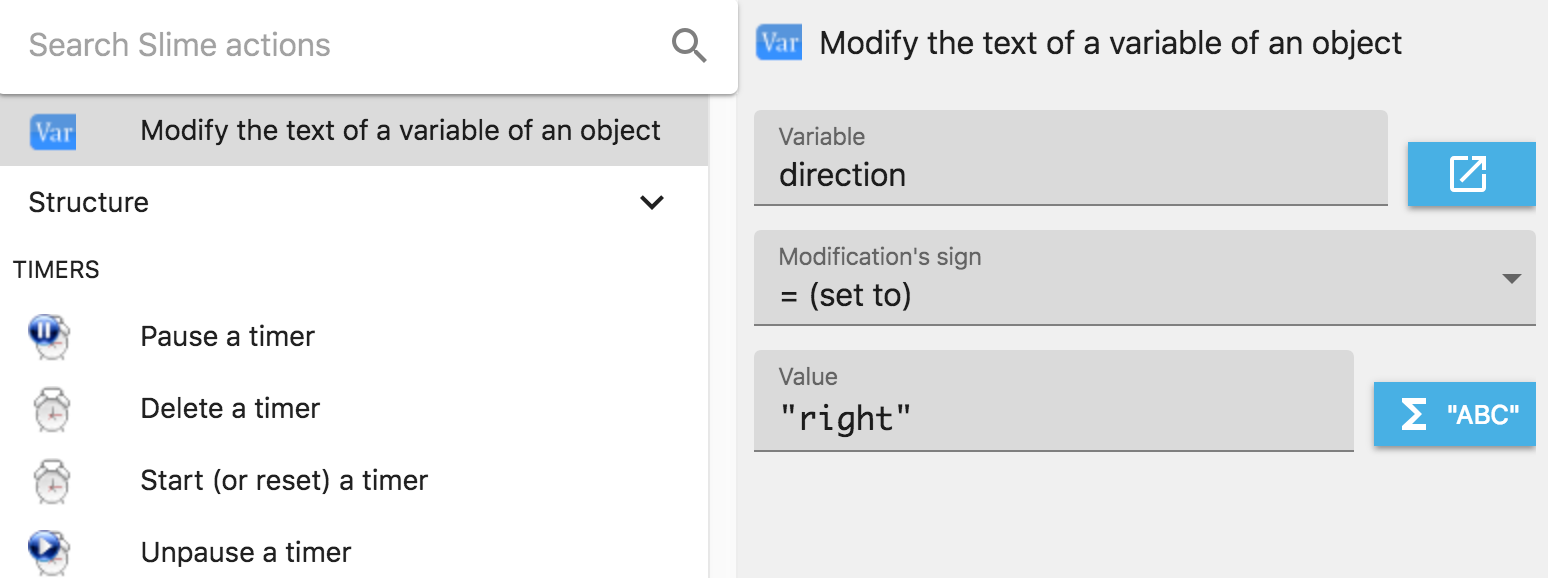
In the parameters, for the object select Slime, for the variable select "direction", for the operator choose '= (set to)'. Finally, for value enter "right". Don't forget the double quotes.
The window should look like this:
If we run the preview now, you may notice that nothing is happening because we didn't tell GDevelop what to do if the direction is 'right'.
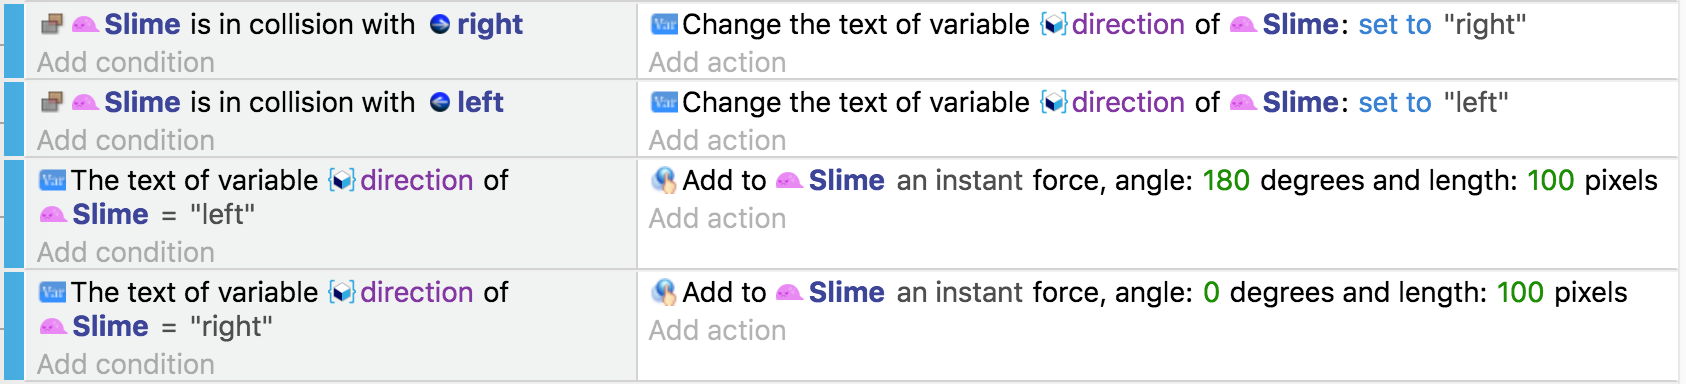
Let's finish by adding the same two similar events, but reversing "left" by "right" and changing the direction. When you are done, the events should look like this:
Now if you launch a preview of the game, the slime should move left and right but it keeps facing left when moving. Let's flip its orientation.
In the list of actions in the event where we make the slime moves to the left, add an action to flip the sprite horizontally. For object select 'Slime' and for value select "No" (as we don't want the object to be flipped when moving left). Repeat the same but this time for the event used to move the slime to the right. Select 'Yes' this time because we do want to flip the object when it is moving right.
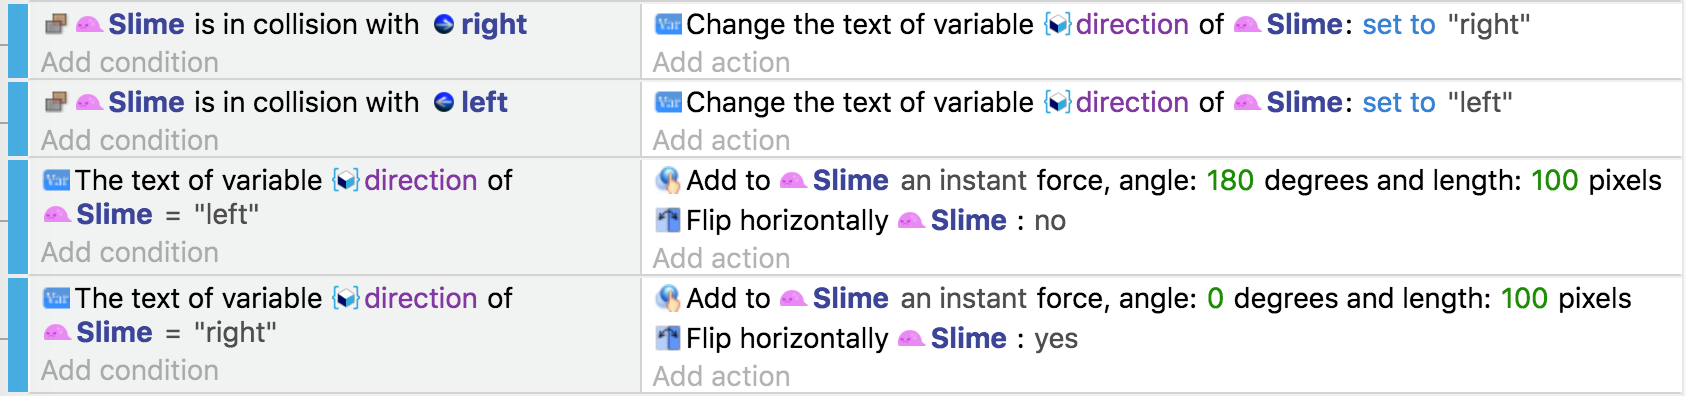
The event should look like this:
Now the slime moves left and right and also have the proper orientation when moving.
Make the player kill the enemy
Let's make the player destroys the slime when it jumps on top of it.
Add a blank event with a condition to check if there is a collision between the player and the slime. Add an action to delete the slime. This is like what we did with the coins before, but this time with the Slime.
If we run this now, the slime should be deleted as soon as we collide with it but this is not yet what we want. We want to delete it only if the player jumps on the top of it.
To do that, add one more condition to our event: this time check if the player is falling.
Now, if we run a preview, our slime should be deleted when the player jumps on the Slime.
It is still not perfect as the player falls on the slime and the slime disappears without the player bouncing.
To do that, add one more action to the event. Choose this time the action called "Allow again jumping" (for the "Player" object). Then add another action called "Simulate jump key press action" to make it jump (this will look like the player is bouncing). You can find both actions in the "Platformer behavior" category.
At this point the event should look like this:

Now if you run the preview and jump on the top of the slime, the player should gently bounce on it and the slime will disappear.
Make the enemy kill the player
Let's now make the reverse logic: have the player killed if the enemy touches it.
Add a blank event and add the condition to check collision between the player and the slime. Then add an action to delete the player.
This is not going to work as it, because we might delete the player before we can delete the slime, or we could delete the slime before we can delete the player.
To avoid this, add one more condition to our event, checking if the player is on the floor.
Now if we run the preview, we should be able to kill the slime by jumping on the top of it and the slime should be able to kill the player if the player is on the floor at the moment of the collision.
Hiding the platform delimiters
The last thing we need to do now is to hide those "left" and "right" arrow objects. To do that, add an event with the condition 'At the beginning of the scene' (which is going to be triggered only one time when the scene starts) and the action to 'hide the object left' and 'hide the object right'.
The events of this tutorial so far should look like this:
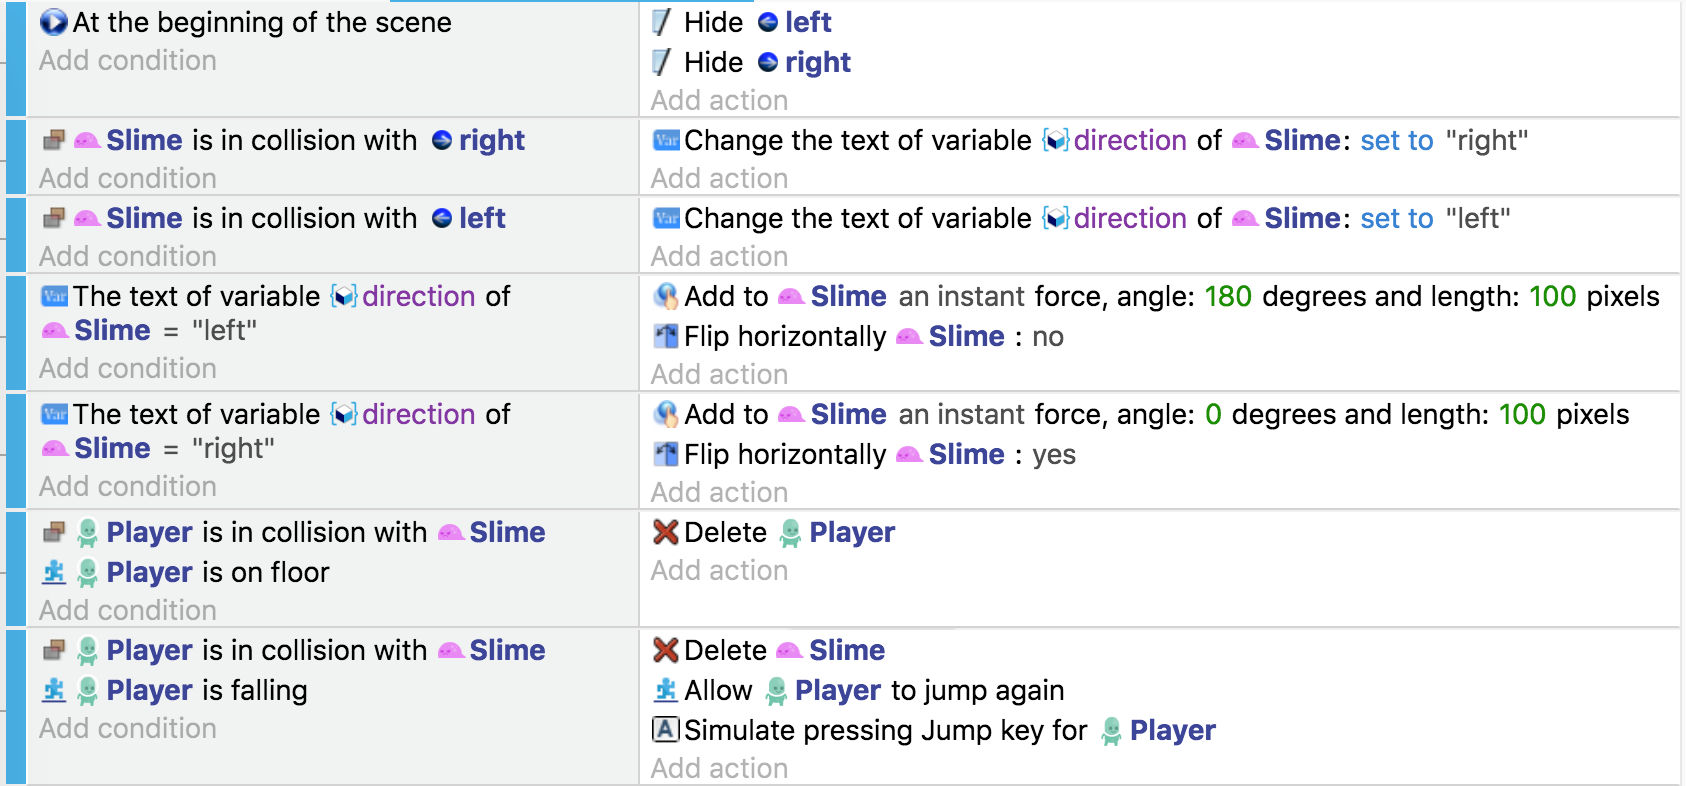
Now if you run a preview, the left and right object with the arrow should be hidden, the slime should move left and right constantly. We are able to kill the slime by jumping on the top of it and the slime should be able to kill the player when it collides with it while the player is on the floor.
Next step: add checkpoints
For now, the "death" of the player is a bit brutal: we just delete it. Let's make him reappear instead to the last checkpoint he crossed. Checkpoints are essential in a platformer game if you don't want to force your player to start again from the beginning when he dies (which can be interesting, but also frustrating!).
➡️ Read 7 checkpoints!