Implementing Procedural Generation
This article covers how to implement a simple top-down procedural generation system. This is a rather large topic so it is split into three sections: Creating a Grid, Adding Noise, and Colouring. Be aware that you need to have the Noise and the Extended Math extensions in your project.
The example is available online to play with before dinging in this step by step tutorial (open the project online)
Part 1: Creating a Grid
The grid is the system that will physically place the tiles into the game for the player to experience. A tile is basically, a single block in Minecraft and can be modified to represent different things. For example, water, sand, or grass.
Step 1: Creating the Grid Objects
The following steps will help prepare the grid objects, which will be used as part of the generation.
- Within the scene, create a new sprite object and give it a name.
- In this example the object will be called origin, as it will serve as the start of the procedural world.
- Create a second object, and give it a name.
- For this example the object is named tile, as this object will be what is placed to make the grid.
- For both objects' animations, give them a black square.
Step 2: Creating the Initialization Events
We now need to set up the initial events to prepare terrain generation.
- Access the event sheet.
- Add a new event.
-
Click Add condition.
- Within the condition list, select At the beginning of the scene.
- Click OK.
-
Within the same event, click Add action.
- Search for Scene Variable.
- Select Value of a scene variable.
- Within the Variable field, type x.
- Within the Modification's sign, select =.
- Within the Value field, type 1.
- Click OK.
-
Repeat all of #4 above, but with a Variable name of y.
These variables will handle the placement of tiles on the x and y-axis.
Step 3: Create Events to Generate Tiles in a Column
Next a set of actions should be set up to allow testing tile generation.
- At the bottom of the event sheet, click Add a new event.
-
Within the new event, click Add condition.
- Search for released.
- Within the results, select Mouse button released.
- In the Button to test field, select Left (primary).
- Click OK.
-
Within the action field, click Add action.
- Search for create.
- Select Create an object from the list. * Note: If using the new condition/action editor, the tile object may need to be selected from the list before the normal Create an object action is available
- Within the Object to create field, ensure that tile is selected.
- In the X position field, type 32.
- In the Y position field, type 32 * Variable(y), this will automatically populate the value of the scene variable Y.
- Click OK.
-
Within the action field, click Add action.
- Search for Scene Variable.
- Select Value of a scene variable.
- Within the Variable field, type y.
- Within the Modification's sign field, select +.
- Within the Value field, type 1.
- Click OK
-
Preview the program. If the above steps are completed successfully, when the left mouse button is clicked a new tile should be created in a column.
- However, the column keeps going on down off the screen. What would be ideal is if once the column got to a certain size it created a new column.
Step 4: Create Events to Generate Tiles in a Rows and Columns
Creating new columns
-
In the first event click add action.
- Search for Scene Variable.
- Select Value of a scene variable
- For the Variable field enter sizeX
- Change the modification's sign to =
- Change the Value field to 4
-
Repeat all of step #1 above, but change the variable name to sizeY
- These variables will control the size of the grid on the x and y-axis. The event should look like this once complete: {{ :gdevelop5:tutorials:procedural-generation:step5.jpg?nolink |}}
- Right-click on the create tile event.
- Then select Add Sub Event.
- Within the sub event, click Add condition.
- Search for Scene Variable.
- Within the results, select Value of a scene variable.
- In the Variable field, select y.
- In the Sign of the test field, select > (greater then).
- finally, in the Value to compare field, input Variable(sizeY).
- Click OK.
- Within the action field, click Add action
- Find Scene Variable.
- For the Variable field, select y.
- For the Modification's sign field, select = (set to).
- For the Value field, input 1.
- Add another Change the scene variable action
- In the Variable field, select x.
- In the Modification's sign field, select + (add).
- In the Value field, enter 1
Now the grid will increment in the x dimension.
Step 5: Making the Grid the Right Size
This next set section will add the last event to prevent the grid from going too far on the x-axis.
- Right-click on the scene variable y > Variable(sizeY) event and click Add Sub Event.
- Click Copy and then Paste the event.
- Move the new event and make it a Sub Event of the original event.
- Select the condition.
- Change the Variable field to x.
- Keep the Sign of the test field the same.
- Change the Value to compare field to Variable(sizeX).
- Select the Change the scene variable y action.
- Change the Value field to -1.
- Select the Change the scene variable x action.
- Change the Modification's sign field to = (set to).
- Change the Value field to -1.
- Select the Left mouse button was released event.
- Select the Create object action
- Change the X position field to 32 * Variable(x)
Step 6: Speeding up Tile Placement
Placing tiles by hand is good for testing, but for a game tiles need to be placed quickly. To do this a while event is used.
- Click the Add button at the bottom of the event sheet.
- Select the While event.
- Under While these conditions are true, click add condition.
- Find Value of a scene variable.
- Within the Variable field, type x.
- Within the Sign of the test field, select > (greater then).
- Within the Value to compare field, type 0.
- Repeat all of the above step, but change the variable y.
- Cut the actions from the Left mouse button was released event and paste it into the while event.
- Drag The scene variable y > Variable(sizeY) event and make it a sub event of the while event.
- Lastly, delete the Left mouse button was released event.
Step 6: Controlling Grid Placement
This section covers changing the location of where the grid is created from.
- Select the while event.
- Select the Create object tile at position action.
- Change the X position field to origin.X() + 32 * Variable(x).
- Change the Y position field to origin.Y() + 32 * Variable(y).
- Place the origin object in the scene.
Part 2: Adding Noise
Step 1: Understanding Noise
Understanding how noise works is important, but not necessary to doing procedural generation. For those interested in knowing more read this.
Step 2: Setting the Noise Seed
- Click Add a new event,
- Drag the new event and place it above the while event.
- Click Add condition.
- Search for At the beginning of the scene.
- Once found select it.
-
Then click Add action.
- Search for the Set the seed used for noise generation.
- Once found click it.
-
Set the seed value to two.
-
The seed can be any value between 1 and 65536, this makes for 2¹⁶ different seed combinations.
Note
The noise seed only applies to the current scene. If you're doing procedural generation in more than one scene you must set the noise seed for each scene.
Step 3: Displaying the Seed
This section covers how to display the seed using the currentSeed() expression.
-
Go to the scene view and create a new text object.
- In this example it will be called seed and will hold the current seed.
-
Be sure to place the object into the scene.
- Move back to the event sheet.
- At the bottom of the event sheet find Add event and click it.
- Drag it above the while event and let go.
- Click Add condition.
- Within the condition list, select At the beginning of the scene.
- Click OK.
-
Then click Add action.
- Search for Modify the text.
- For the Modification's sign, select = (set to).
-
Set the valuefield to "seed: " + ToString(Noise::currentSeed()).
-
The currentSeed() expression always holds the current seed for the scene.

Step 4: Applying Random Values to the Tiles
In order to visually see the noise values, the opacity of the tile must be changed creating a grayscale version of the procedurally generated world.
-
Change variable sizeX and sizeY to both be set to 16.
- The grid created will now be 16 tiles by 16 tiles for a total of 256 tiles.
-
Click on Add action in the while event.
- Find the Change sprite opacity action.
- Within the Modification's sign field, select = (set to).
-
Within the Value field, enter RandomInRange(0, 255).
-
Opacity is measured on a scale of 0 to 255 with 0 being fully transparent and 255 being fully opaque, which is why the random number must be between 0 and 255.
Step 5: Understanding Randomness
Run the program. 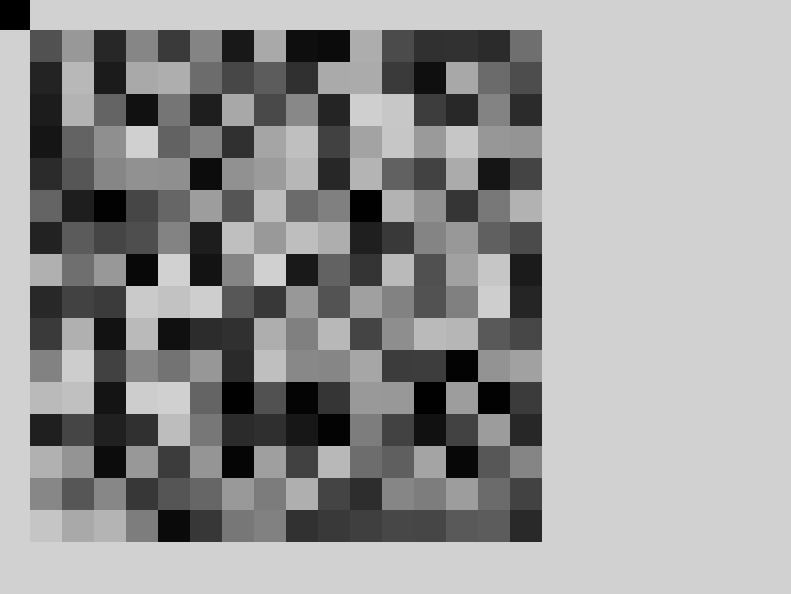
- Assume the lighter a square is the lower its is and the darker it is the higher it is.
- Notice how each square does not smoothly transition to its neighboring tiles.
- This is because random values are generated without consideration for the values generated before or the value that will be generated after.
- This is why noise must be used instead of random.
Step 6: Implementing Noise
To get a smooth gradient of opacity randomInRange() must be swapped out with a noise function. For this example noise::perlin2()will be used.
-
Select the Change the opacity action.
-
Change the Value field to Noise::perlin2(Variable(x) / 10, Variable(y) / 10).
-
Noise functions take coordinates instead of min and max values like random.
- Variables x and y must be divided by 10 for the function to work correctly.
-
-
Run the program, notice how no tiles are visible.
-
Change the value field to the following ExtendedMath::Map(Noise::Perlin2(Variable(x) / 10, Variable(y) / 10), -1, 1, 0, 255).
-
The tiles are not visible because, a noise function returns a value between -1 and 1, but opacity is measured between 0 and 255.
- For more information on the map function read this
- Run the program and notice how all the tiles smoothly transition between each other and look like they belong.
-
Step 8: Creating Different Worlds
- Select the set noise seed action.
- Change the value field, to a randomInRange(1, 65536).
- Run the program a few times to see some examples of procedural generation.
Part 3: Colouring
The last step in procedural generation is to take the black and white grid, and then add colour to it.
Note
To keep the code organized the last two steps have been placed into a group. This step is optional.
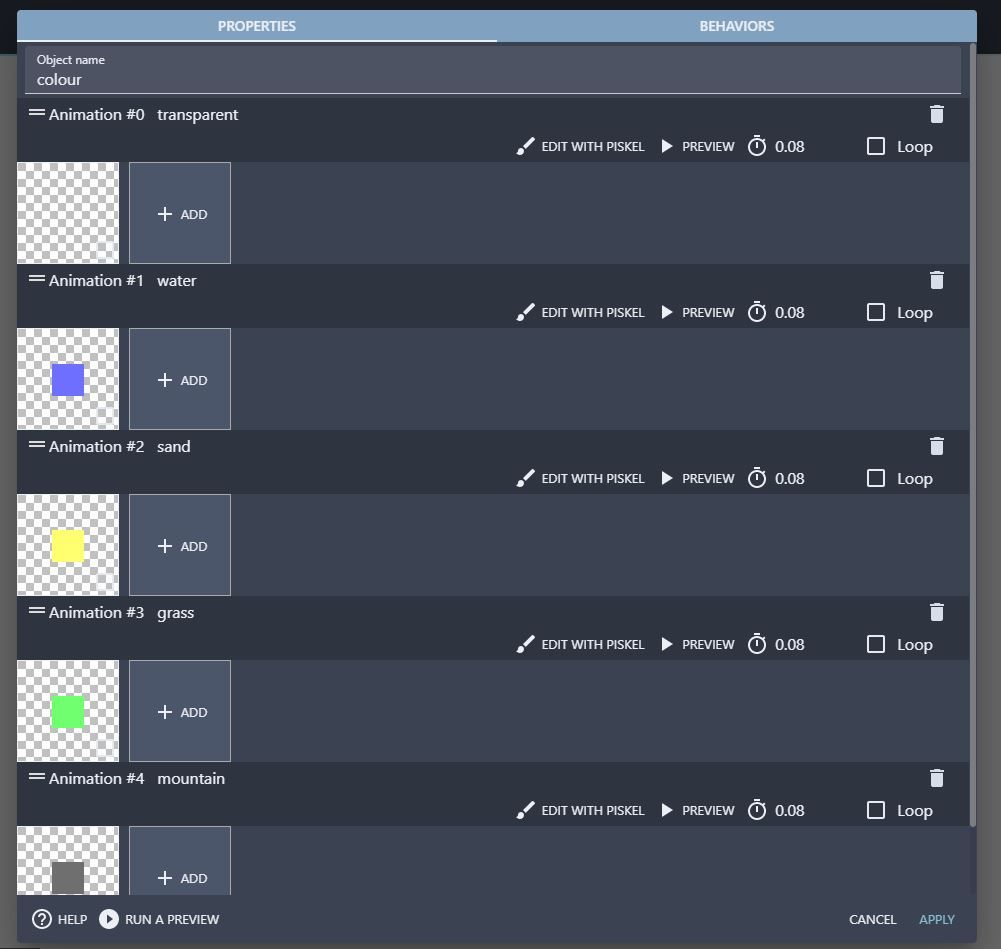 Go to your tile object and add animations for each type of terrain wanted. For this example blue, yellow, green, and grey animations will be added. To represent water, sand, grass, dark grass and mountains. But, any colour or sprite could be used. Then duplicate the tile object and name it colour. Change the first animation (the black one) to a transparent square of the same size.
 Back in the event sheets, goto the create tile event and copy the create tile action and paste it right below that. Then change the object to colour.
 Next, create a new event then give it the condition of the left mouse button released. Then, create a sub event on the mouse button released event with the condition of pick all tile objects and the opacity of tile is \< 127.5. Finally, add an action to change tile animation to 1.
 Now when you run the program the lowest parts of the grid are coloured blue. There are many improvements that can be made to this event to improve the look. First, add a pick all colour objects condition underneath the pick all tiles condition. Then, adding a colour is in collision with tile condition.
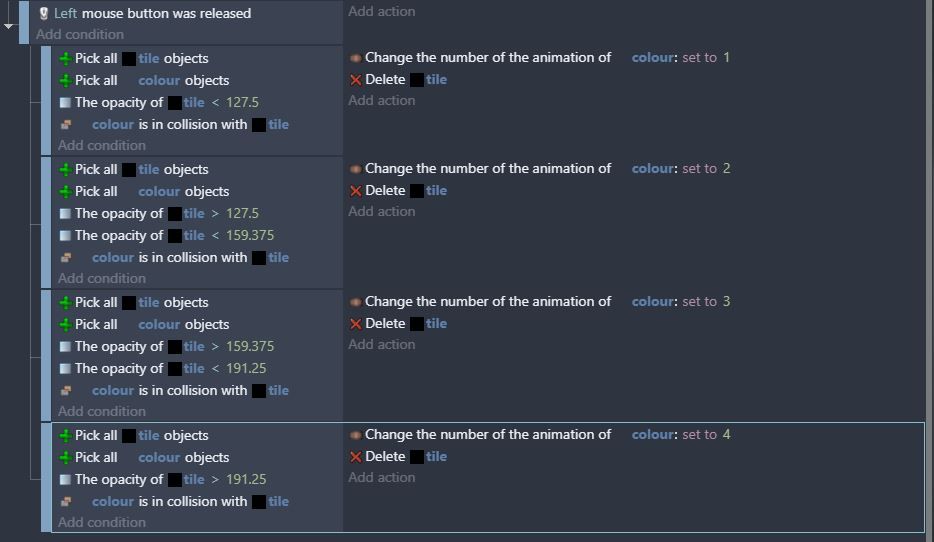
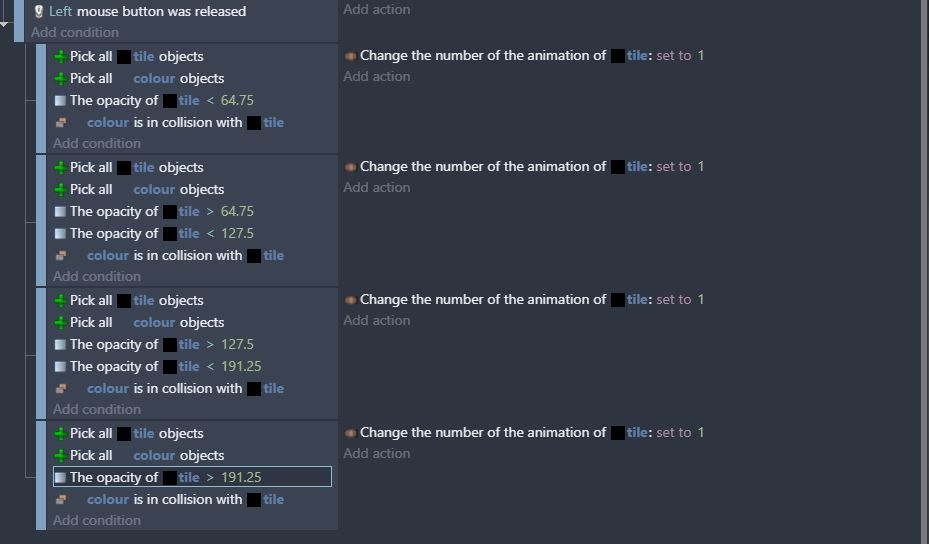 Copy and paste the sub event 3 more times. For the two middle events add an additional opacity of tile condition. Change the first sub event’s opacity to \< 64.75. For the second sub event change opacity to > 64.75 and \< 127.5. For the third > 127.5 and \< 191.25. For the last sub event change the opacity to > 191.25.
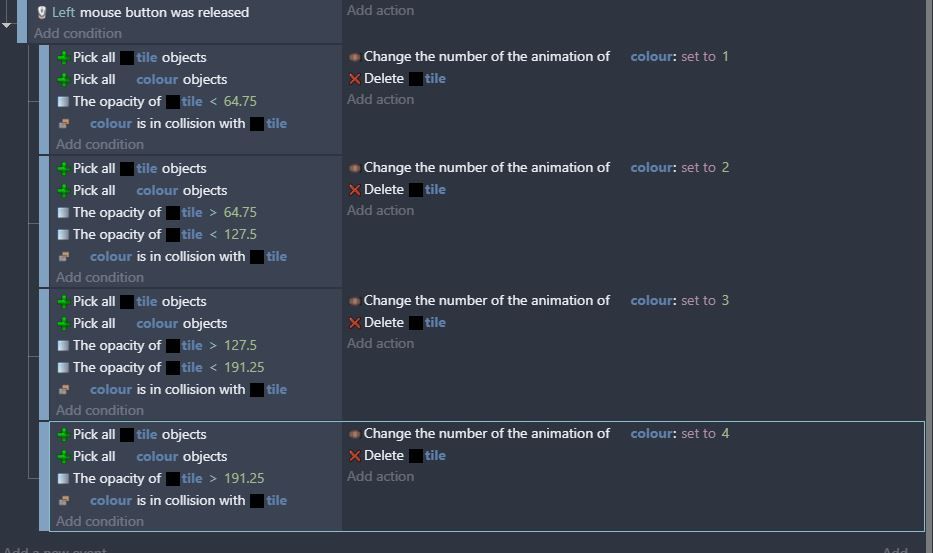 Then change the object in the change animation action from tile to colour. Also, for each sub event set the animation one higher than the event above it. Lastly, add a new action to delete the tile object for each event.
 Run the program a few times. A large amount of the world’s generated end up being made up of the green and yellow colours. Even though only 1 half of the tile opacity should be blue or grey. This is because noise functions tend to return many values around 127.5 and very few around 0 and 255.
 An easy solution to this is to half the range of the two middle sub events and double the range of the first and last sub events. By adjusting what part of the opacity will make what colour you can create very different types of worlds.
 Now when the program is run a more balanced world is created.
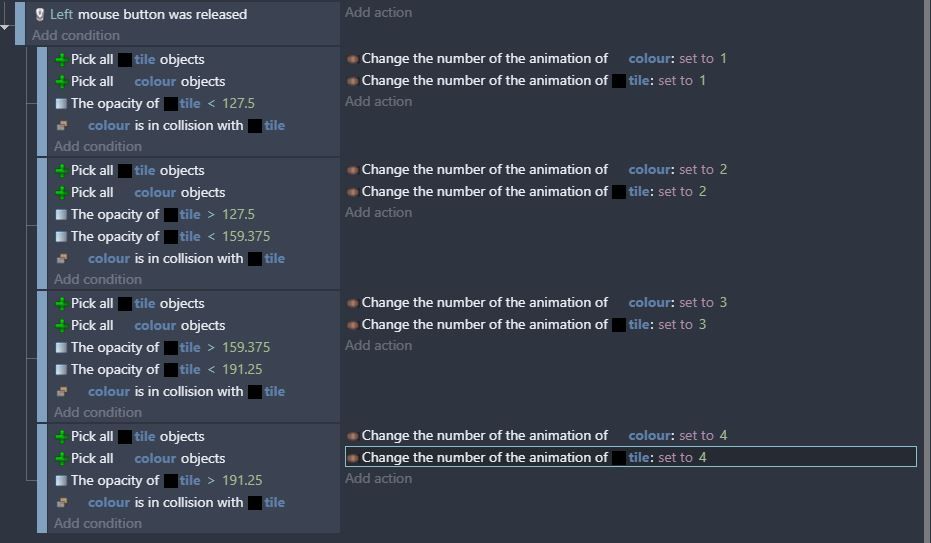 If you do not like the look of the solid colours an easy way to implement shading is to remove all the delete tile actions and replace it with a change tile animation action to the same number as the animation action for the colour object.
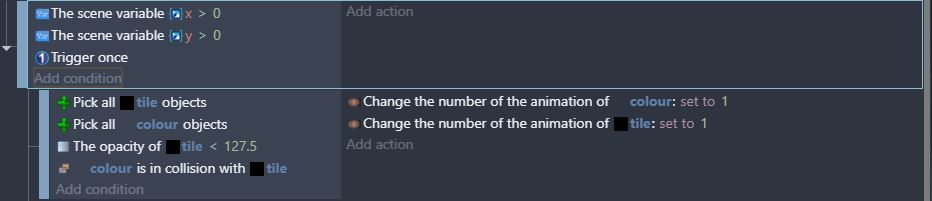 Lastly, remove the left mouse button release condition and replace it with variable x \< 0 and variable y \< 0 conditions make sure to also add a trigger once condition. Now the colouring will happen automatically.
Conclusion
 A working version of this project can be found in the examples section. Or viewed in the browser in the web editor.