Objects
In GDevelop, everything displayed on screen is an object. This includes—but is not limited to—the playable character, enemies, and parts of the environment.
You can use different types of objects in your game, each serving a specific purpose. For example, Sprite objects display animated visuals, while Text objects show written content.
Objects can also include behaviors, which give them built-in abilities—like moving, jumping, or following a path. To control what happens during gameplay, you can use events to make objects move, rotate, switch animations, or apply effects.
Common object types in GDevelop
GDevelop offers a wide variety of objects, each designed for a specific use. Below is a selection of commonly used ones, grouped by purpose:
- General objects (used for visuals, layouts, or 3D elements):
- Display text (like scores, dialogue, or labels):
- Create user interfaces (menus, controls, input fields, etc.):
- Add visual effects (particles, lighting, drawing shapes):
- Advanced effects or rendering:
Tip
Many more objects are available through extensions, which you can add from the extension library. Advanced users can also create their own custom objects, either to create an entirely new kind of object on the screen or to assemble multiple objects into one ("prefabs").
Adding an object to your game
- Open the Scene editor. This is the default view after creating a new project.
- In the Objects panel, select Click to add an object.
- In the Add a new object dialog, select a type of object.
- Configure the object. The available settings depend on the type of object.
- Select Apply.

Choosing a name for your object
Objects are given a default name when they are created. You can change this from the object editor or by using the context menu on the object in the objects list.
Note that there are limitations on how you name your object: you can only use alphanumeric characters and no spaces. You can use an underscore if you want to separate words (though games typically use camelCase to separate words, for example: EnemyBullet).
This is to ensure your object will be recognized properly when used in expressions.
Some good examples of names are: Player, RedEnemy, Red_Enemy, Car1, FinalBoss, Final_Boss, Wall... Giving a descriptive name is useful to help you quickly identify objects in events.
Adding an instance of an object to a scene
After creating an object, GDevelop doesn't immediately add it to a scene. You need to add the object to the scene via the Objects panel. You can add as many copies of the object to the scene as you like.

Each copy of an object in a scene is referred to as an instance of the object. All instances of an object share the same underlying behavior as the original object, but you can customize them independently of one another. For example, each instance of an object may have a different position in the scene.
Modifying an instance of an object
If you select one or more instances of an object, the Properties panel appears on the left side of the screen. This panel displays information about the selected instance(s).

You can customize the following properties of an object's instance:
Position
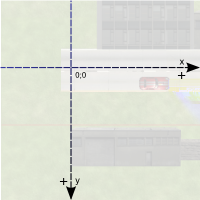
Every object has a position in the game world, defined by coordinates. These coordinates follow the Cartesian coordinate system, with X for horizontal placement and Y for vertical placement. The X value increases as you move right and decreases as you move left. The Y value increases as you move down and decreases as you move up.
If you're working with 3D objects, there's also a Z coordinate, which adds depth alongside X and Y.
Angle
The Angle option defines the rotation of an object, in degrees. The following illustration demonstrates how GDevelop understands the angle of rotation for 2D objects:

3D objects also have rotation, in degrees, around the X and Y axes.
Warning
If you use trigonometric functions like sine or cosine, you need to express angles in radians. (1 radian = 180/PI degrees and 1 degree = PI/180 radians. PI is the number approximately equal to 3.14159). You can use the expressions ToRad and ToDeg in events to convert between degrees and radians.
Tip
Also see more details about How to rotate objects.
Z Order (for 2D objects)
When objects on the same layer overlap, the Z Order of the object determines whether the objects appear in front of or behind one another. For example, an object with a Z Order of 2 appears in front of an object with a Z Order of 1.
In the following image, the Z order of the bush on the left is 2, the Z order of the coin is 1, and the Z order of the bush on the right is 0:

The value of the Z Order field can be any integer, including negative numbers and zero.
Note that 3D objects don't have a Z order, but rather a Z coordinate in 3D space.
Layer
All objects exist on a layer. Objects are then drawn onto the screen layer-by-layer, from bottom to top. This means an object on the top layer will always appear in front of objects on the bottom layer (even if the objects in the bottom layer have a higher Z Order value).

Typically, background objects, interactive objects (such as the playable character), and UI objects exist on different layers, but there are no strict requirements.
Lock position/angle in the editor
Sometimes, a scene has many objects and it's difficult to select a specific instance. If you enable the Lock position/angle in the editor option, you can no longer select the instance, which makes it easier to select the instance you do want to select.

Instance variables
An instance variable is a variable that's specific to an instance of an object. The Instance variables table lets you define the variables attached to the instance and the values of those variables.

For more information, refer to Object variables.
Custom size
If enabled, you can change the height and width of the object instance. These dimensions are distinct from those of the original object.

Instance timers
Each instance of an object living on the scene can have timers set during the game with events. See the page about timers to learn more about these.
Visibility
By default, object instances are all marked as visible, meaning they are displayed on the screen. Using events, you can hide any instance during the game. A hidden object instance won't be displayed anymore, but will still exist on the scene (reacting to collisions and following all other events as usual).
Tip
Some objects, like Sprite or Text objects, can also have an opacity. The opacity, between 0 and 255, defines how transparent an object is (0 being fully transparent, 255 being fully opaque and is the default). This can be changed independently from the visibility.
Adding effects to objects
You can add extra visual effects to objects. For example, you could use the "Outline" effect to make an object easier to pick up or more visible. You can also use more advanced visual effects that change the shape of the object or create interesting visual results.

Read this page to learn more about adding effects to your objects.
Note
You can also add visual effects to a layer of the scene—useful for example to animate a background or change the atmosphere of the whole level at once. Read more about adding effects to layers here.
In the events editor
You can change and manipulate the properties of an instance of an object, or of multiple instances, using events during the game. This is the essence of game making in GDevelop: manipulating objects in real-time as the game is played. Since events and the events editor are beyond the scope of this page, refer to the basic game making concepts page to get started.
- All objects share the same common features (like position, angle, and everything that is written on this page), and there are many conditions and actions that you can use for all objects.
- Objects can also provide you with specific features. For example, Sprite objects can have animations, and the animation being played can be changed using an action. Find more information on the page for each specific object.
Organizing objects into groups for events
You can organize objects into groups and then refer to all of the objects in that group by a single name.
This makes it possible to create events that apply to many objects without repeating events multiple times, increasing the performance of your game, maintainability, and readability of your events.
Tip
For more information, refer to object groups.
Advanced: create custom objects (aka "prefabs" or "templates")
Thanks to its modular extension system, you can create custom objects, which are reusable objects containing one or more other objects. "Custom objects" are also called "Prefabs" or "templates" in some game engines.
For example, the multitouch joysticks, buttons, sliders, and other user interface objects that you can find in the list of objects are "custom objects" built with other objects.
Reference
All actions, conditions, and expressions are listed in the object reference page.