ロードライダー - エンドレスカーゲームチュートリアル
このチュートリアルは、GDevelopに慣れるのにとても役立ちます。このチュートリアルの内容は、エンドレスの車のゲームを作ることです。プレイヤーは道路上の車をかわす必要があります。ゲームにはスコアがあり、車が通過すると自動的にスコアアップされます。.
GDevelopのダウンロード
GDevelopをまだお持ちでない場合は、GDevelopの公式Webサイトからダウンロードできます。Windows、macOS、Linuxで利用できます。
GDevelopをダウンロードした後、インストールが終了するとDevelopを起動できます。
このゲームのオブジェクトを作成するために使用されるアセット(ゲーム中で使用するデータ)が必要です。 ここからダウンロードしてください。ゲームの保存場所として選択したディレクトリに.zipファイルをダウンロードして解凍します。
新しいプロジェクトの作成
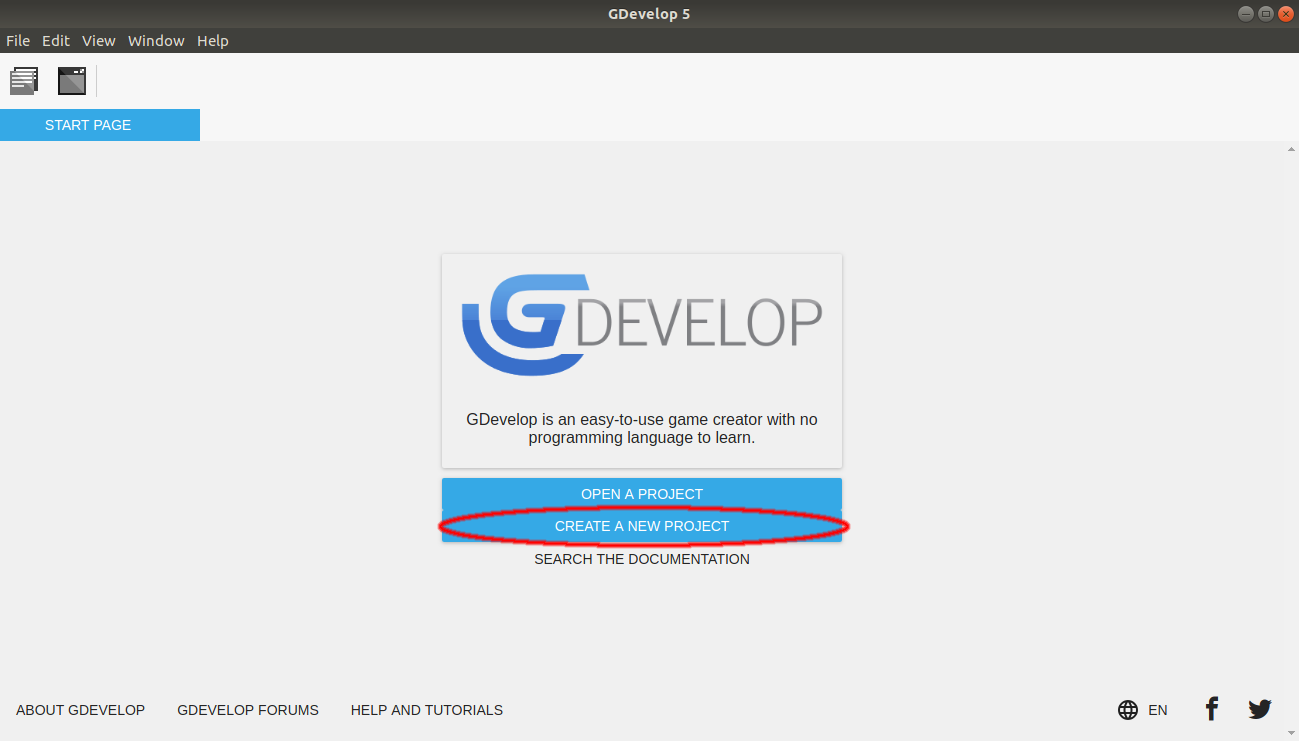
スタートページで「新しいプロジェクトの作成」をクリックします。
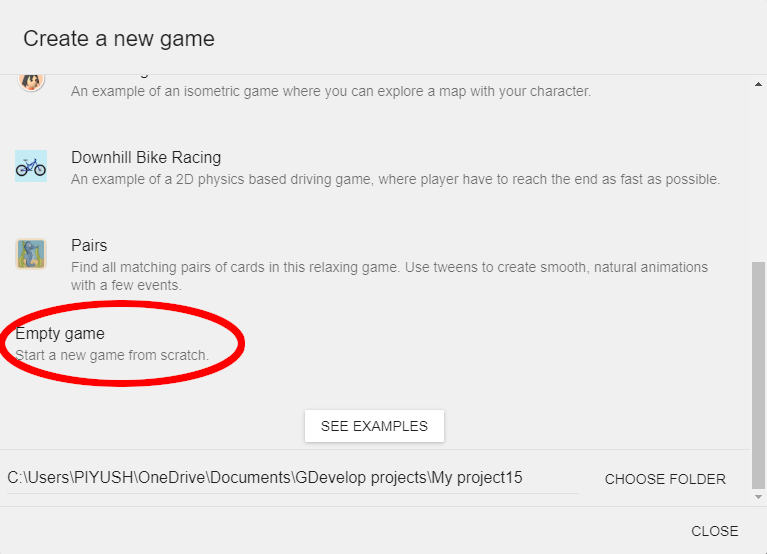
空のゲームと表示されるダイアログボックスで(このオプションを見つけるには下にスクロールする必要がある場合があります)を クリックし、プロジェクトを保存する場所を選択します。
新しいシーンの作成
シーンは、ゲームを作成している間、ほとんどの時間作業するエリアです。シーンは基本的にゲーム内のステージ(またはメニュー、アイテムなど)です。画面に配置できるオブジェクトが含まれています。
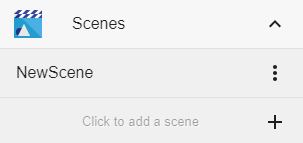
空のゲームをクリックするとすぐに、画面の左側にパネルが表示されます。これはプロジェクトマネージャーと呼ばれるものです。プロジェクトマネージャーのシーンでオプションをクリックします。
「シーンの追加」と表示されるドロップダウンからオプション を使用して、新しいシーンを作成します。作成された「新しいシーン」をクリックして、新しいシーンに移動します。
新しいオブジェクトの作成
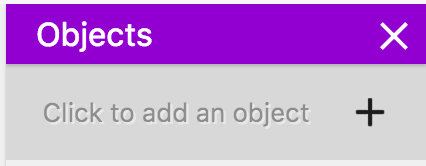
右側のオブジェクトパネルから「オブジェクトの追加」オプションを選択します。
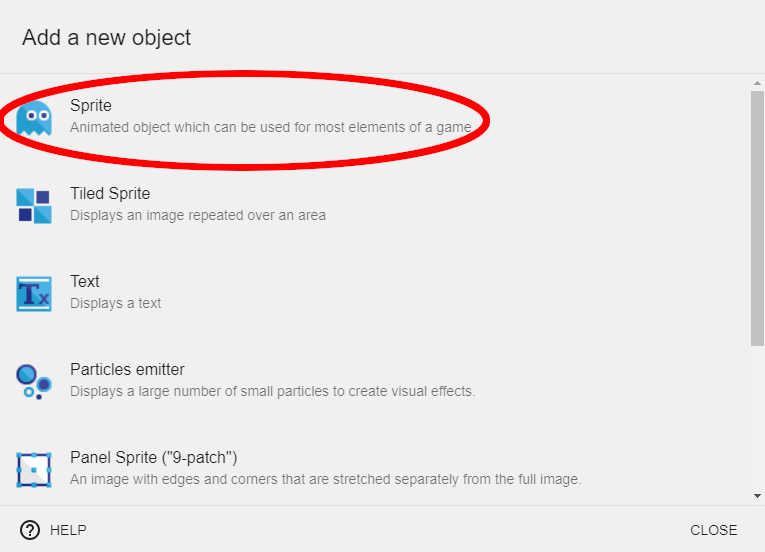
続いて「新しいオブジェクト」ダイアログウインドウがポップアップするので、「スプライト」を選択します。
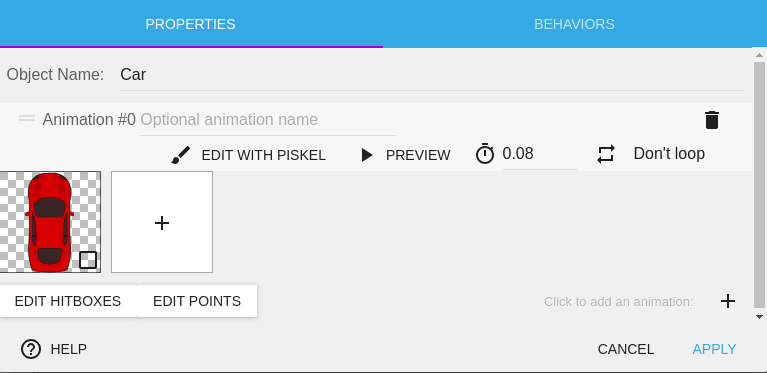
オブジェクトはデフォルトでNewObjectと表示されてダイアログの上部に表示されます。各オブジェクトに説明できる名前を付けて、イベントでそれらを処理するときにそれらが何であるかを理解できるようにすることをお勧めします。 今回は名前を_Car_に設定します。
オブジェクトにアニメーションを追加しましょう。アニメーションには、スプライトオブジェクトの画面に表示される画像が含まれています。
オブジェクトにアニメーションを追加するには、「クリックしてアニメーションを追加」の横にある+記号をクリックしますClick to add an animation

「car.png」という名前の画像をアニメーションとして追加し、「適用」オプションをクリックします。.
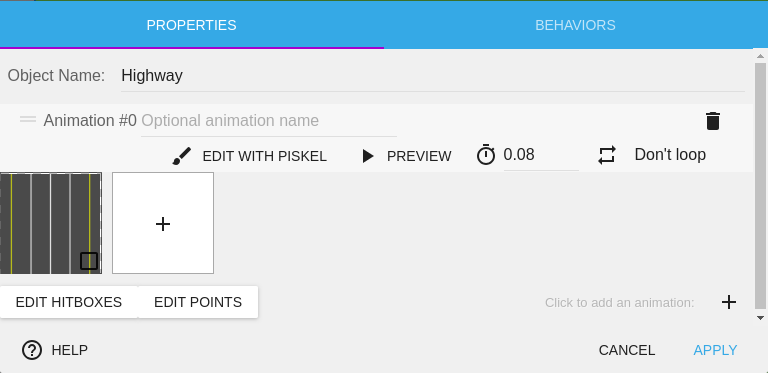
同様に、アニメーションとして画像「highway.png」で構成される、新しいスプライトオブジェクト_Highway_を追加します。
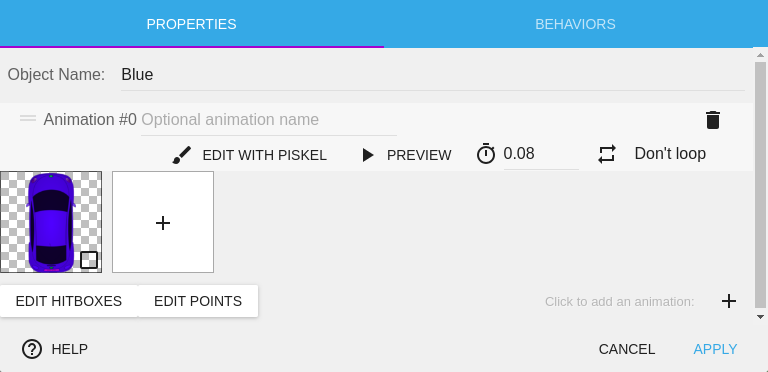
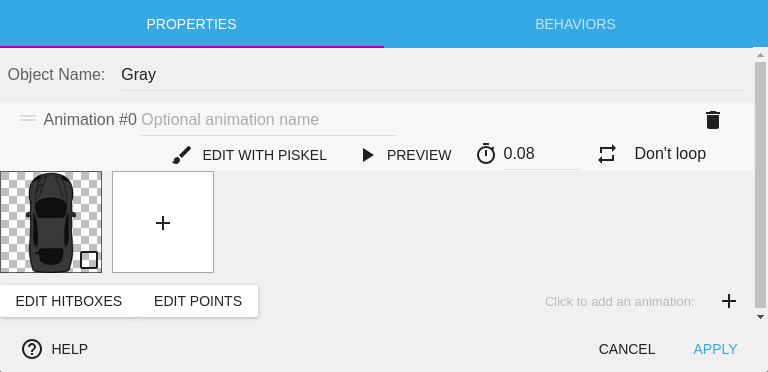
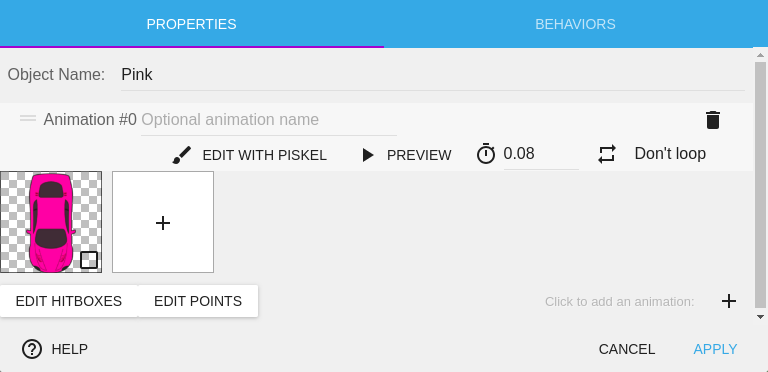
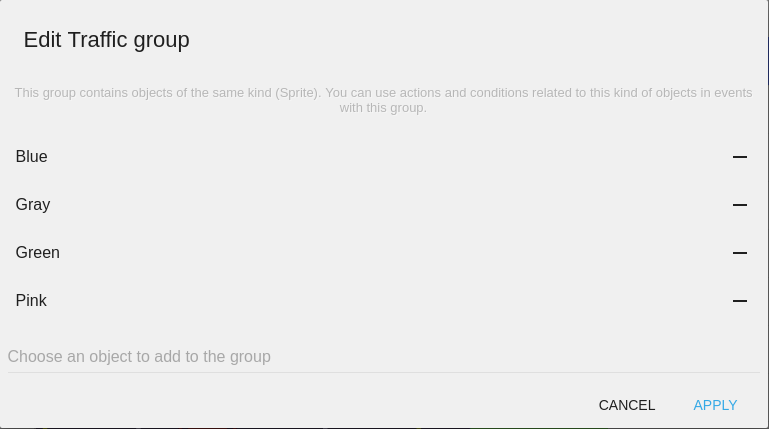
次のステップは、4台の車を異なるスプライトオブジェクトとして追加することです。 これらは、ぶつからないように回避する必要があるオブジェクトになります。 それらにBlue、Gray、Green、Pinkという名前を付けることができ、それぞれに「blue-car.png」、「gray-car.png」、「green-car.png」、「pink-car.png」のアニメーション画像があります。

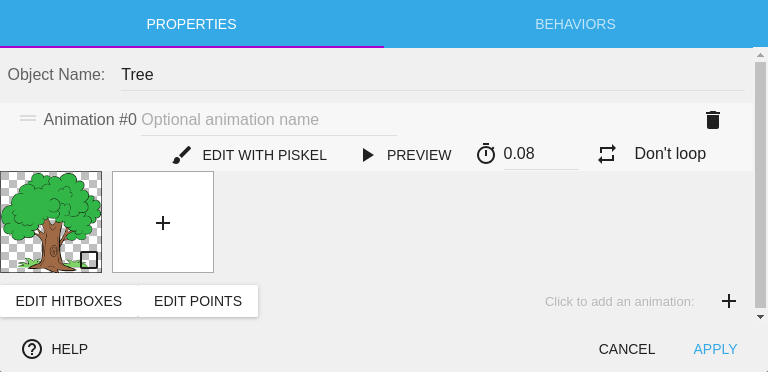
アニメーション用に「tree.png」を持つ 新しいスプライトオブジェクト「ツリー」を作成します。このオブジェクトは、ゲームの進行中に道路の両側に配置される街路樹として使用されます。
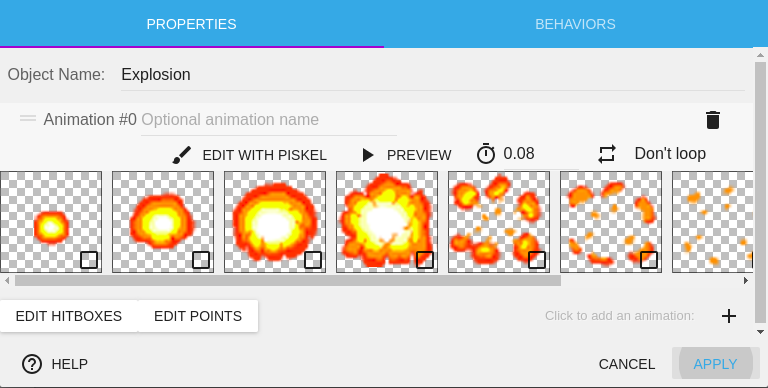
新しいスプライトオブジェクト_Explosion_(爆発の意味)を作成し、「Explosion1.png」から「Explosion8.png」までのすべての画像を選択します。
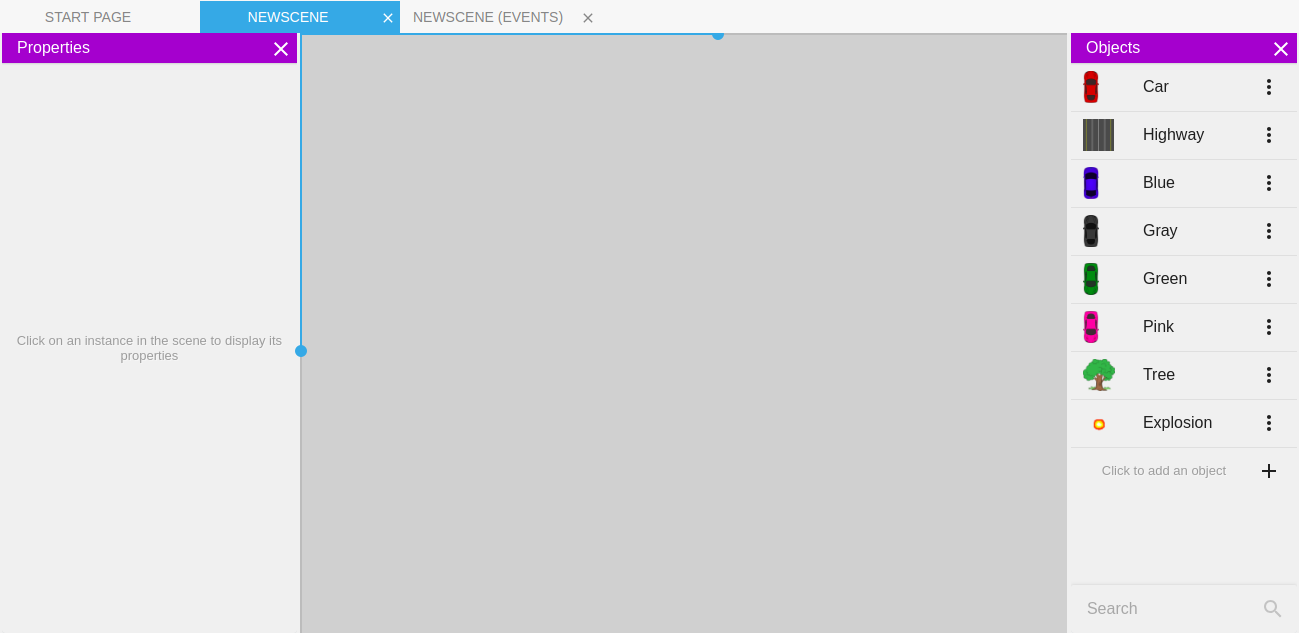
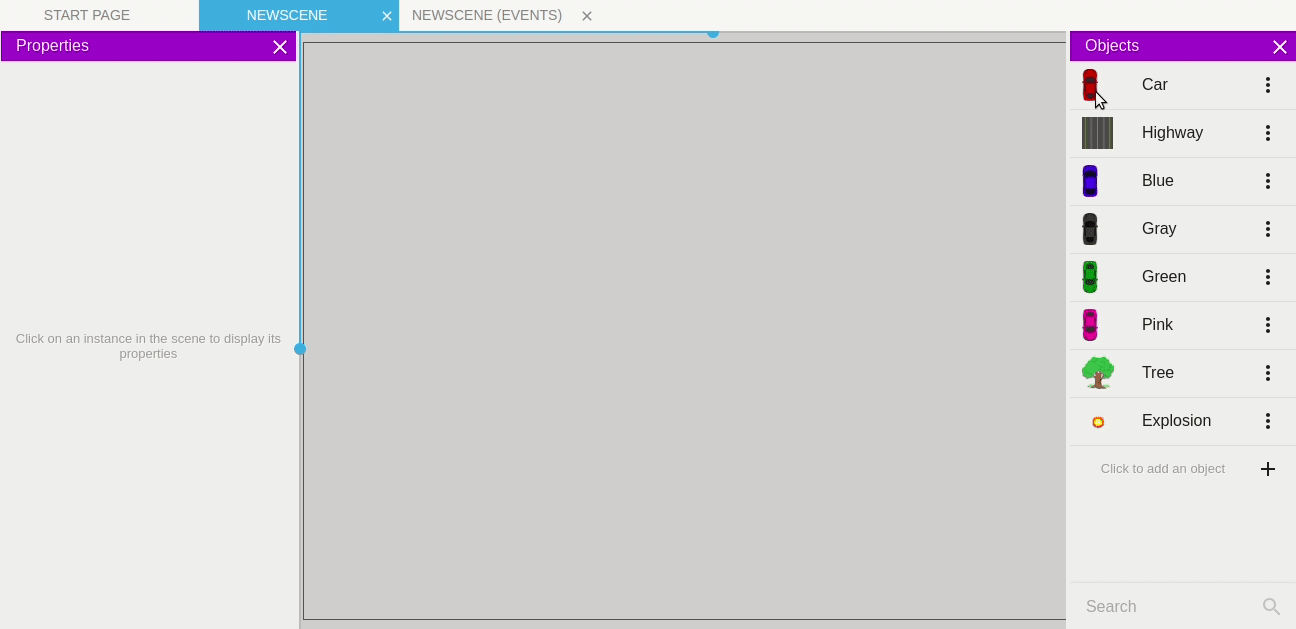
このステップの終わりまでのシーンには、8つのオブジェクトが含まれているはずです。
Adding top-down movement to the car
Adding a top-down movement behavior to the car will allow us to set its maximum speed as well as the acceleration and deceleration of the car. This will allow the car to slowly gain the speed rather than starting with the maximum speed. For this, we will have to open the Object Editor.
To do this, you can either double-click on the Car object from the object side panel or click on the three-dot-menu beside the object and click on edit object.
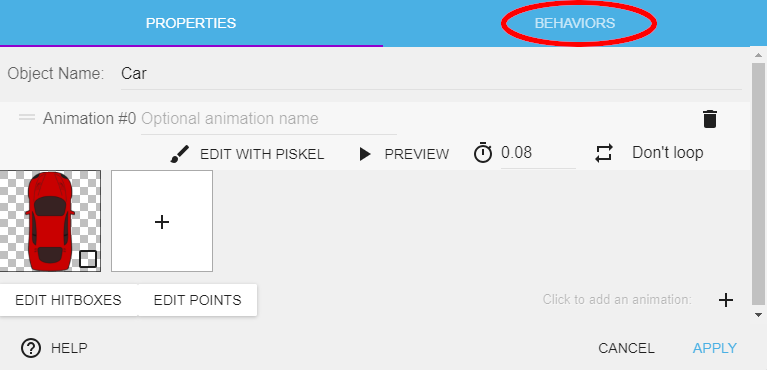
Click on the BEHAVIORS tab at the top of the panel and click on the + button beside Click to add a behavior to the object.
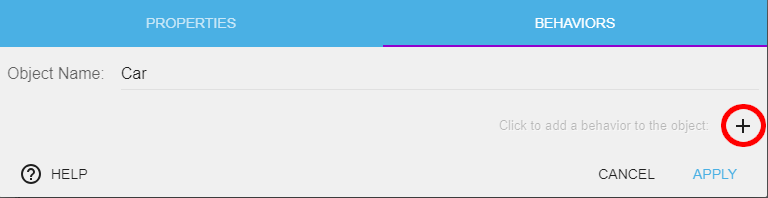
Choose Top-down movement in the Add a new behavior to the object pop-up.
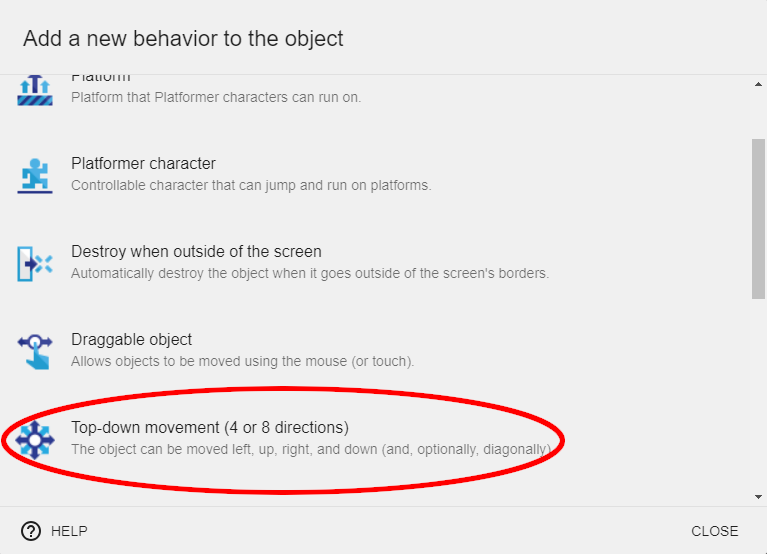
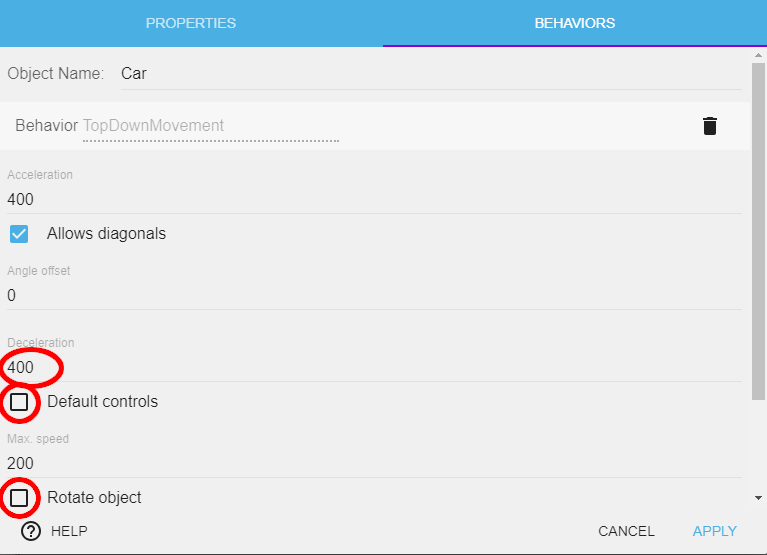
This opens a wide variety of options to alter. You can see the default values for the related to the behavior. Set the deceleration to 400 and untick the boxes having the options Rotate object and Default controls and click APPLY. Rest of the default values are fine for our game.
Creating a new event
An event is a pair of conditions and actions. When a given set of conditions is true, the corresponding action or set of actions is performed.
While making this game we will encounter a few events with no conditions and one or more actions assigned to them. In such a case, the action is performed on every frame created.
To add a new event, open the NEWSCENE (EVENTS) tab from the top

From the events editor toolbar choose the option that says Add a new empty event.

This will create a new event with an empty condition and an empty action.

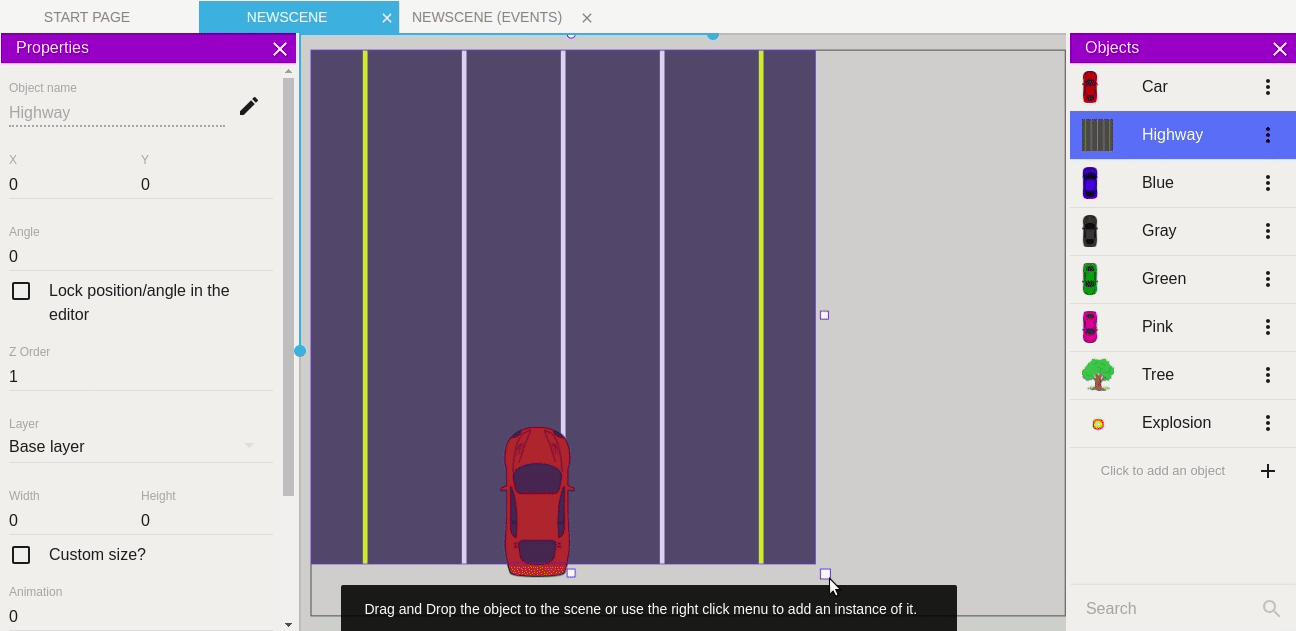
Create instances of Car and Highway
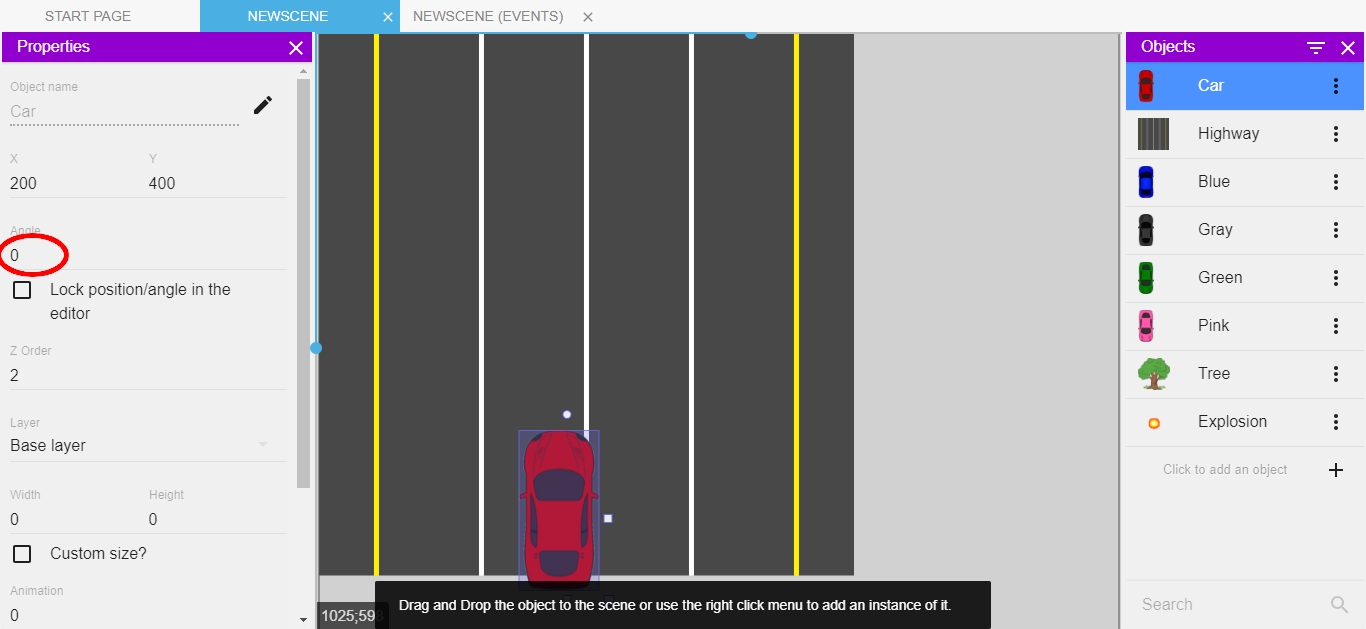
To create an instance of the Car object we can drag and drop the object from the Objects panel to the scene and give it the coordinates of our choice.
If you need to alter the coordinates of the object after getting it on the scene, you can do so by the drag and drop method, but by dragging the object on the scene.
Another method to move the object is by changing the X and Y-coordinates in the Object properties panel on the left side.
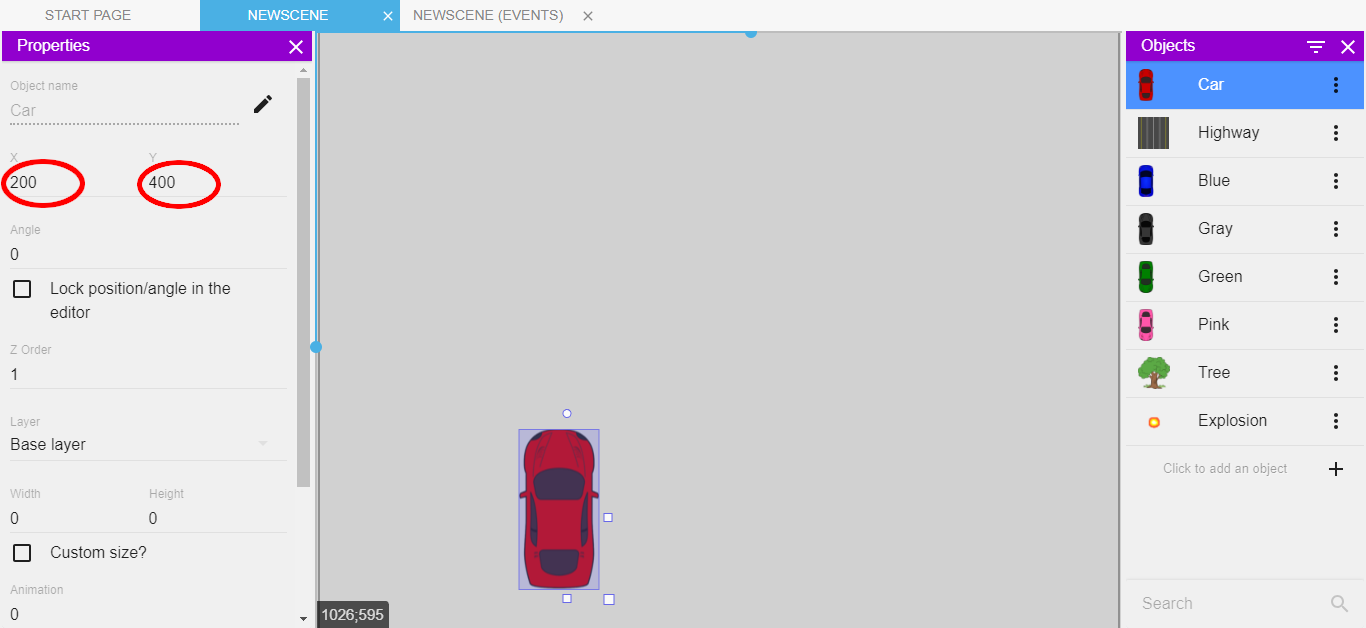
You can choose the values of your choice but if you want results similar to that of the tutorial, you are expected to have the same values.
Similarly, to create an instance of Highway you can drag and drop the object to the scene and set its X and Y-coordinates.
A user can use the preview feature provided by GDevelop. Using this feature, you can see how the game behaves in the real world. You can preview your project by clicking on Launch a preview of the scene icon above the scene.

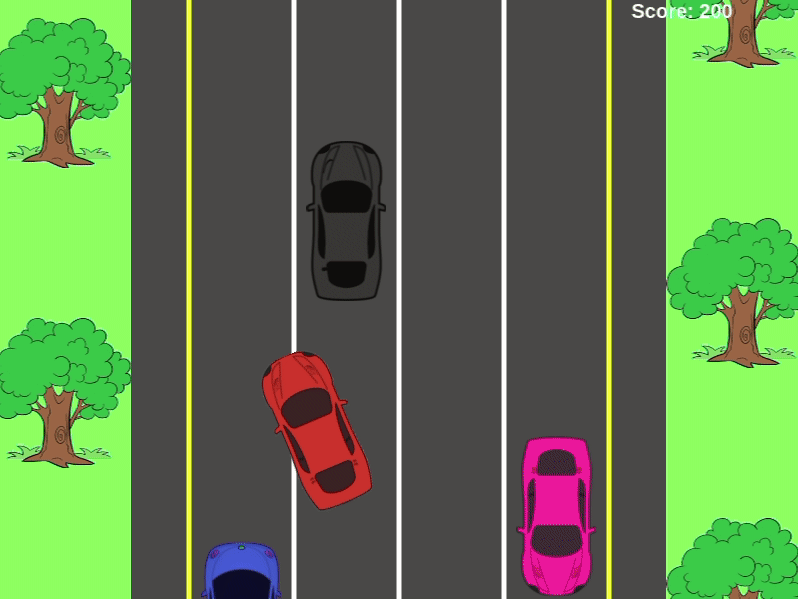
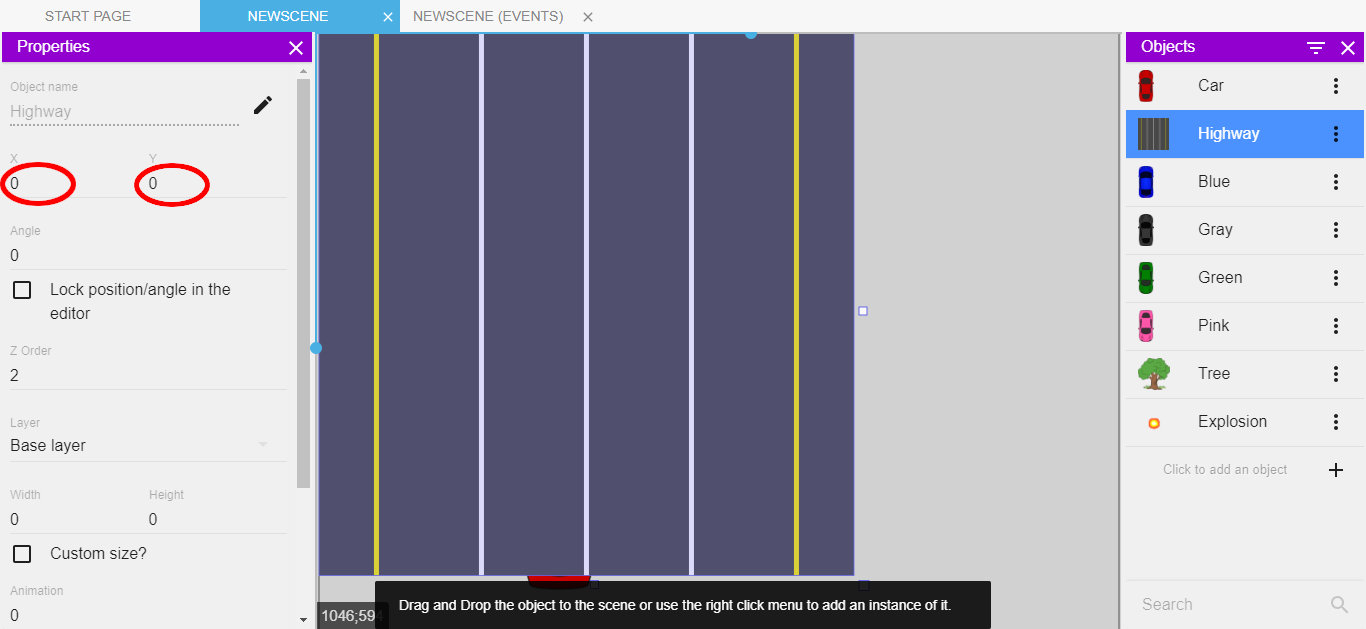
You should see something similar to the image shown below.
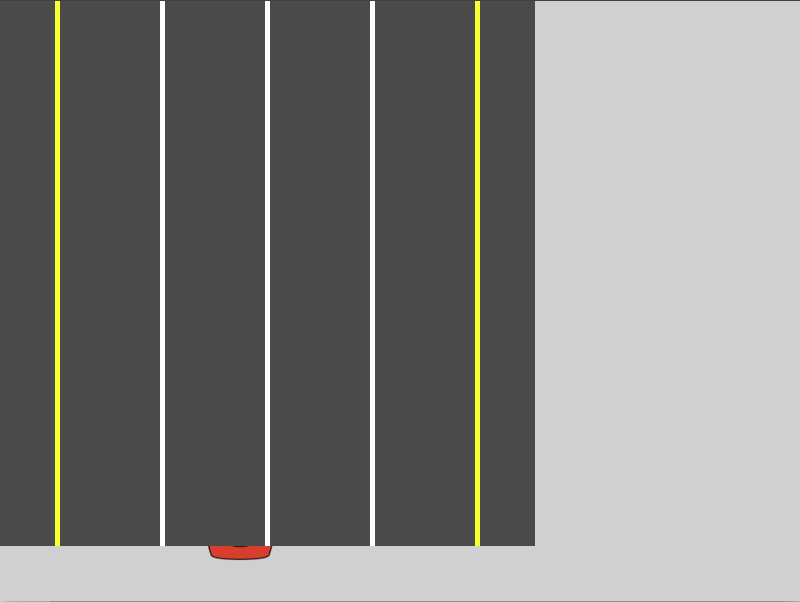
We see a few problems:
- The Car is not fully visible.
- The part of the screen below the Highway is empty.
- The Highway is too far away from the center of the screen.
Making the car visible
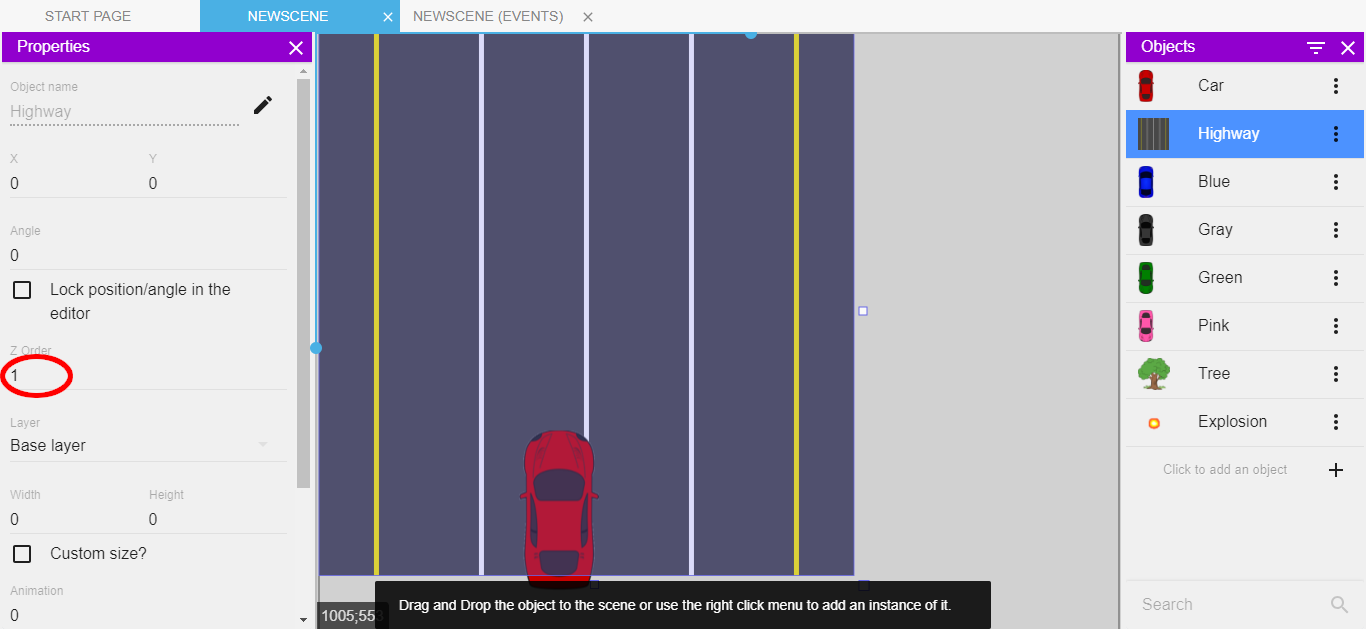
To make the car visible, we need to know the reason for it being hidden under the Highway. The answer is, Z Order.
Note
Z Order of an object is the property which decides whether the object should be displayed on the front or the back. An object with a certain Z Order assigned to it will always be shown in front of the objects with lower Z Order value and behind the objects with higher Z Order value.
In our case, we can assign a Z Order of 1 to the Highway and 2 to the Car.
Creating the bottom part of the Highway
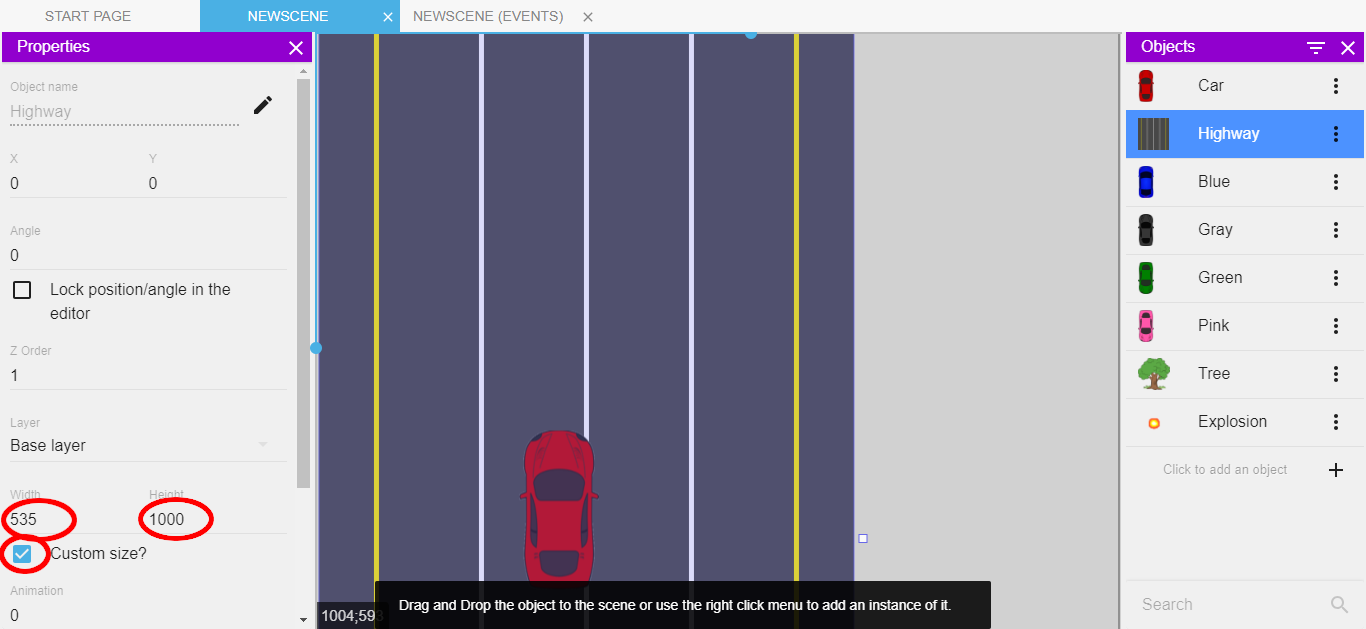
To create the bottom part of the Highway, we can elongate the height of our object Highway.
To do this, you can click and drag the white box at the corner of the Highway.
Another way to do this is to tick the box beside Custom size option in the Properties panel and enter the height and width of your choice.
Getting our game to the center of the window
To get our game to the center of the preview window, we will create our first event.
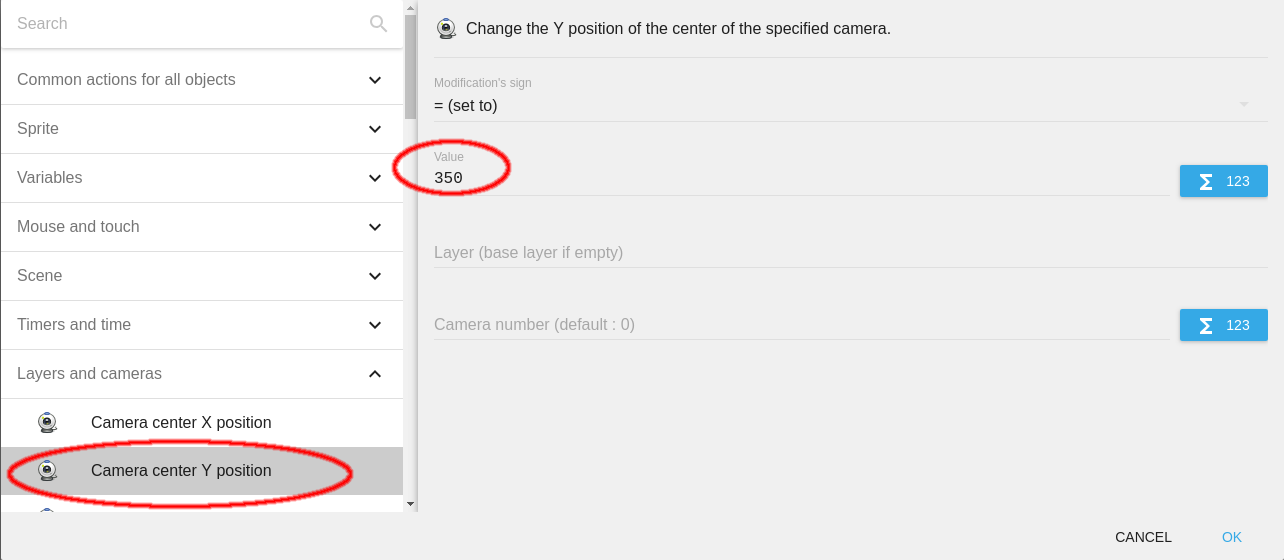
But before that, we need to determine the X position and Y position of the camera.
Note
The coordinates of an object depict the location of the top-left corner of our object rather than the center of the object and coordinates of the center of the camera is the center of the displayed window.
For the X position, the camera has to be at the center of the window/highway. The width of the Highway is 535 pixels. So the center of the Highway will lie at 267.5 pixels.
Similarly, to set the Y position of the camera, we can keep it a little above the Car so that the player can get a better view of the cars approaching. set it at 350 pixels.
First, create a new empty event using the explanation above.
We need to make an event such that the game lies in the center of the screen. Therefore, setting the X and Y-coordinates will be our action.
This action needs to be true for all frames, i.e. for all conditions. And so that the action is true for all conditions, we enter no condition.
To add an action, click on the Add action option.

To choose an action, you can either choose it from the various drop-down menus available or you can use the search bar at the top.
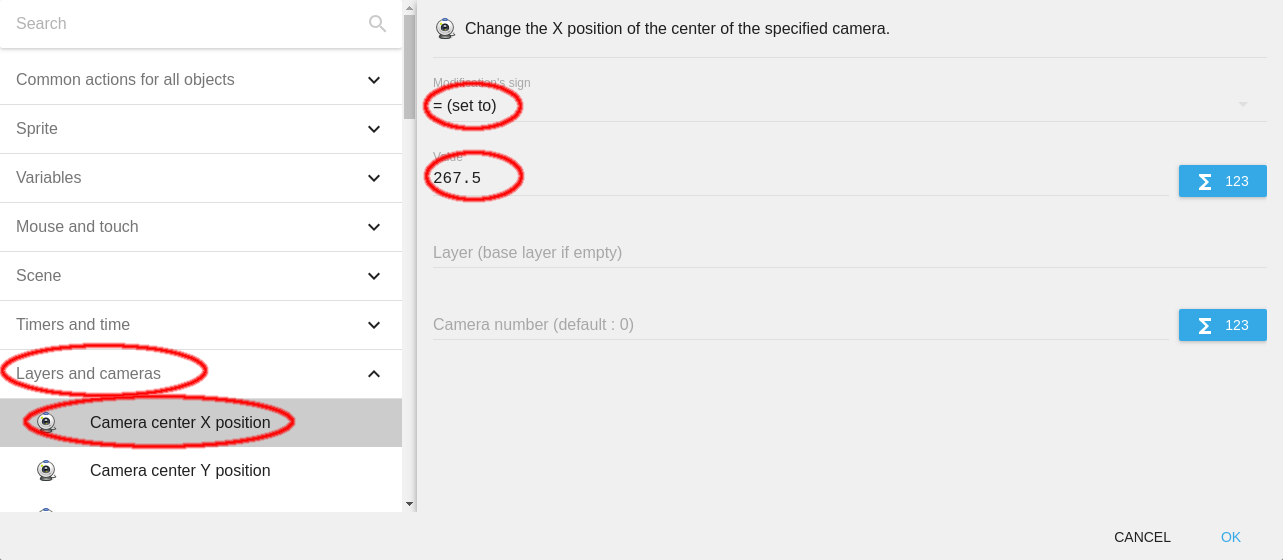
For example, to change the position of the camera, you can go to Layers and Cameras followed by Camera center X position. The right part of the window will now display configurable parameters.
Because we want to set the X position equal - neither less nor more - to 267.5, choose the = (set to) option in Modification's sign. In the Value field, you can enter the desired X coordinate of the camera.
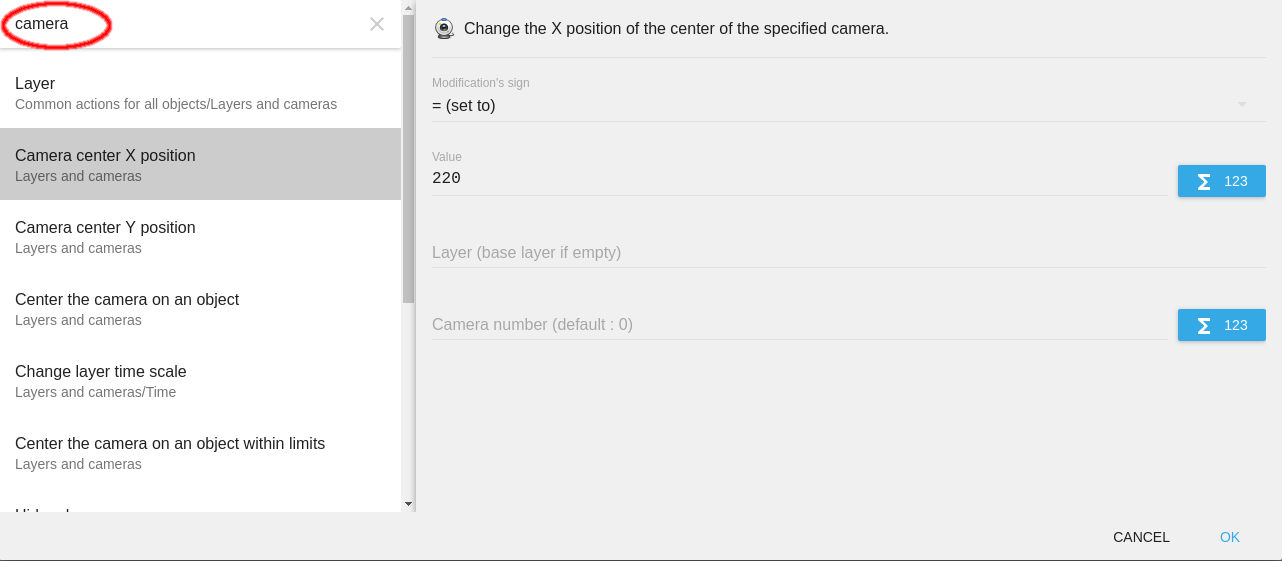
Else, you can search for the action in the top Search bar.
Click OK.
You can now see the added action in the Events Editor.
To set the Y position of the camera center, click on Add action in the same event.

You can now follow a similar procedure for Y position as you did for X position but make sure that this time you choose the Camera center Y position option and enter the Y coordinate.
To make sure that all your progress has been saved, click on Save in the File menu or press Ctrl + S.
Moving the car
To move the Car, we need to create an event such that the car translates as well as rotates to some degree when left or right key is pressed.
As we can deduce from the above statement, the condition of the events will be left key press and right key press.
Warning
Remember that each key press (left and right) should have different events because we need to have different motions for each of them.
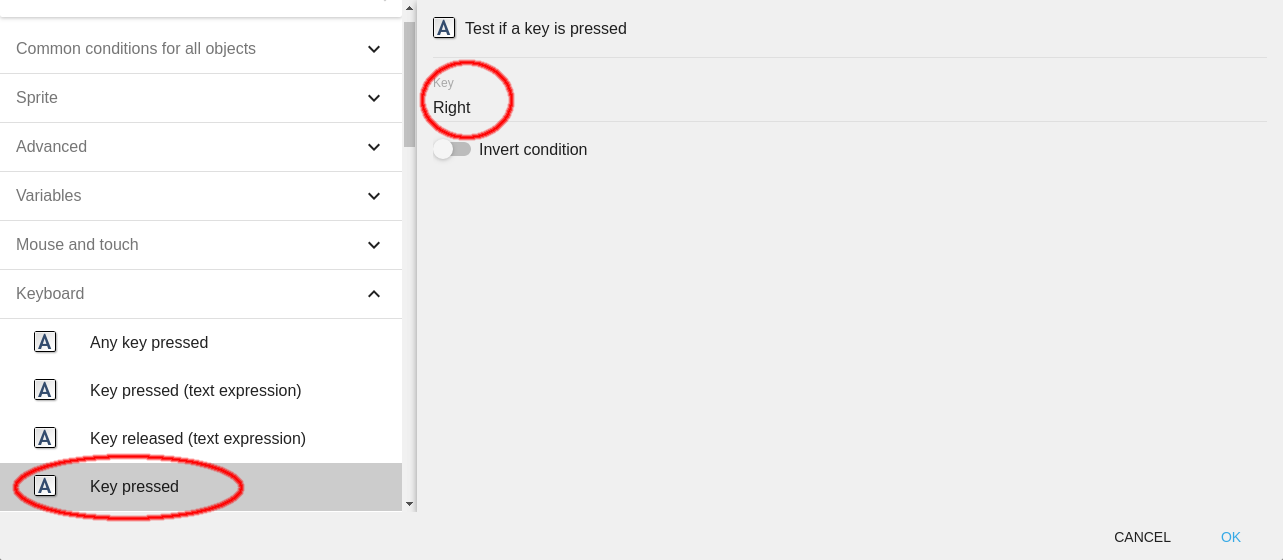
We will start with the event that has the condition of left key press.
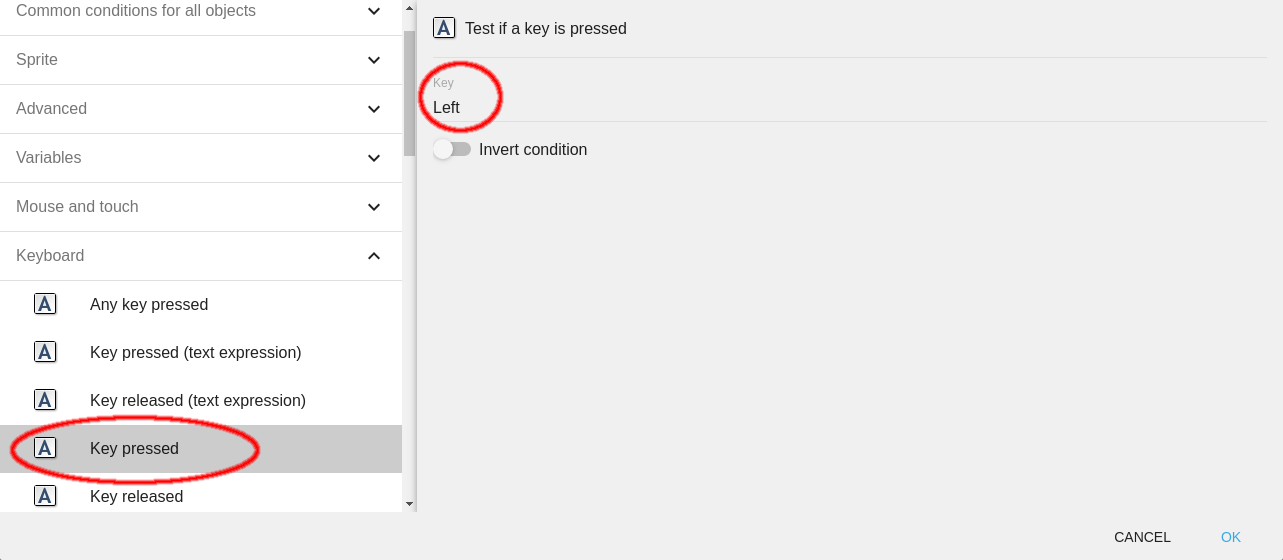
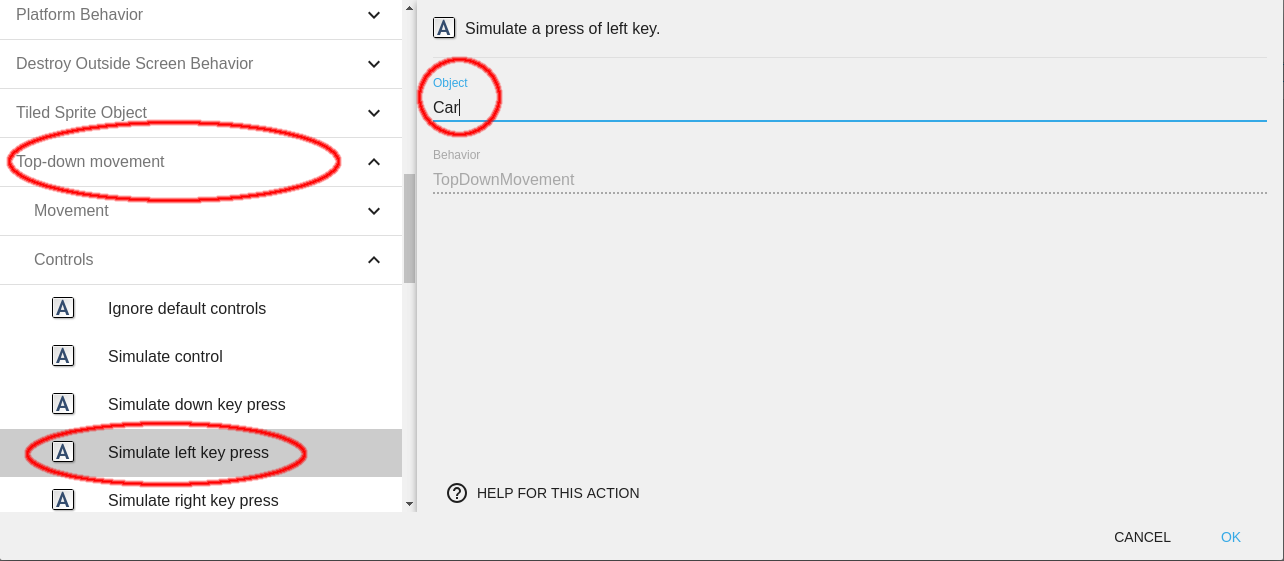
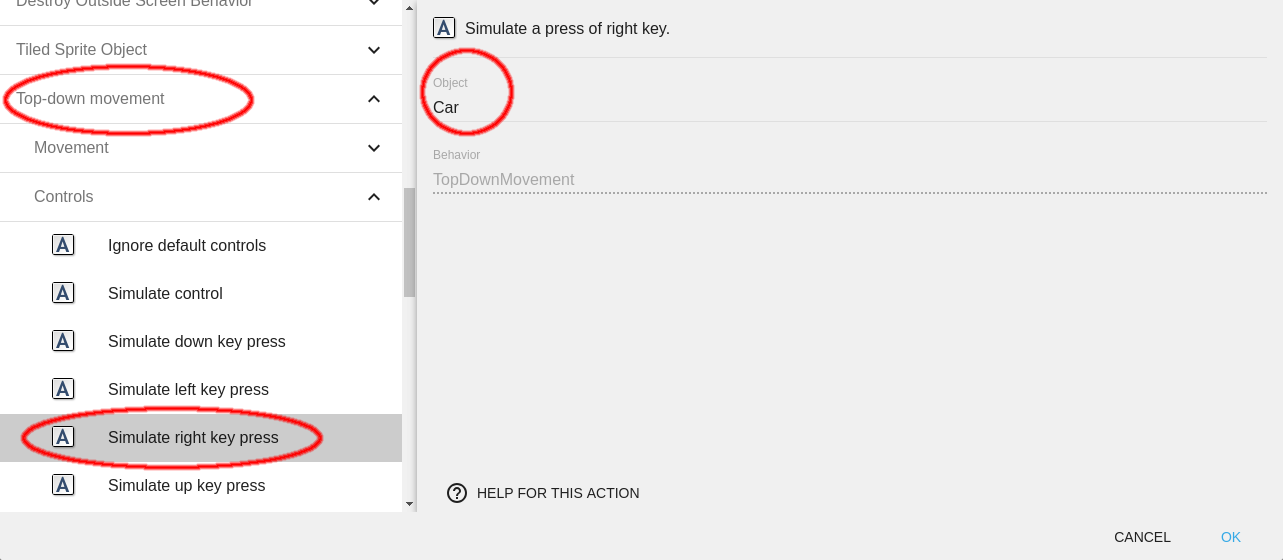
For the action, when the left key is pressed, the Car should have a movement on the left side. This can be easily done using an action Simulate left key press that would simulate the left side movement for the object selected (Car).
But make sure to use the action with the same behavior as your object (top-down movement). So, we need to choose it from the Top-down movement drop-down.
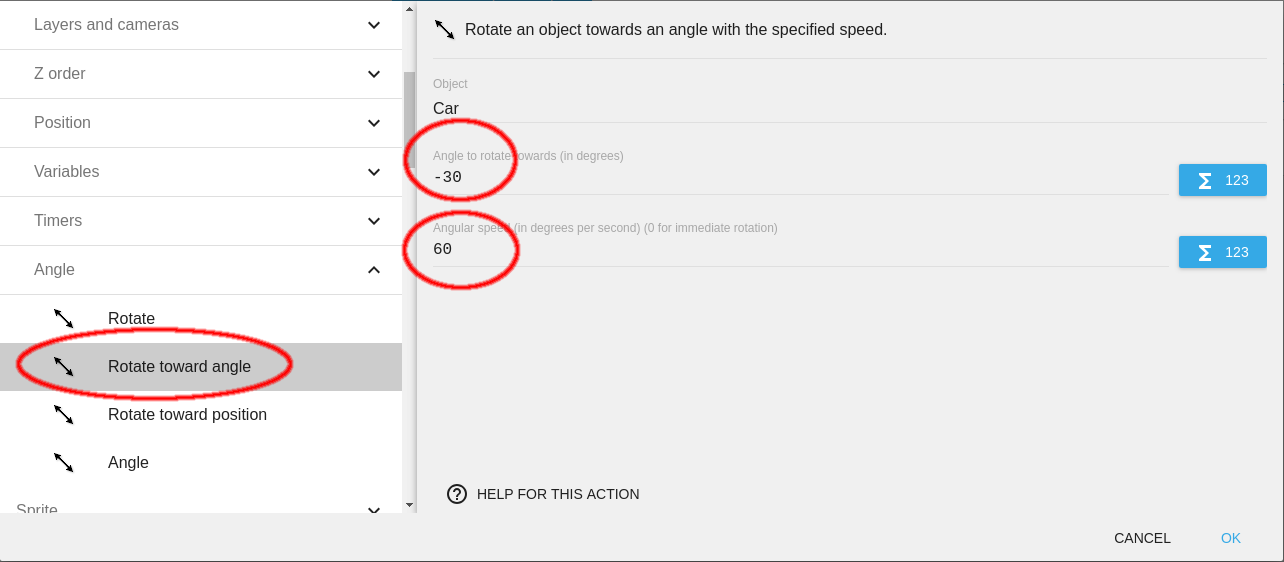
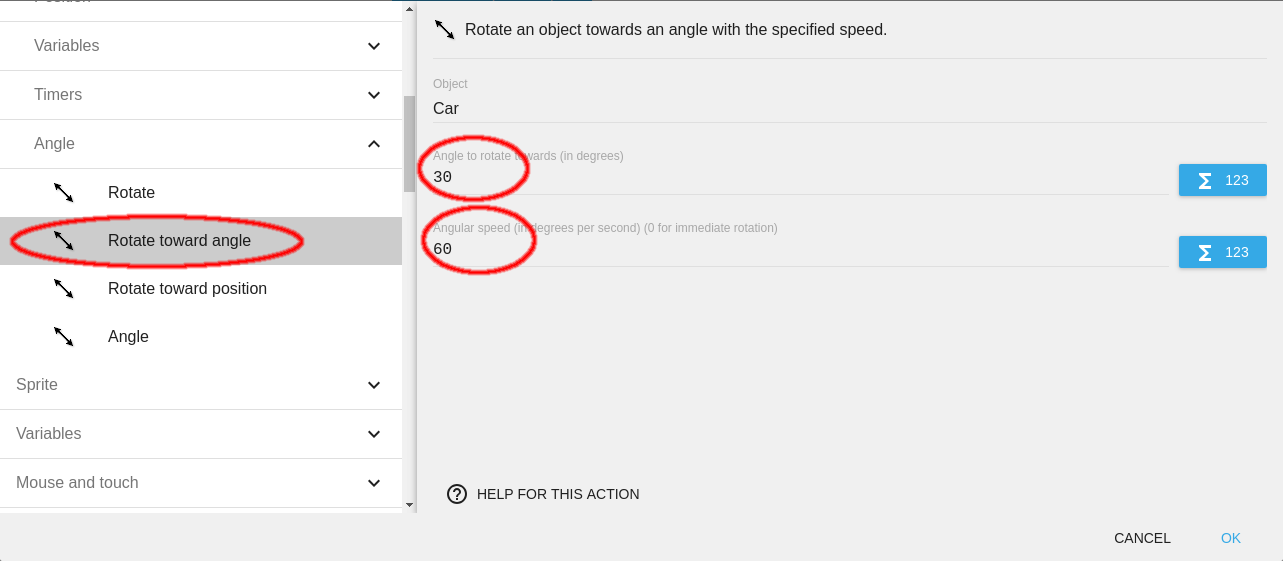
Now we need to give our Car the desired rotation for a better visual experience. If we just give rotation to the object it will rotate up to 180 degrees.
To avoid such a result, we need to set a final angle too. We will assume it to be 30 degrees on both sides, i.e. -30 degrees for the left key press and 30 degrees for the right key press.
But before we move ahead, we also need to assign the Angular speed for the rotation. We will be using a value of 60 degrees/second for the same.
Remember that the angular speed will be the same for both the key presses. It cannot be negative because it is the "Angular speed", and speed cannot be negative.
We can repeat a similar event for right key press.
If you preview your project, you should be able to control your Car using the left and right arrow keys.
But we still encounter one problem, the car does not return to its original state when we leave the keys. Instead, it stays oriented at an angle. Let's solve this problem now.
Returning the car to its original orientation
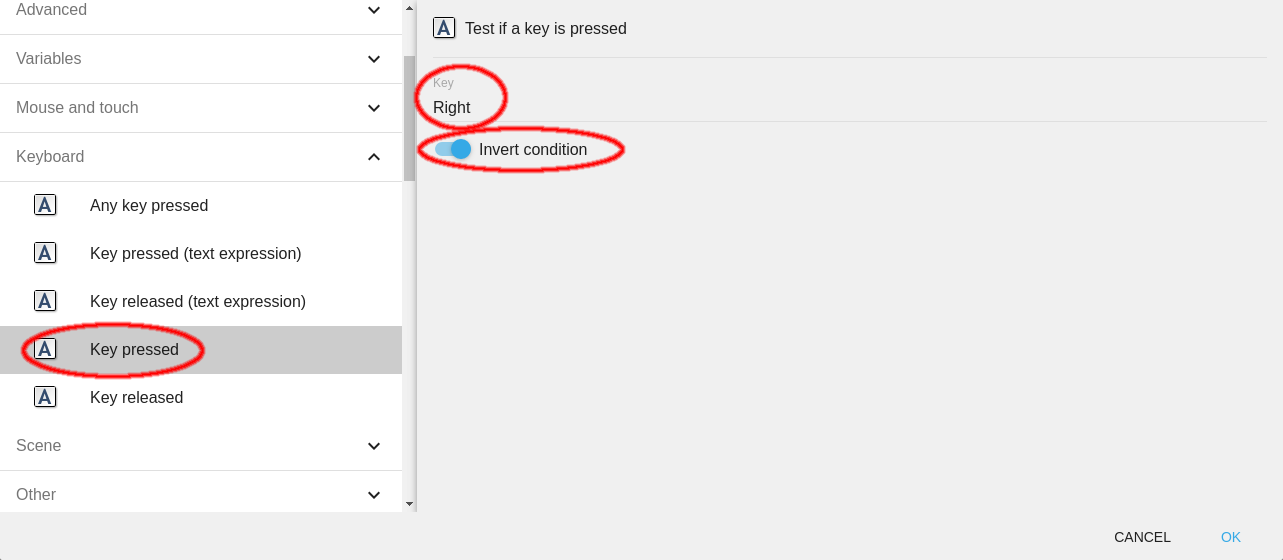
We need to return the car to an angle of 0 degrees when none of the arrow keys are pressed. In other words, we need to return the car to an angle of 0 degrees when the conditions, right key press and left key press are inverted.
To achieve this, we add a new event and try to add the above 2 conditions, i.e. right key press inverted and left key press inverted. We add a condition Left key is pressed and turn on the switch below that says Invert conditions.
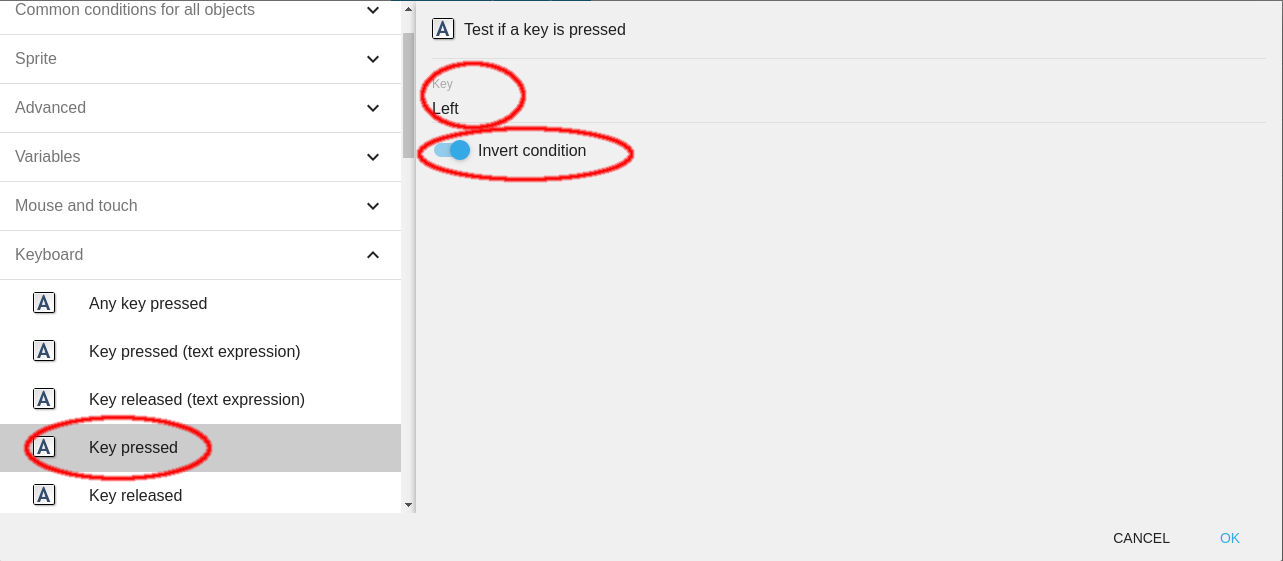
In the same event, we add a similar inverted condition for right key press.
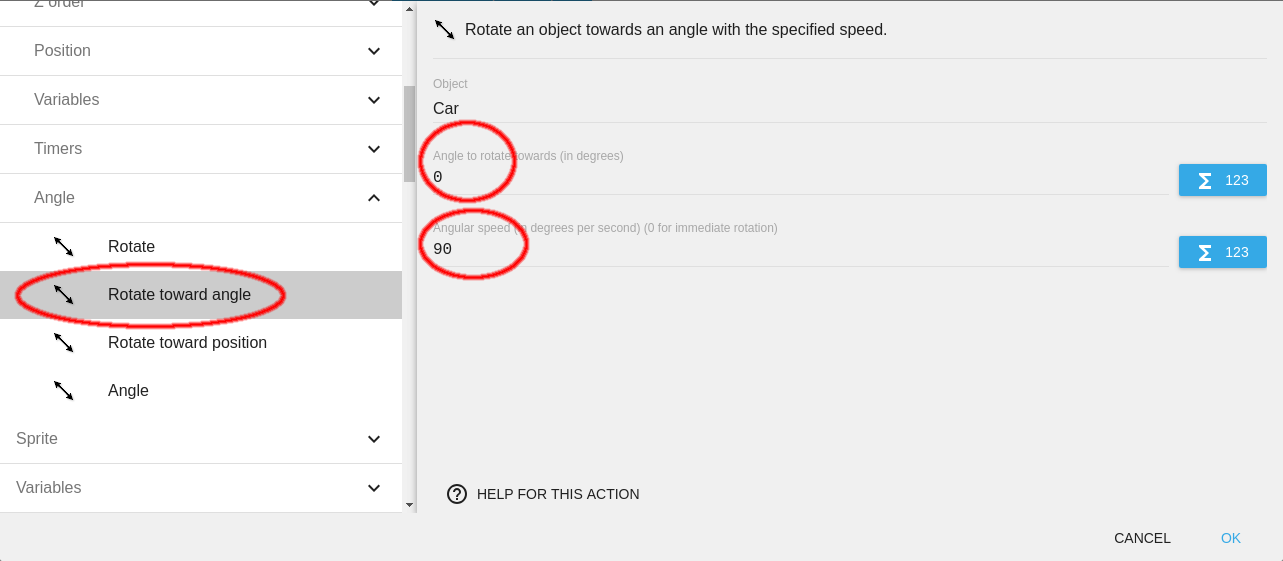
For the action, we will make an action for rotating it towards 0 degrees with an angular velocity of choice similar to what we did for the non-inverted conditions of key press.
Note
Make sure to include both the conditions in the SAME EVENT because we want the vehicle to return to 0 degrees only when neither left nor right arrow key is pressed.
Now, the car moves and rotates to an extent when an arrow key is pressed and rotates back to the original angle when the keys are released.
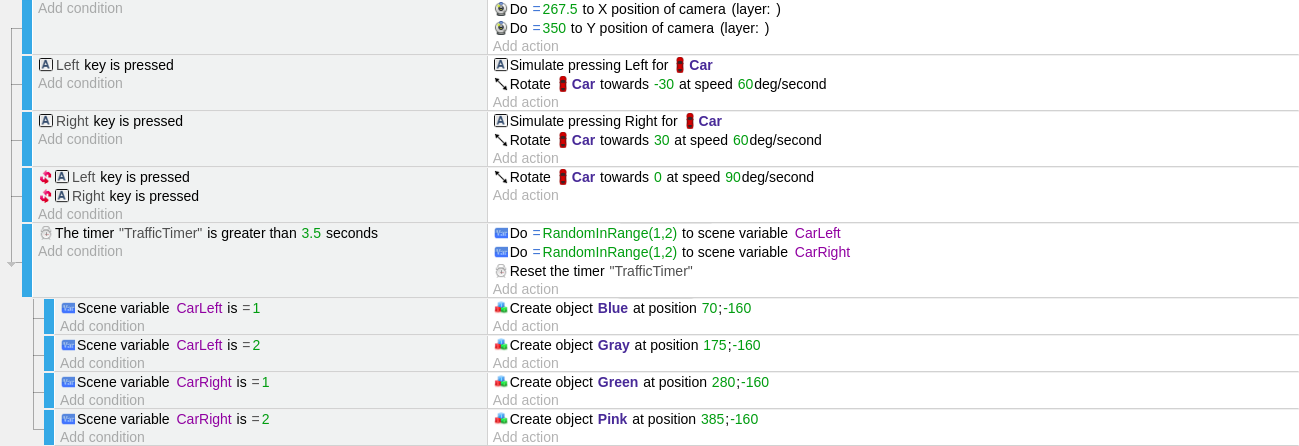
Adding traffic cars to be dodged to the scene
Now, we need to begin creating traffic cars which should be dodged by the Car. To maintain uniformity and simplicity in the game, we will create the objects at a fixed Y position and a random X position within a fixed time interval such that all the traffic cars created lie between the yellow lines of the Highway.
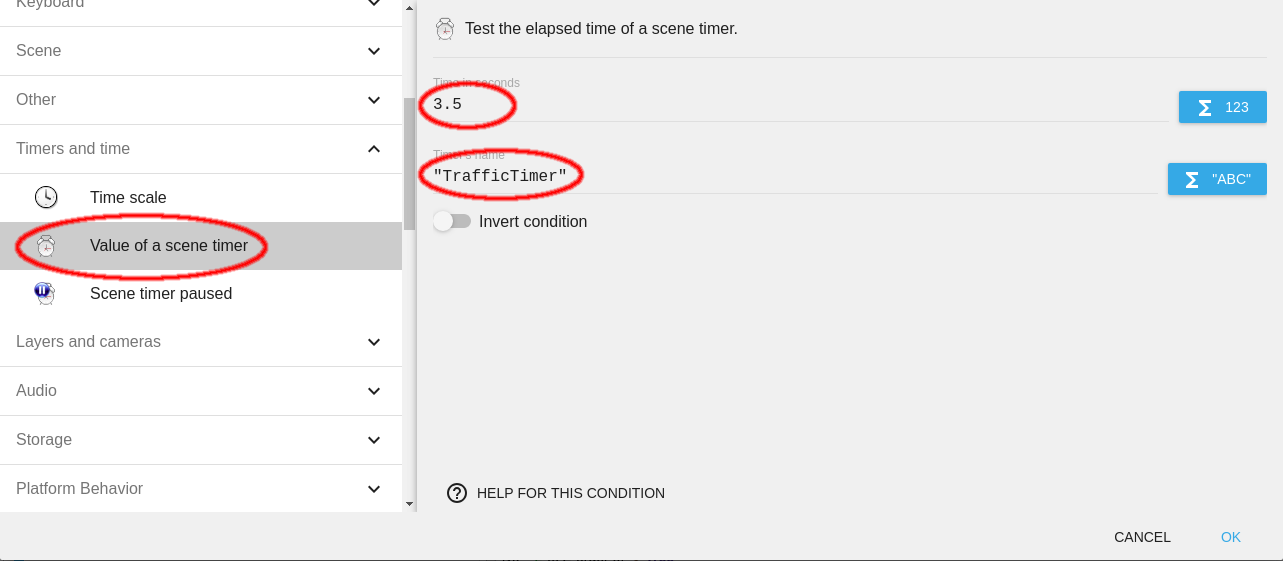
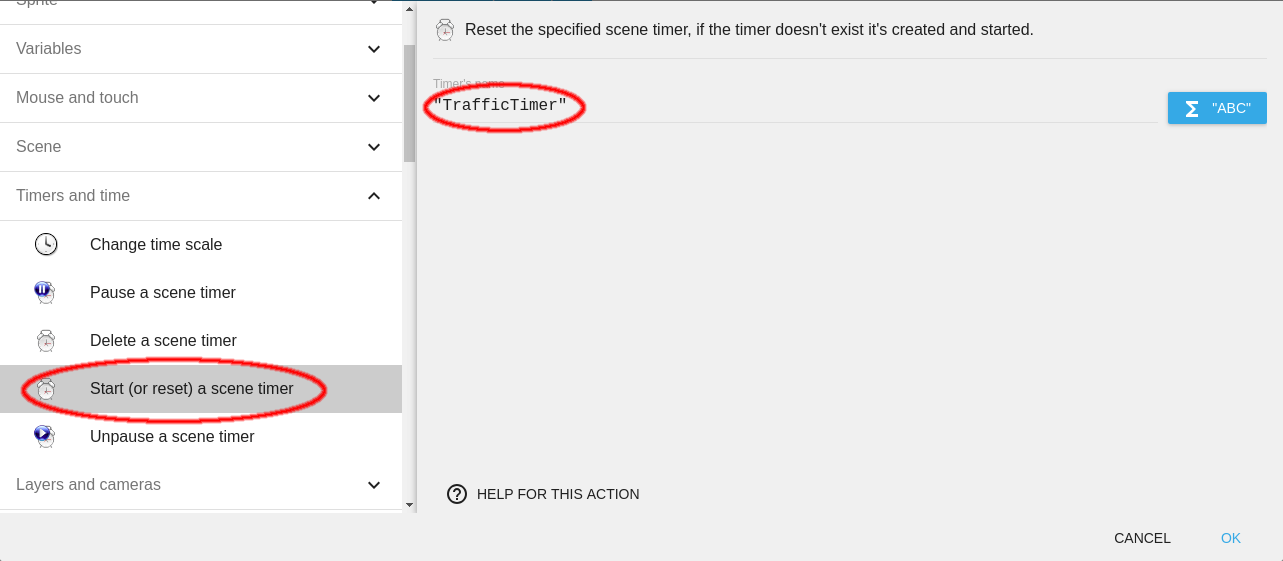
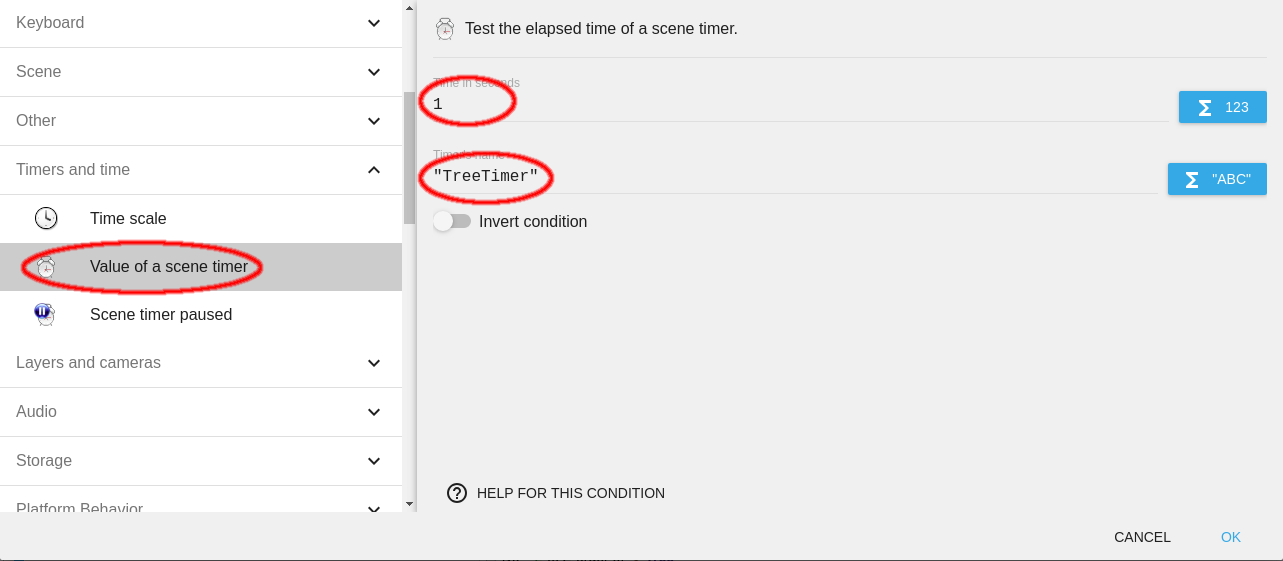
For a fixed time interval, we can use the Timer feature that GDevelop provides. To set a timer, we will create an event with the condition Value of a scene timer. Now, you need to fill the desired time interval between the creation of two consecutive instances of traffic cars on each side in the Time in seconds field.
After entering the time you need to enter the name of the timer. It can be any name of your choice but remember to fill it within quotes.
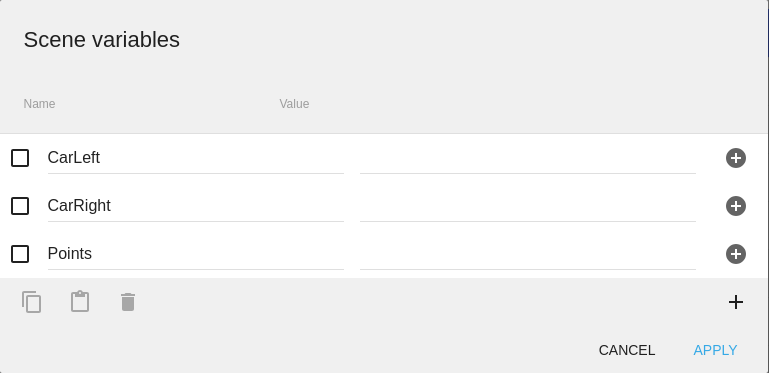
For the first action, we can make use of a Scene Variable. A variable allows you to store number or text in the computer memory and a scene variable allows you to store a number or text only when a particular scene is active. You can read more about variables here.
To create a new variable, go to the Scene Editor, right-click on the background and click on Scene properties. From the pop-up that appears, click on the EDIT SCENE VARIABLES button.
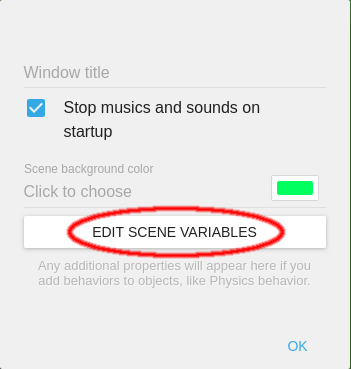
Now click on the + button on the bottom-right of the new dialog, enter a name for your variable and click APPLY.
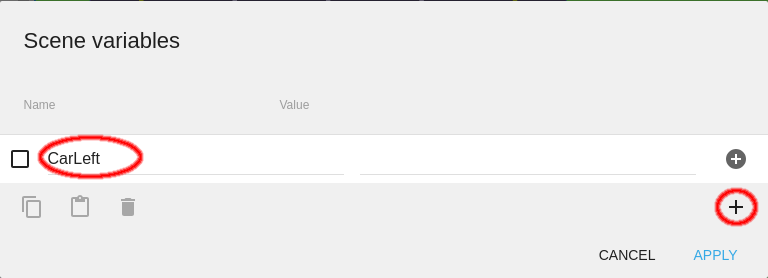
We will name our scene variable 'CarLeft'. To assign a value to your scene variable, use the action Value of a scene variable. Enter the name of the variable you created in the Variable field.
To create the cars at random, we can assign a value using the expression "RandomInRange". RandomInRange(min, max) is used to return a random integer between the minimum and maximum specified in the expression.
We'll use the expression RandomInRange(1, 2) such that whenever the expression returns 1, we will create a blue car in the first (leftmost) lane and whenever it returns 2, we will create a gray car in the second lane. Therefore, set the Modification's sign to = (set to) and the value to "RandomInRange(1, 2)".

You can add a similar action for a variable CarRight which can be used to create traffic cars on the right side of the highway.

Before adding events to check the value of our scene variable Car1, we will add one more action in the same event which will set the value of our timer to 0. To do this, we will use the Start (or reset) a timer action.
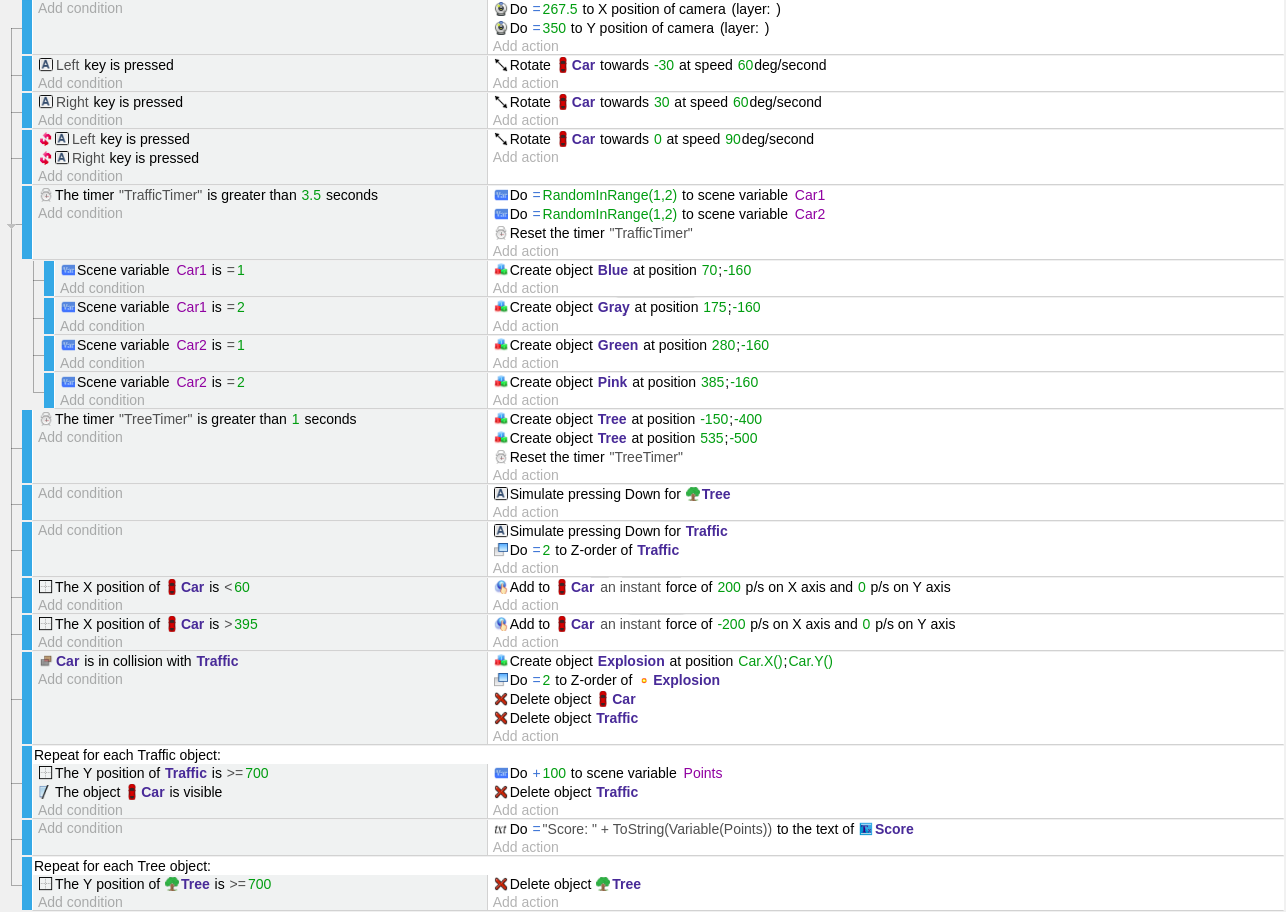
This is what our Events Editor should look like:

To check the value of Car1 and to create the corresponding traffic cars at the same moment as the CarTimer is reset, we will add a sub-event for each condition. A sub-event is performed only if the parent event's condition is true. You can read more about events here.
You can create a sub-event by clicking on the Create a sub-event to the selected event button at the top.

This will create a sub-event for the selected event.

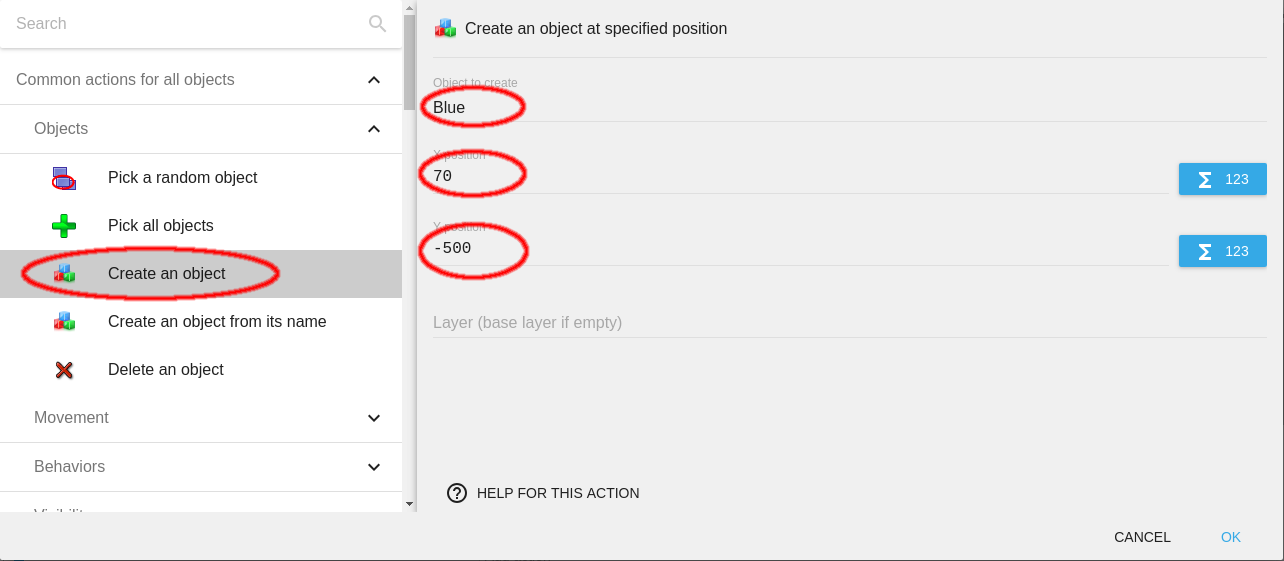
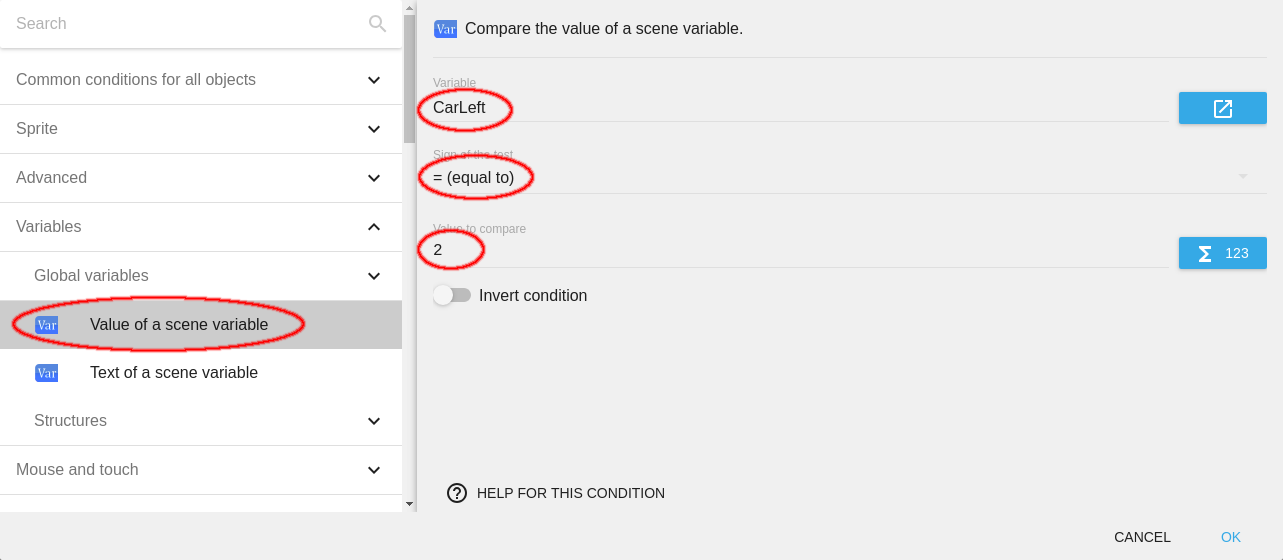
In the condition of the sub-event, we will check if the value of CarLeft is equal to 1. To do this, we will add the Value of a scene variable condition. Enter the variable name CarLeft in the Variable field, set the Sign of the test to = (equal to) and fill '1' in the Value to compare field.

For the action, you can create the object Blue at the X coordinate of the first lane (70) and Y coordinate such that the object is created well above the window so that by the time it reaches the window with an acceleration of 1000 it reaches its constant maximum speed else the user might see the car accelerating in the window.
You can add a similar sub-event for Gray with the condition checking if the value of Car1 is 2.
If the condition is true, we will add an action to create Gray at the X position of the second lane (175) and Y coordinate -500.

Similar to what we did for variable CarLeft, we will now check the value of CarRight and create Green at (280, -500) if the value of CarRight is 1. If the value is 2, we will create Pink at the position (385, -500).
Here is the resulting events sheet so far. If you are on the same page as the tutorial, you can save your game and proceed.
Adding surrounding trees to the game
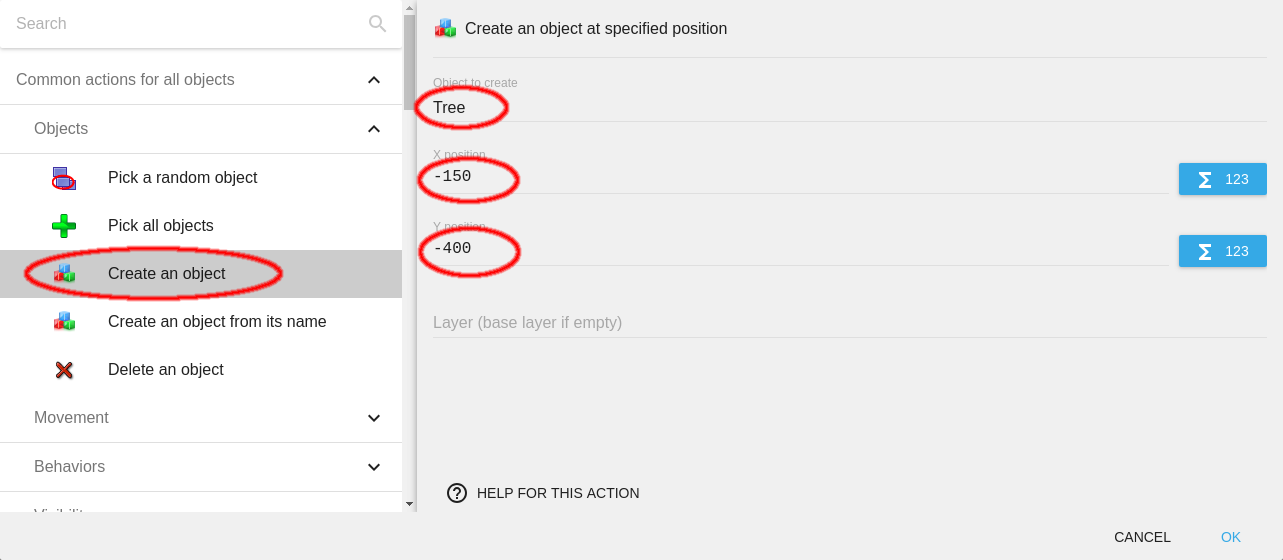
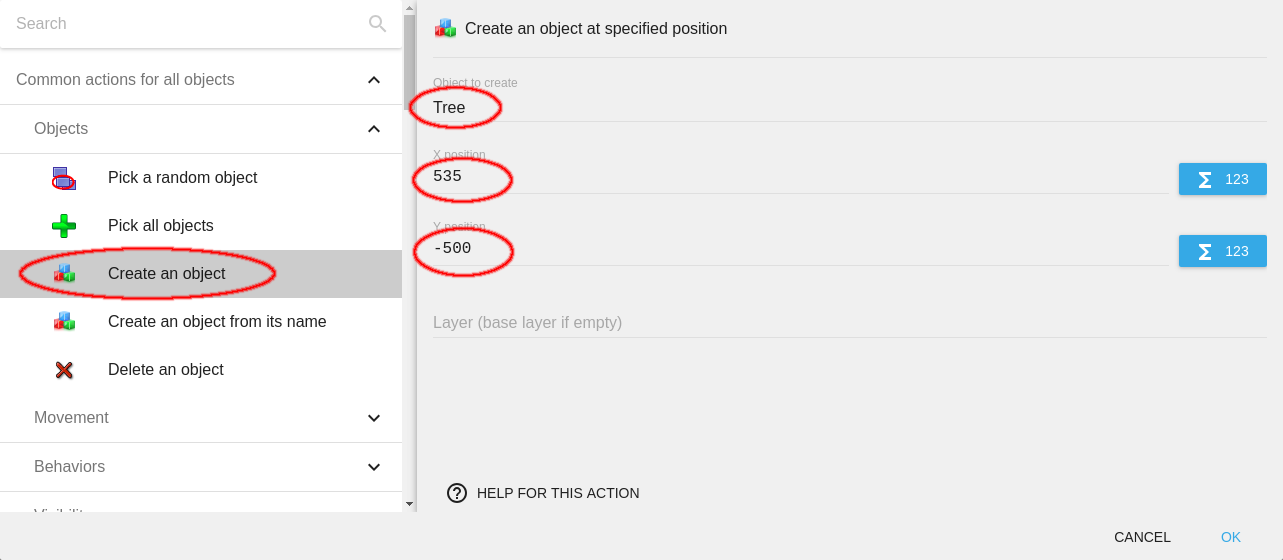
After adding the traffic cars to be dodged, we will now add the surrounding trees which will simulate a moving background. We will use the object Tree for this purpose.
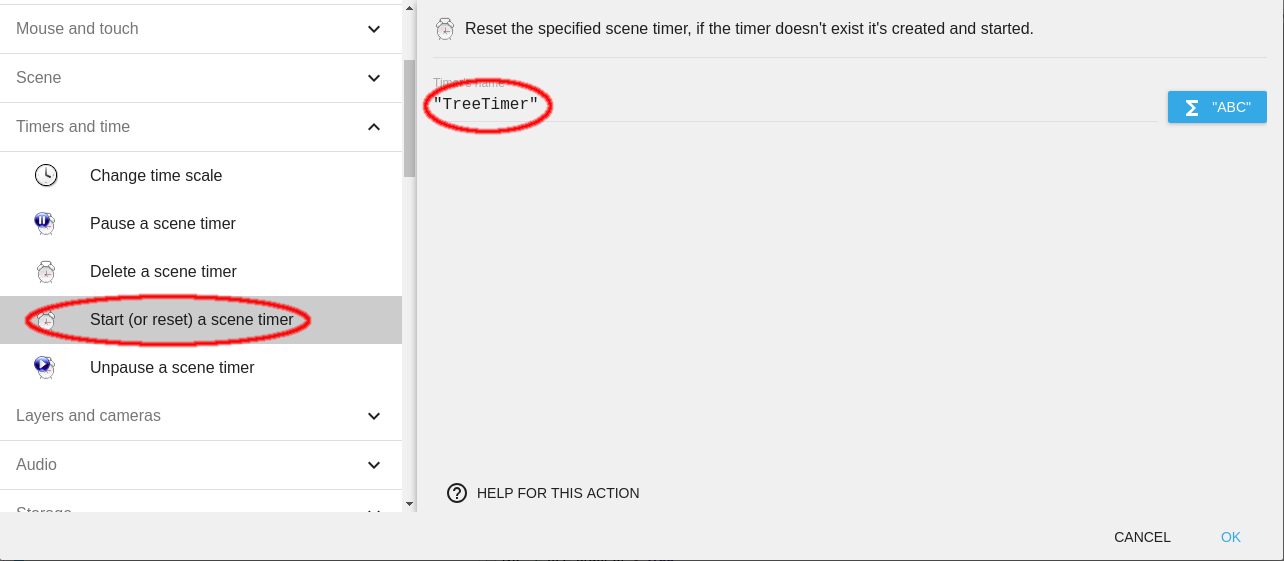
To create object Tree we use another timer TreeTimer, similar to how we used TrafficTimer. We will use these trees for moving background simulation by moving them in the backwards direction on both sides of the road.
We will set their Y coordinates such that they are created above the screen and for better viewing experience, you can create them at different Y positions so that they are not perfectly aligned.
We will set the X coordinates for both trees on both the sides such that the trees are right beside the Highway. The dimensions of the tree are 150×150 pixels.
For the left side of the Highway we will set the X position to -150 pixels and the Y position to -400 pixels.
For the right side, the X position will be set to 535 pixels and Y position to -500 pixels.
We need to add one more action to reset the TreeTimer to 0 when it is greater than 1 second.
Moving the trees
In the game, we need to move the trees such that they never stop, i.e. without any condition. So we add an event and add action to that event without any conditions.
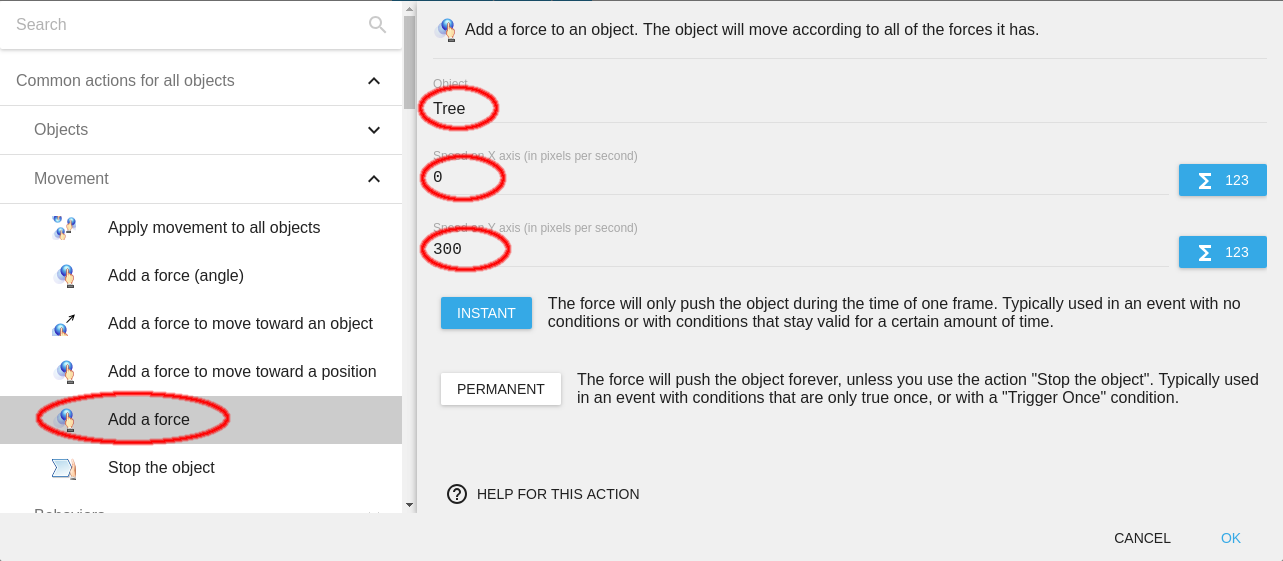
Our trees should move in the direction opposite to that of the Car so that we can simulate a moving background. To do this, the event we add should add a downward force to the object Tree.
Add the action Add a force to the Tree. The movement of the car should be in the vertical direction only. There should not be a horizontal component of the force applied to it. So the speed on the X axis should be set to 0 and the speed on the Y axis will be set to 300 pixels/second.
Moving the traffic cars
To move the traffic cars, we can add events with no conditions and add a vertical force. But if we try to do it in a way similar to what we did for Tree, we will have to add these events for each and every car individually. To simplify this, we can use the Object Groups feature provided by GDevelop.
An object group is a collection of objects. You can classify similar types of objects in an object group. You can then use the conditions and actions on a group object rather than repeating it for each and every object separately.
Blue and Gray that should move on the left side of the highway will have the same motion for each object created. Similarly, Green and Pink should also have the same motion. So we can classify the 4 traffic cars to 2 object groups.
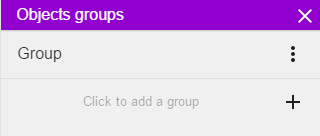
To open the Groups Editor, click on the Open the objects groups editor icon in the toolbar.

This will open the object groups list. All the object groups in the scene will be visible on the list. To add a new object group to the list, click on the + sign beside Click to add a new group. This will add a new group to the list.
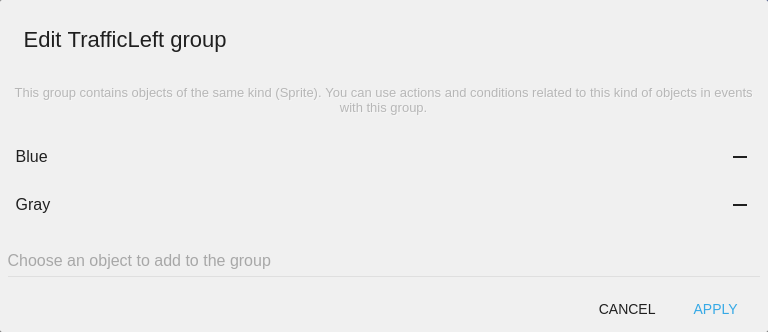
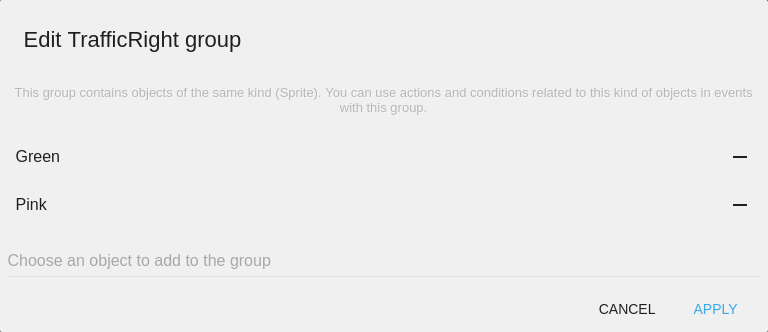
To rename the group name, click on the three-dot-menu or right click on the object group name and choose "Rename". We will name the group TrafficLeft. Now add another group and rename it to TrafficRight.

To add objects to TrafficLeft, click on the group name. A new dialog will appear.
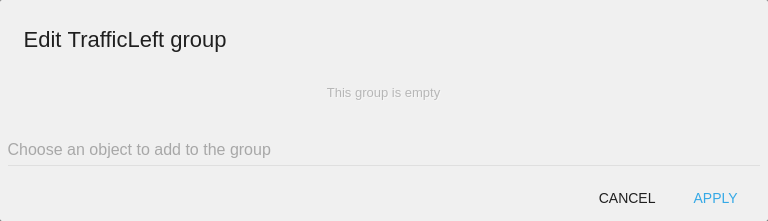
Click on the Choose an object to add to the group field and choose the object Blue followed by Gray and click APPLY. This object group represents the cars on the left side of the highway.
Similarly, add Green and Pink to the group TrafficRight.
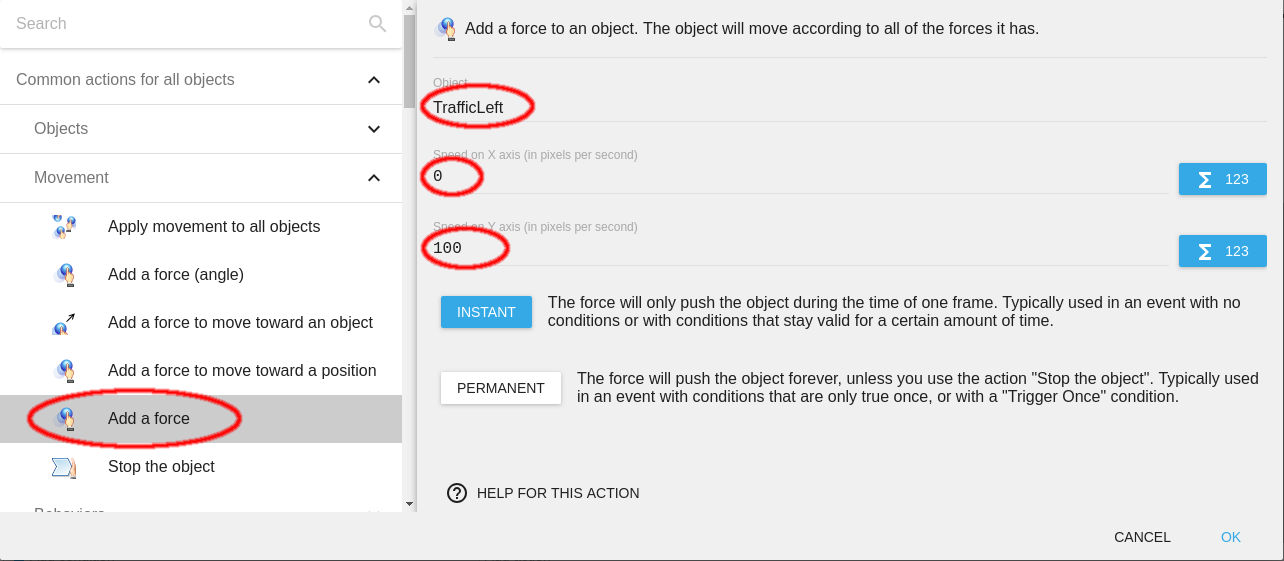
To move the cars we will now add an event with no conditions. We will now add a downward acting force to TrafficLeft and TrafficRight.
Objects in TrafficLeft are cars that move in the same direction as Car. So these cars should move at a pace slower than Tree so it looks like the cars are moving faster than the background but slower than Car. We will apply a force of 100 pixels/second in the Y direction for TrafficLeft. The X component should be 0.
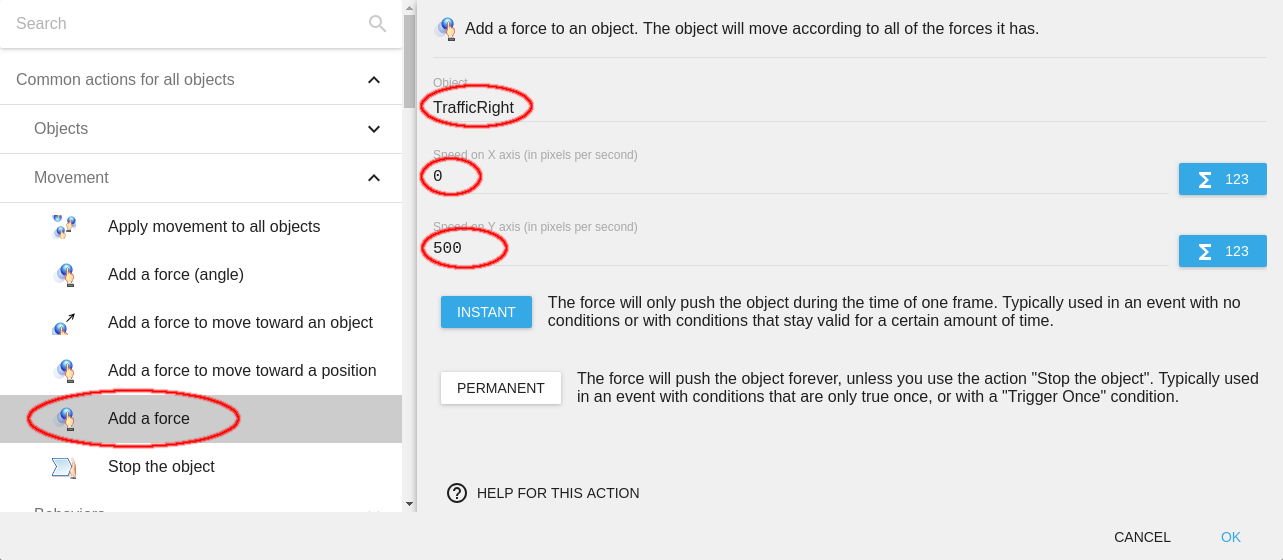
On the other hand, objects in TrafficRight move in the direction opposite to that of Car. So these cars should move faster than Tree so that they look like moving in the backward direction. We will apply a force of 500 pixels/second in the Y direction for TrafficRight.
On starting a preview of the project, you might not be able to see the traffic cars yet. You can solve this problem by setting a Z order for the objects in the same event. To use the action for all the objects at once, create a new object group Traffic. Add all the objects to the group.
Note
To see the traffic cars, you should set a Z order higher than the object covering it, i.e. Highway.
Set the Z order of Traffic higher than the Z order for Highway.

You may now check the events we have created so far and then save your game.

Before moving on to the event for a collision between Car and Traffic, we notice that the car's motion is not limited to the road.
Limiting the car's motion between the yellow lines
To limit the car's motion between the yellow lines, we need to add a new event to check the X position of the Car.
We will add two different events for each side because the force applied should be positive when Car is on the left side and negative when Car is on the right side.
The distance of the yellow lines from both ends is 60 px while the width of the Car is 80 px, so its motion has to be limited between 60 px and (535 - 60 - 80), i.e. 395 px.
The force applied to the car should be greater than or equal to the maximum speed of the Car, set in its behavior (200, in our case).
Our first event will include a condition that checks if the X position of the Car is less than 60 px.
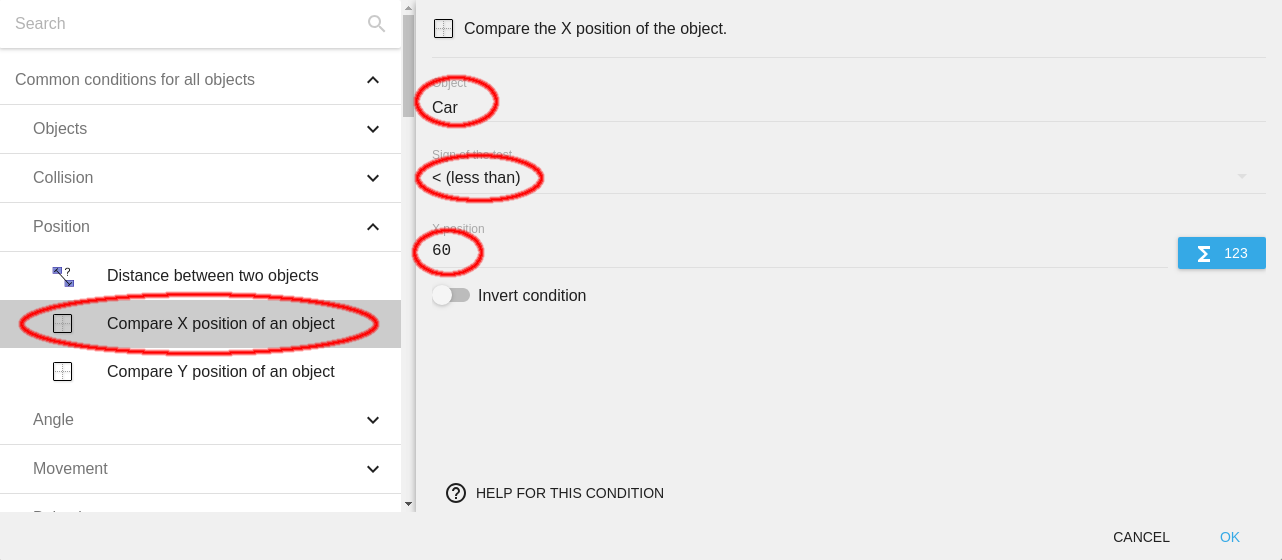
If the condition is satisfied, a force greater than or equal to the maximum speed of the car should be applied in the opposite direction. Therefore, a force greater than or equal to 200 pixels/second should be applied on the Car along the X-axis.

Similarly, we need to add another event, with the condition to check if the X position of the Car is more than 395 px.

If the condition is true, a force with a magnitude higher than 200 pixels/second should be applied in the negative X direction.

If you preview the game, you should now be able to see Tree and all the objects in the group Traffic and the motion of the car should be constrained between the yellow lines.
Now, we need to set how the game behaves when there's a collision between Car and Traffic.
Collision between Car and Traffic
In the next event we create, we need to set the condition such that it checks a collision between Car and Traffic.
For this, you can use the Collision condition and set the objects to Car and Traffic.

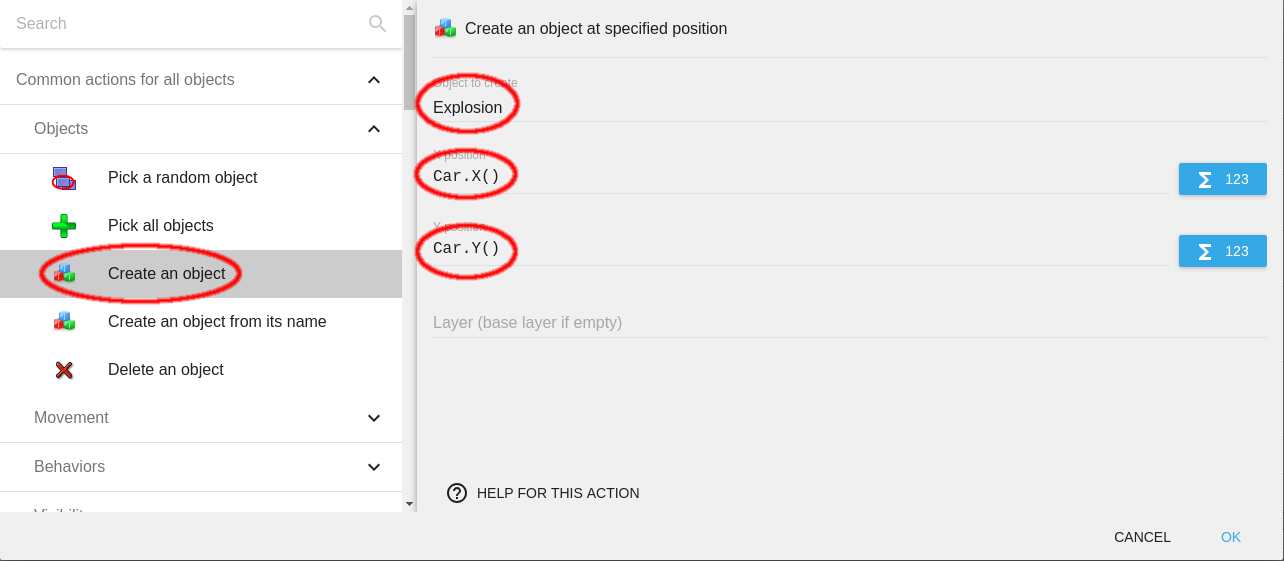
In case of this condition being true, we need to create an object Explosion. You can use the action Create an object and fill Explosion in the Object to create field.
We need to create this object at the coordinates same as that for Car. To achieve this, you can use "Car.X()" and "Car.Y()" in the X position and Y position respectively.
Note
"Car.X()" and "Car.Y()" denote the X and Y position of the Car respectively.
If you watch the preview, there encounter a few minor issues:
- Explosion cannot be seen.
- Car keeps moving.
- Traffic keeps moving
We will now solve these problems. Make sure that you add these actions for the same Collision condition.
- To make the Explosion visible, add an event to set the Z Order of the object Explosion so that it is higher than that of the Highway
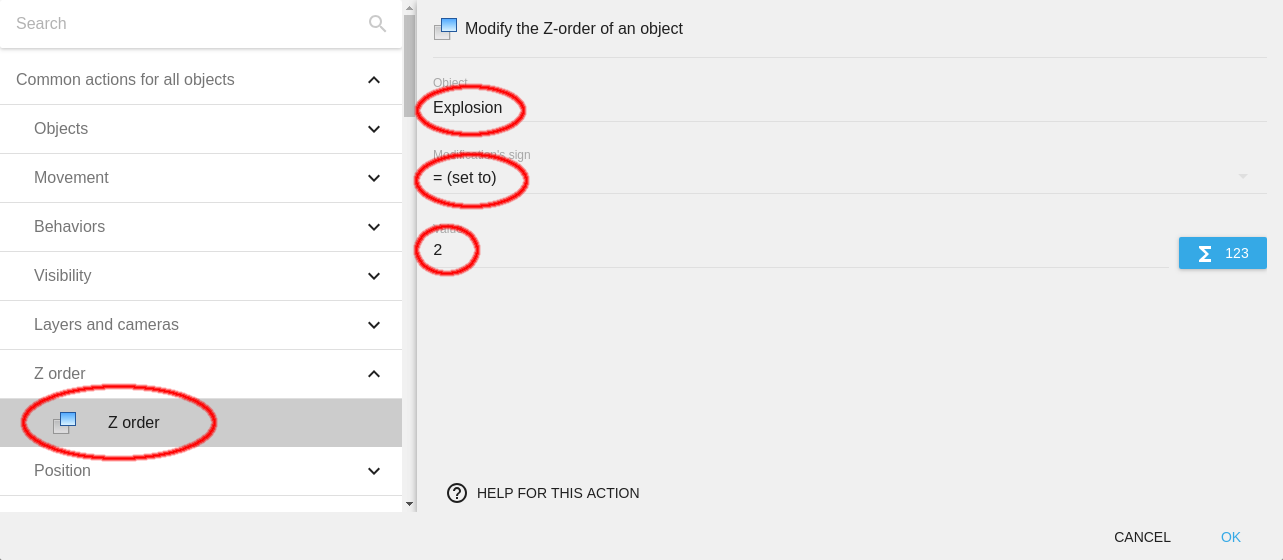
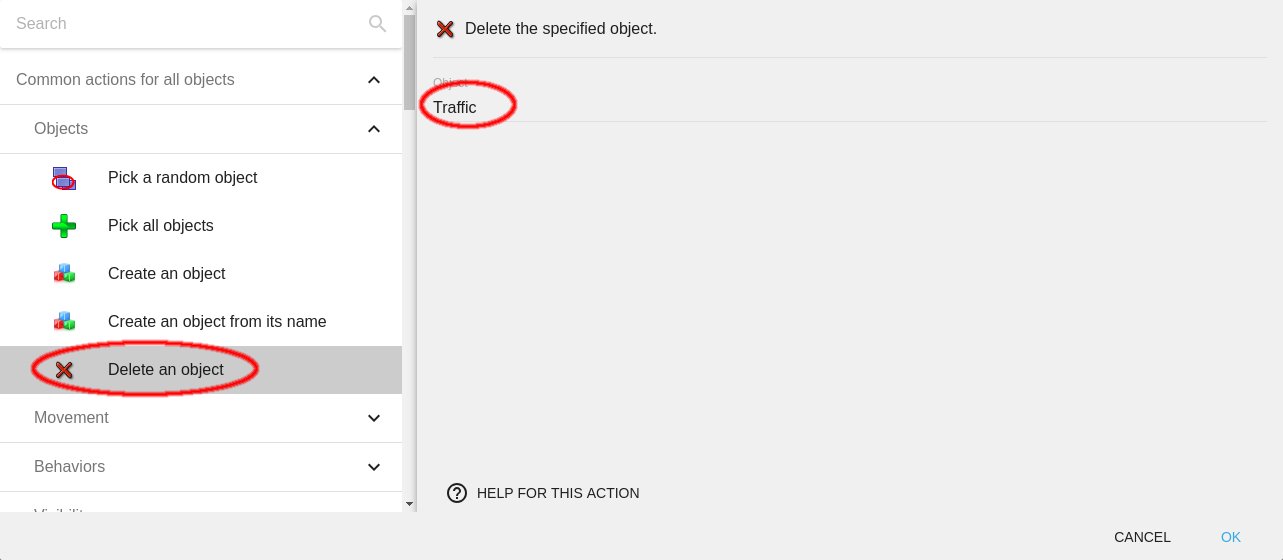
- To remove the instance of Car we shall now add an event to delete the object Car.
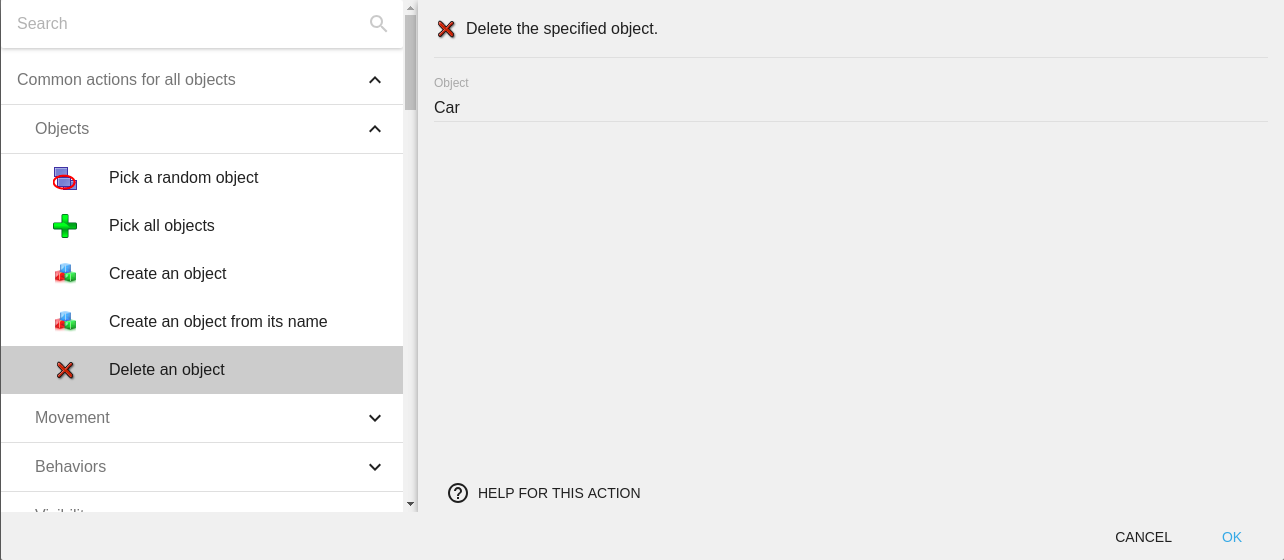
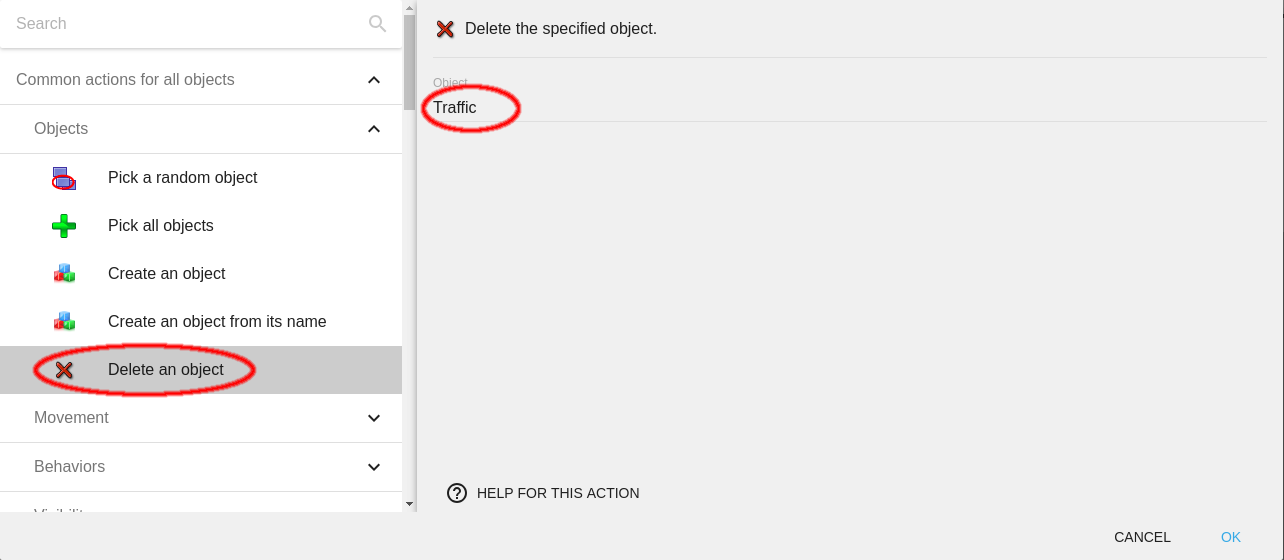
- Similar to what we did for Car, to remove an instance of Traffic we can delete the object Traffic too.
You can watch the preview now. Our game is ALMOST complete. We cannot say that the game is complete until we can see the score made by an individual.
Setting the background color
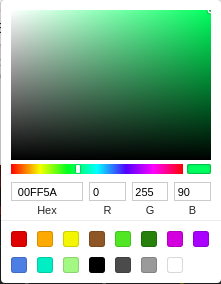
The gray background does not really suit the game. As there will be trees on both sides of the road, the green color might be the best. To do so, you can right-click anywhere on the scene and select Scene properties. Click on the box below Scene background color that says Click to choose.
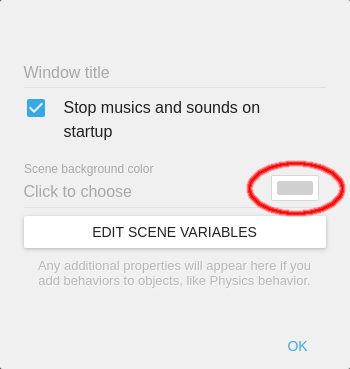
You can choose the color of your choice and click OK in the Scene properties.
Displaying score in the scene
To display the score, we will make an event such that when any object in the group Traffic passes a predefined position, the value of the score is updated. To do this, we need to use the help of a scene variable.
Let's start with creating an object Score.
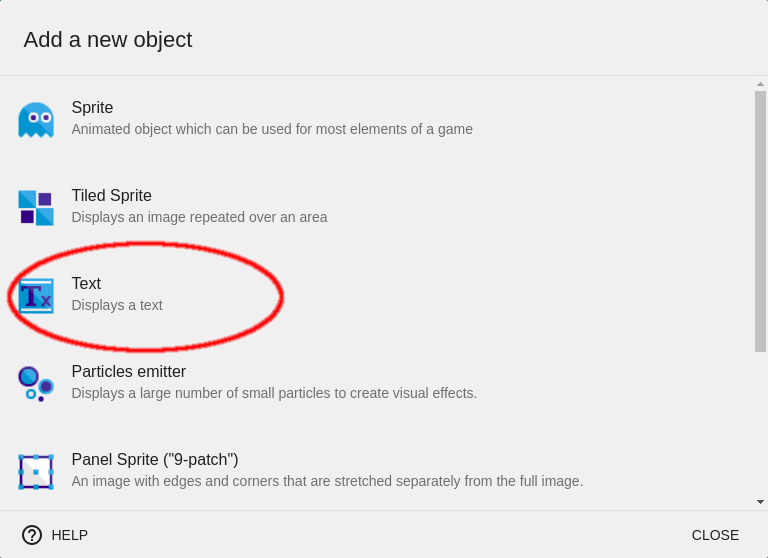
For this, you need to go to the Scene Editor and create a new object and choose Text from the Add a new object table.
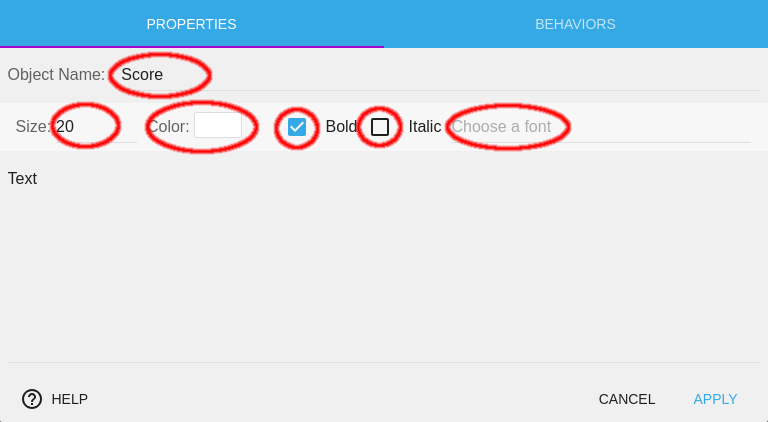
You can rename the object to Score and choose the text properties from the Properties panel.
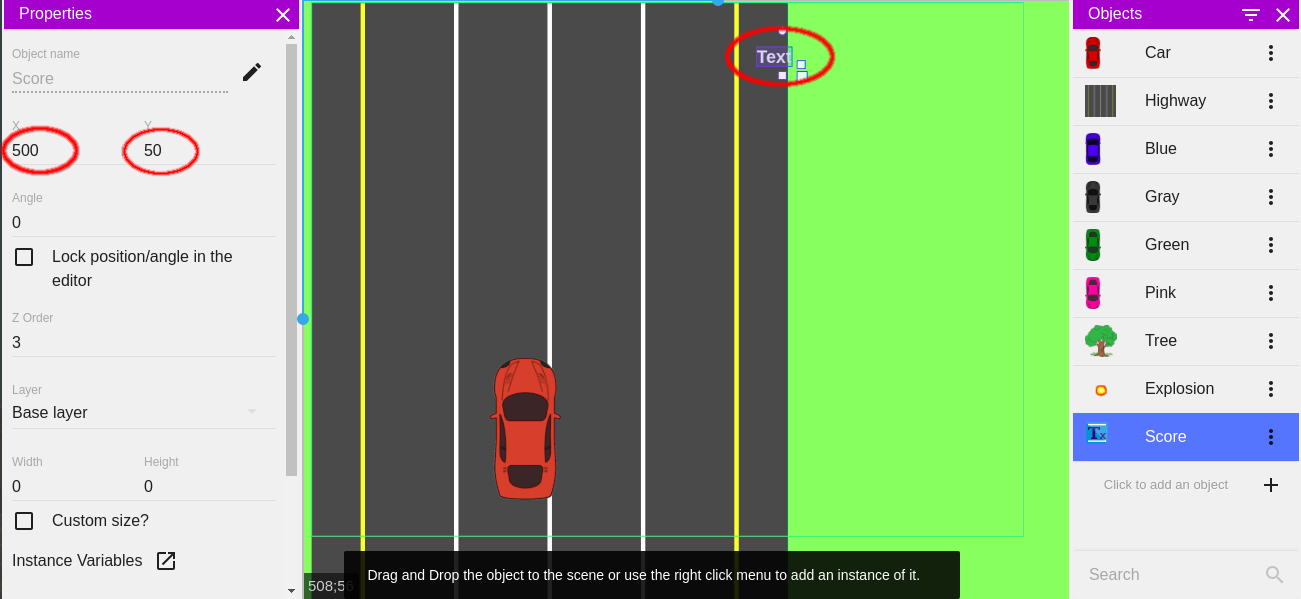
You can now drag and drop the Score object on the screen. You can also change the coordinates of the object from the Properties panel.
The score in our game will be shown as a number. You cannot directly add a number to a number stored in Text.
But you can do it using a variable. To update the score, we need to add a number to the variable defined every time a tree crosses a predefined position and then send that value to the text object.
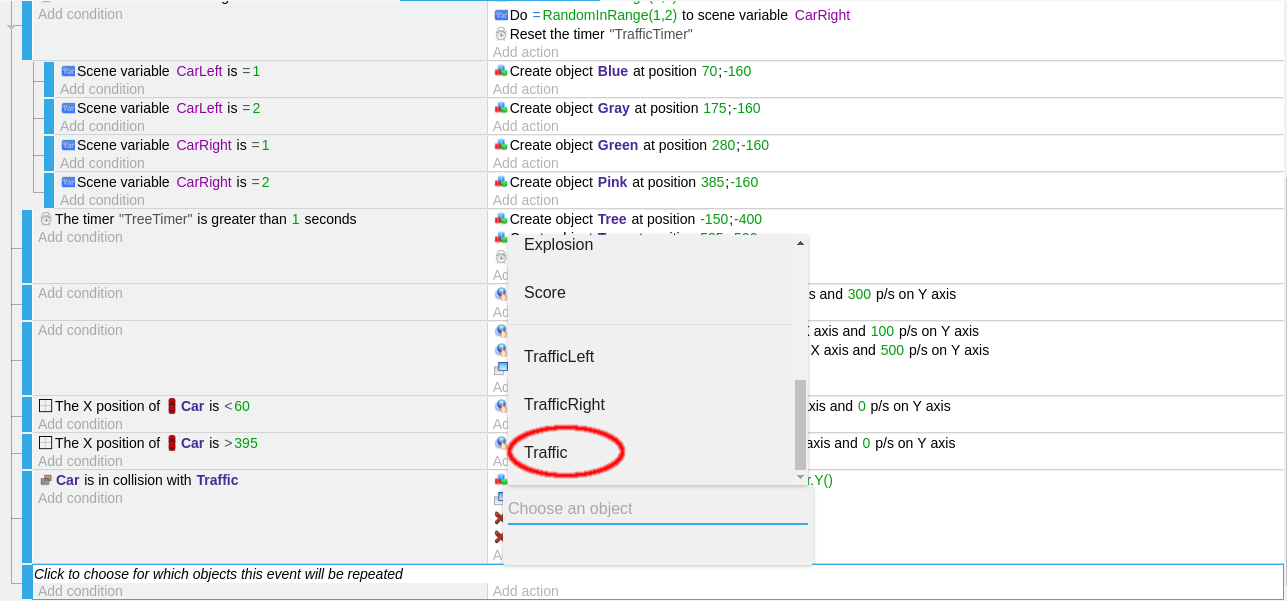
To repeat it for each object in Traffic, we will make a For each object event. To make a For each object condition, click on the Choose and add an event icon at the top.

From the menu that appears, choose the For each object option.
We need to repeat this event for each Traffic, so choose Traffic for the object to be repeated.
Because we want to update our variable every time Traffic crosses a position, we will have to add a condition to check if the position of Traffic is greater than or equal to 700.
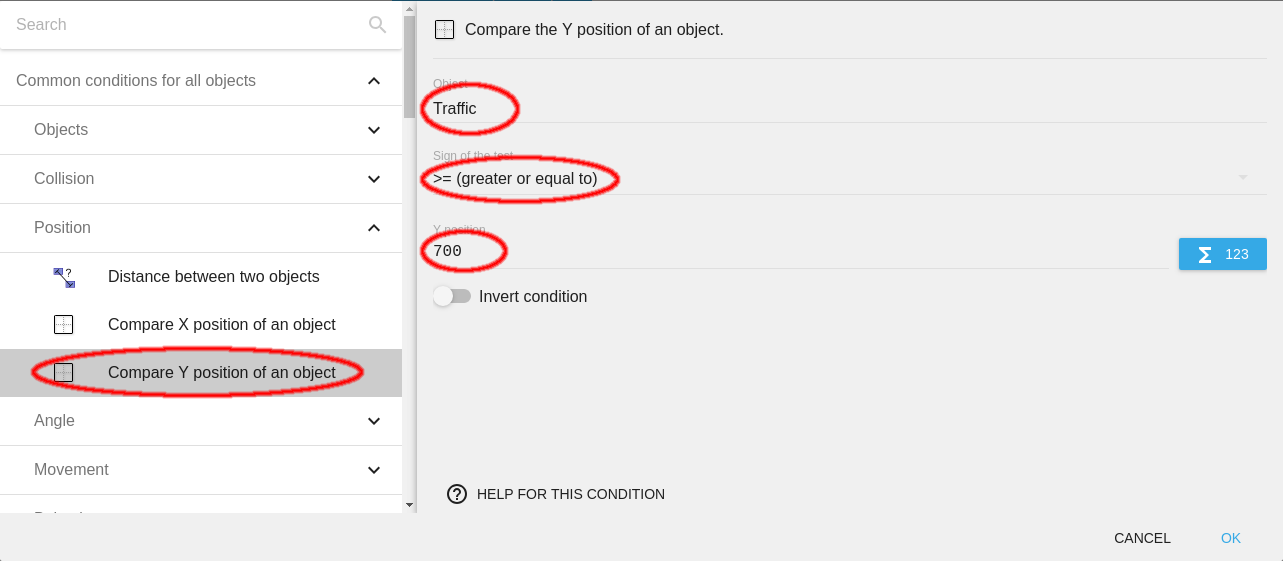
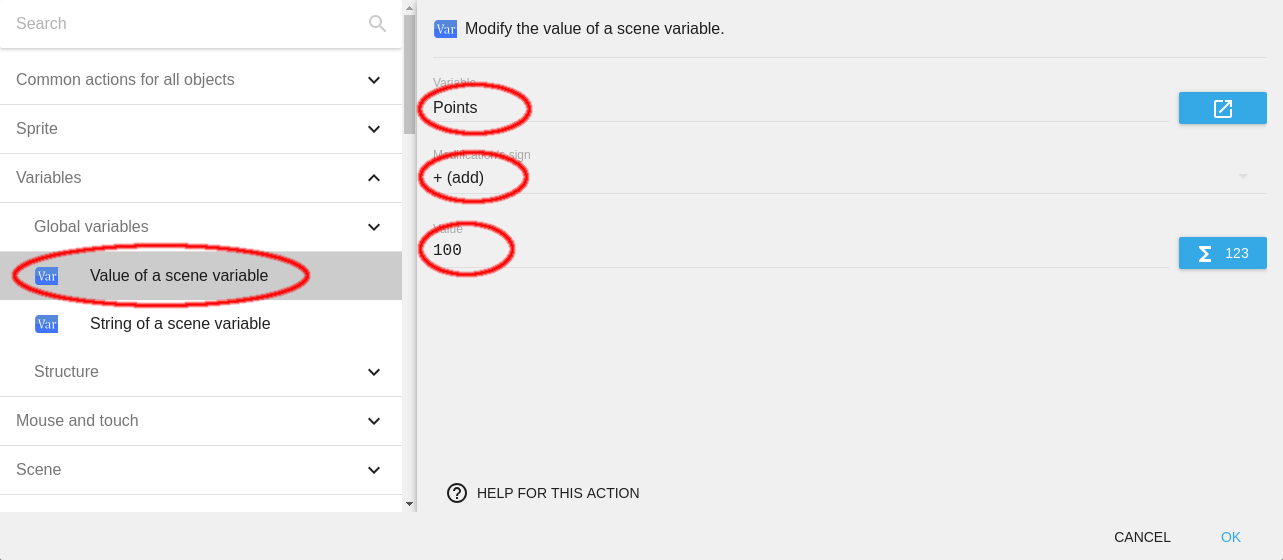
Our action will be to create and change the value of a scene variable. Create a new scene variable Points similar to how we created variables CarLeft and CarRight.
Now, we will add an action Value of a scene variable. Enter the variable you created in the Variable field.
Every time the Traffic passes the Y-position of 700, we will add 100 to the Score. Therefore, we set the Modification's sign to + (add) and the Value to 100.
To send this value to our Score we will make an event with no condition because our score should always denote the value of our variable.
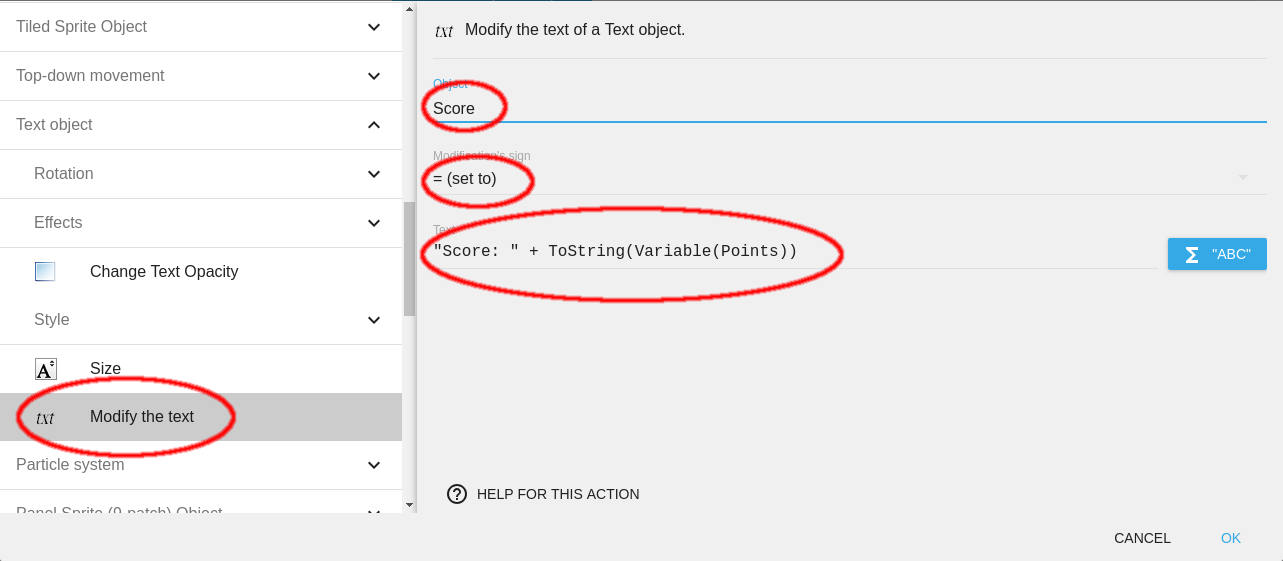
We will use the action Modify the text. Enter Score in the Object field and set the Modification's sign to = (set to).
Our text should display "Score: " followed by the value of the variable. But, the problem is that a Text can only display a string/text, not a number.
To counter this problem, we will first convert the variable to string and then send it to the text.
To do this, we will write ""Score: " + ToString(Variable(Points))" in the Text field. Note the quotes and + sign in the text. Quotes help us to distinguish a string and a function while + is used to concatenate two strings.
Note
Even though the second part of Text is addressed as a function in the above paragraph, remember that the end result of the function will be a string.
If we now preview the game, we'll see that the Score keeps on updating with every frame. This is because the condition checks if the Y position of Traffic is greater than or equal to 700.
To solve this problem as well as to optimise the game by freeing up memory, we will add another action to the event which will delete the object Traffic.
This action will free up some amount of memory as well as help us solve the Score problem by deleting the tree in the very next frame of Traffic crossing a Y position of 700.
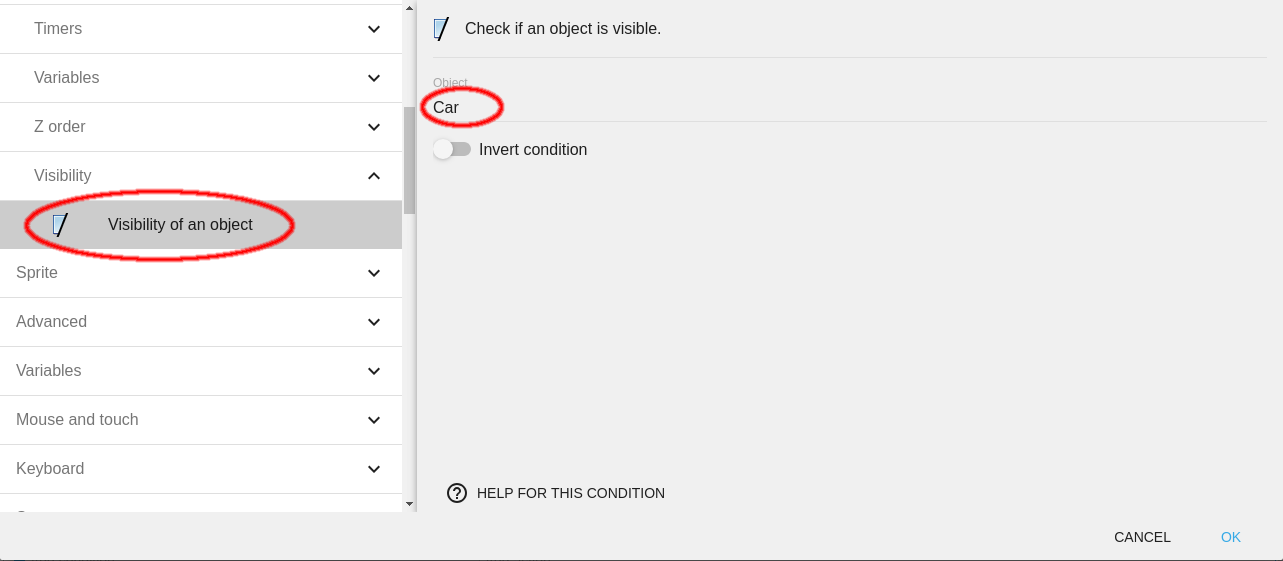
Now if you preview the game, you will see that the score keeps updating even after the collision between Car and Traffic takes place. For this, we can add another condition in the tree deleting event that would check if the object Car is visible.
Warning
There is a difference between the visibility of an object and its existence. An object might not be visible but may exist but if an object ceases to exist (like the Car in our case), it directly implies that it is not visible.
To optimise our game for the long run, we can also use a similar For each object event for deleting Tree
The condition of the event will be to check if Y position of Tree is more than 700 while the action would be to delete the object Tree.

This is what our Event Editor should look like:
You have now created an infinite car game in which the score gets updated as we pass by the trees.
Enjoy the game.
Add new features
You can now pose new challenges in front of yourself like allowing the car to go off the highway or allowing the movement of the car in front and back too.
GDevelop offers many tutorials for users to get more familiar with it. You can see them here.