How to make a platform game: player animations
Warning
This version of the tutorial is deprecated. Please refer to the new platformer tutorial for the completely revised version of the tutorial. The equivalent information to the current tutorial can be found in Part 4.
This tutorial will explain to you how to add different animations and how to use events to change the animations when the state of the player is changing.
Click here to read the previous tutorial if you have not done it already.
Add animations
At the moment, the player is always displaying the same standing animation but we're going to change that using events.
But first, we need to add the appropriate animations to the Player object.
Jumping animation
Open the editor of the Player object, make sure you're on the Properties tab, then click on the + button on the bottom of the window to add an animation.
Finally, click on the thumbnail with the + sign of the new animation and choose p1_jump as the image to add:
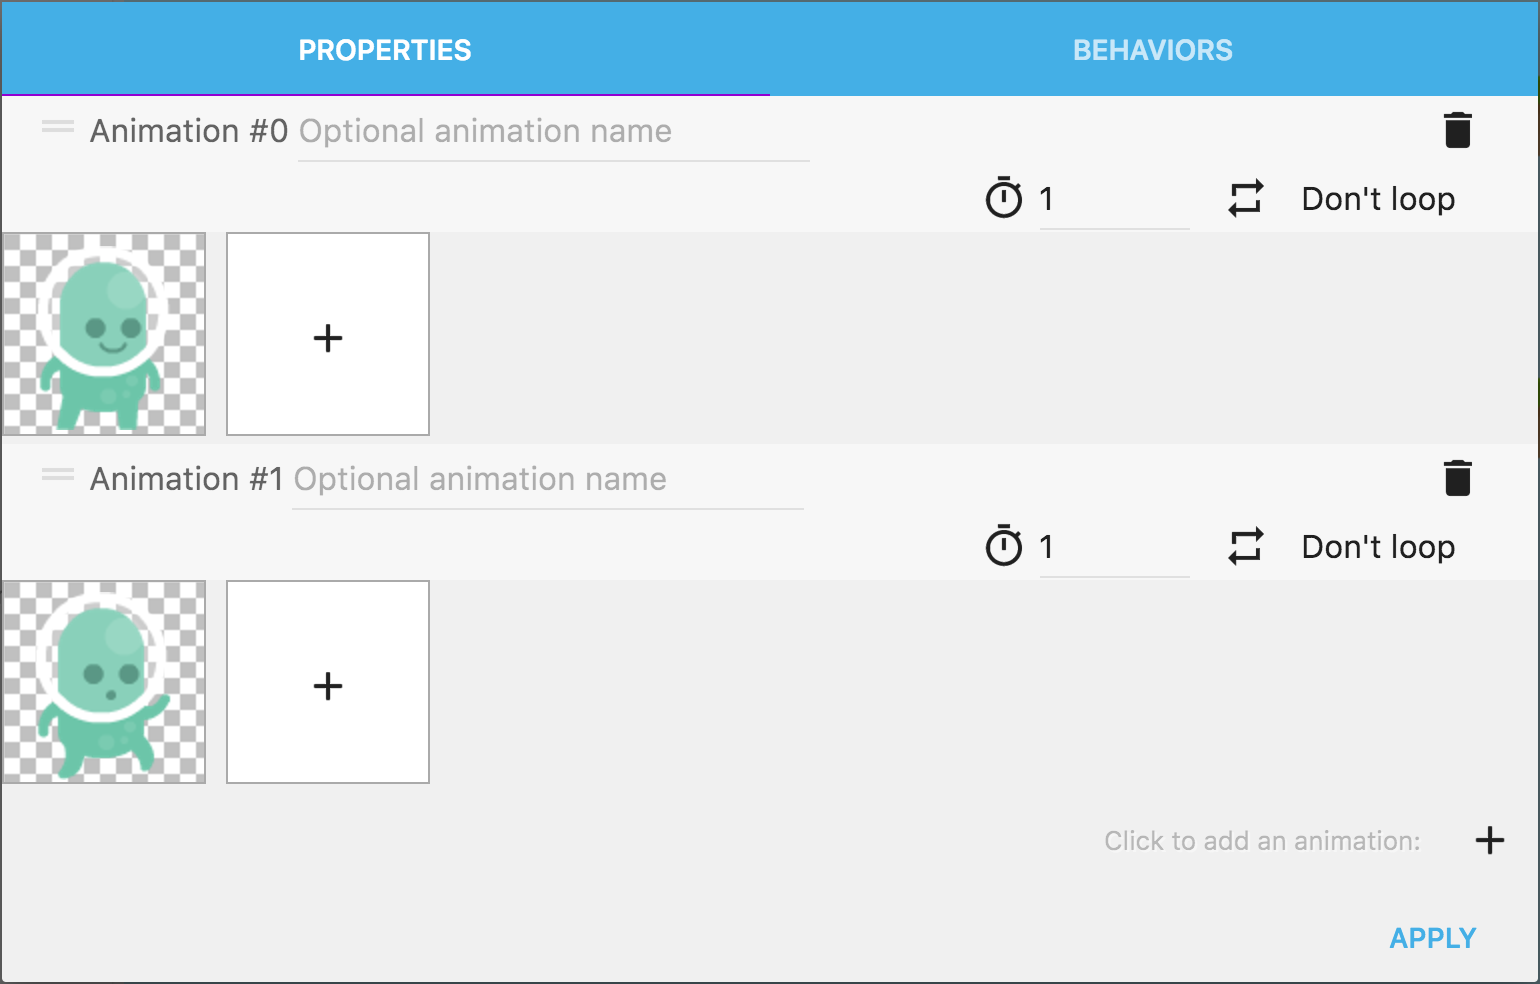
Animations can be given names. It's an easy way to differentiate between them and use them in the events. It's as simple as clicking on "Optional animation name" and typing the name you want.
Enter "Idle" and "Jumping" as names for our two animations:

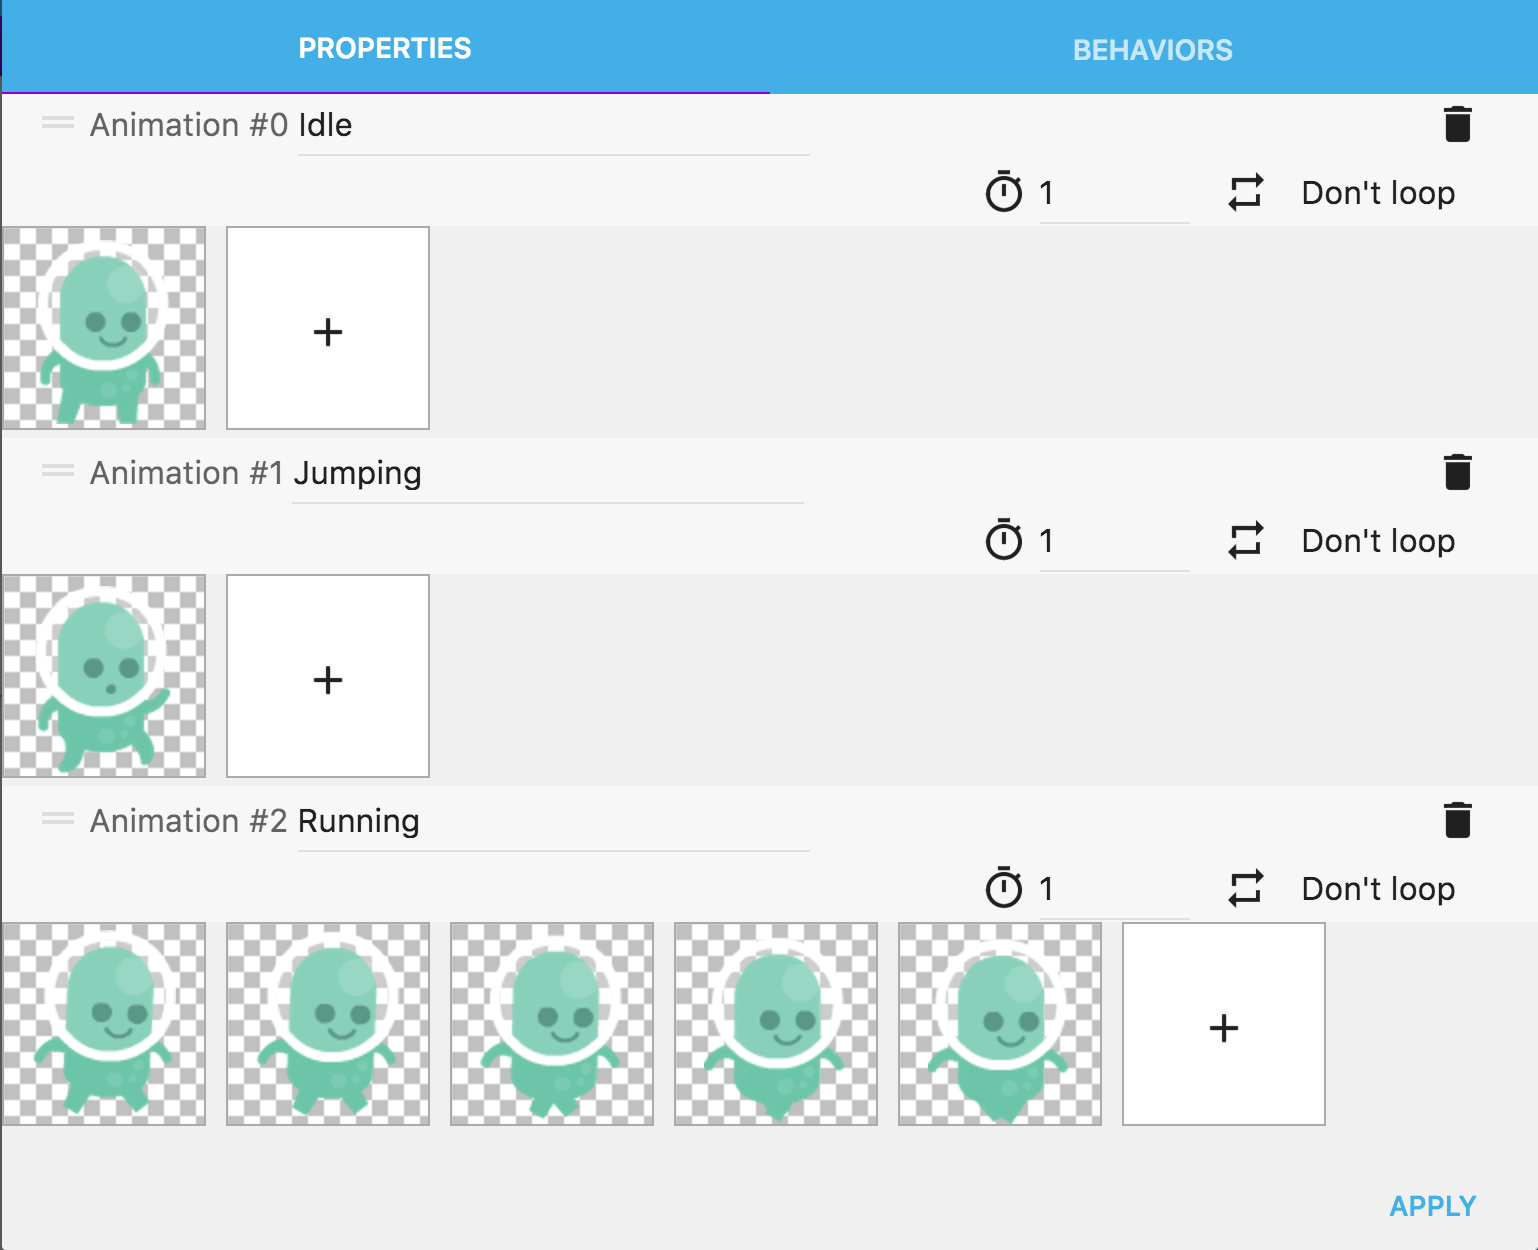
Running animation
We also need to add the walking animation to display when the character is walking on a platform.
Add another animation like we did before, and, when adding images, select the 5 images p1walk03.png, p1walk04.png, … and p1_walk07.png. You can select all the images at once or one by one as you prefer. Finally set the name of the animation to Running:
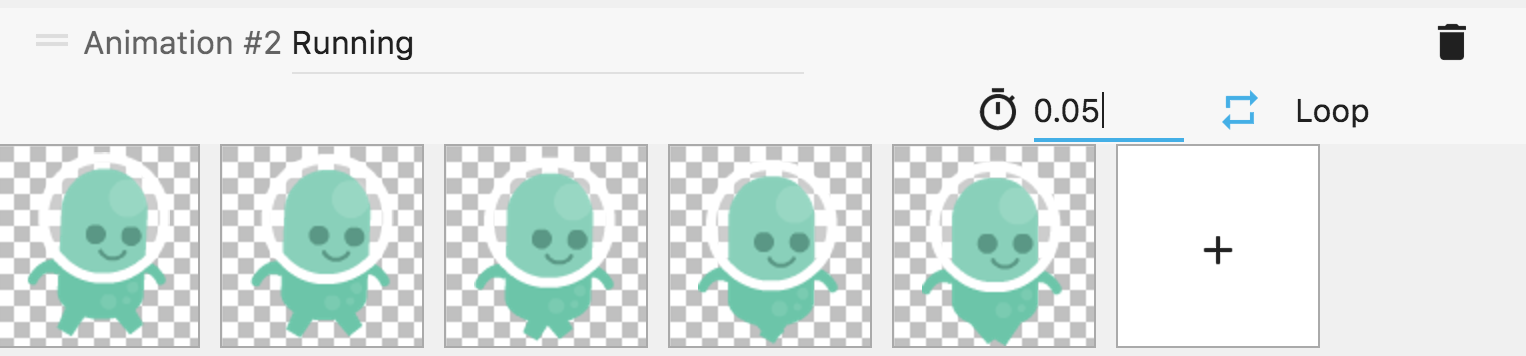
These images will be displayed so as to create the animation. We need to tweak a bit some options. First, click on Don't loop to switch this option to Loop. This will make the animation restart when the end is reached. The timer is displaying the time in seconds between each image: this is the speed of the animation. Enter 0.05 instead of 1 so that the animation is played faster:
Our object is now ready, click "Apply" in the bottom right corner.
Use events to change animations
The first event: animate when jumping
Tip
Please note that this tutorial shows screenshots using the Full List editor mode rather than the Object-specific (new) editor mode. Click here to see examples of each editor mode and how to switch.
Now, we need to change the animation displayed by the object according to what the player is doing. We're going to use the events, which are used to describe the rules of the game and how objects are animated, moved and respond to player inputs. It's a kind of visual programming that can be learned very quickly and is accessible to all.
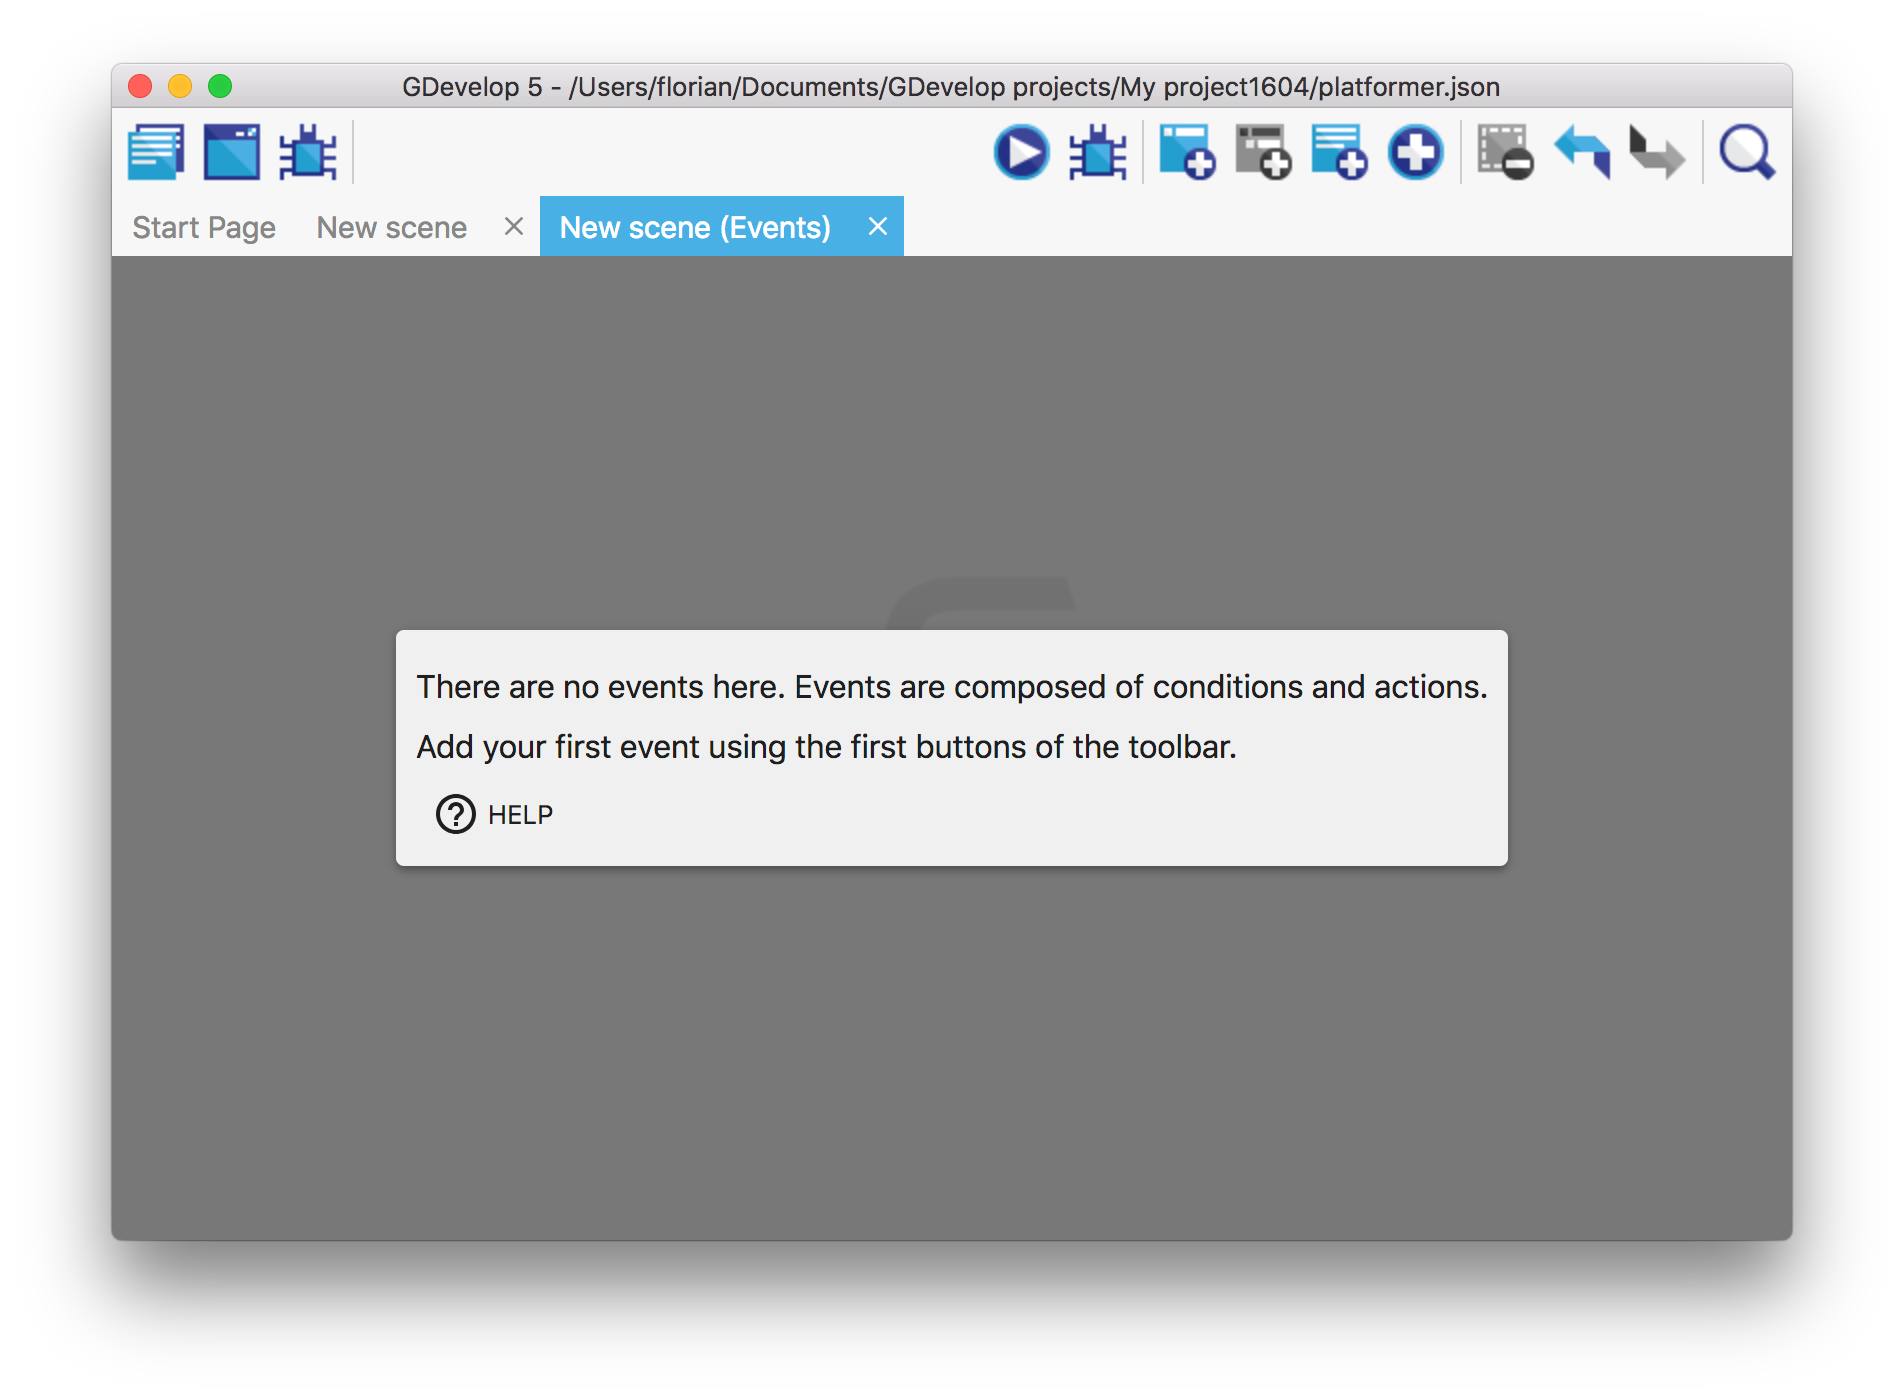
Open the events editor of the scene by clicking on the tab called New Scene (events).
For now, the events editor is empty:
Add the first event by clicking on the add event button in the top toolbar.

An event is composed of a list of conditions (e.g. to check if a collision is happening, if a key is pressed, if the player life is low etc...) and a list of actions that happen when the conditions are met.
For now the event is empty:

In this first event, we're going to check if the player is jumping, and change its animation accordingly.
First Click on Add condition.
In the new window, you can see all the conditions available to make your game. We want to check if the Player object, which has the Platformer character behavior, is jumping. Open the category called Platform behavior and then choose Is jumping.
The right part of the window displays the parameters that are needed to configure the condition. Here, we want to check if the "Player" object is jumping, so choose Player for the first parameter (the second is automatically filled):
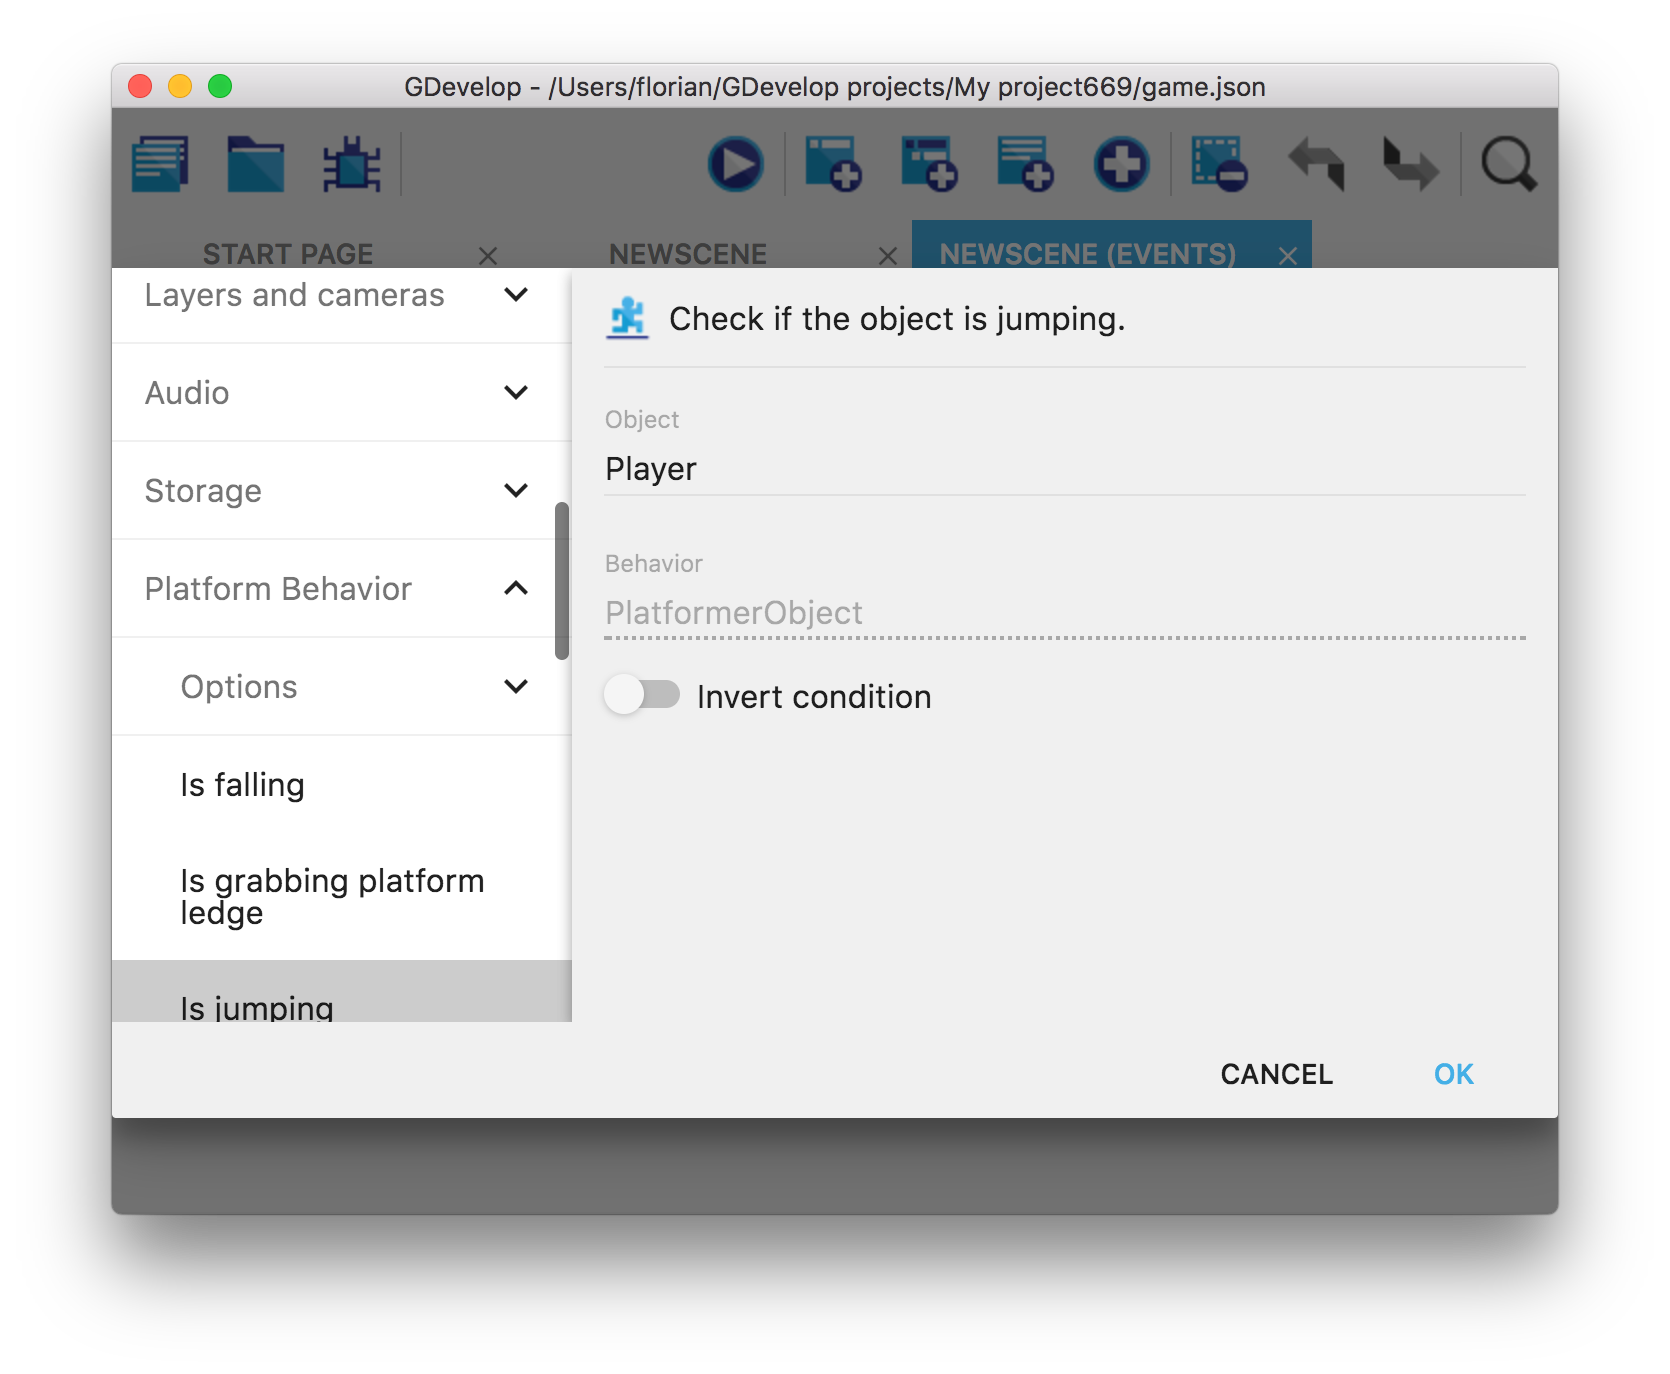
The condition is ready! Click on Ok in the bottom right corner to close the window and see the condition added in the event:

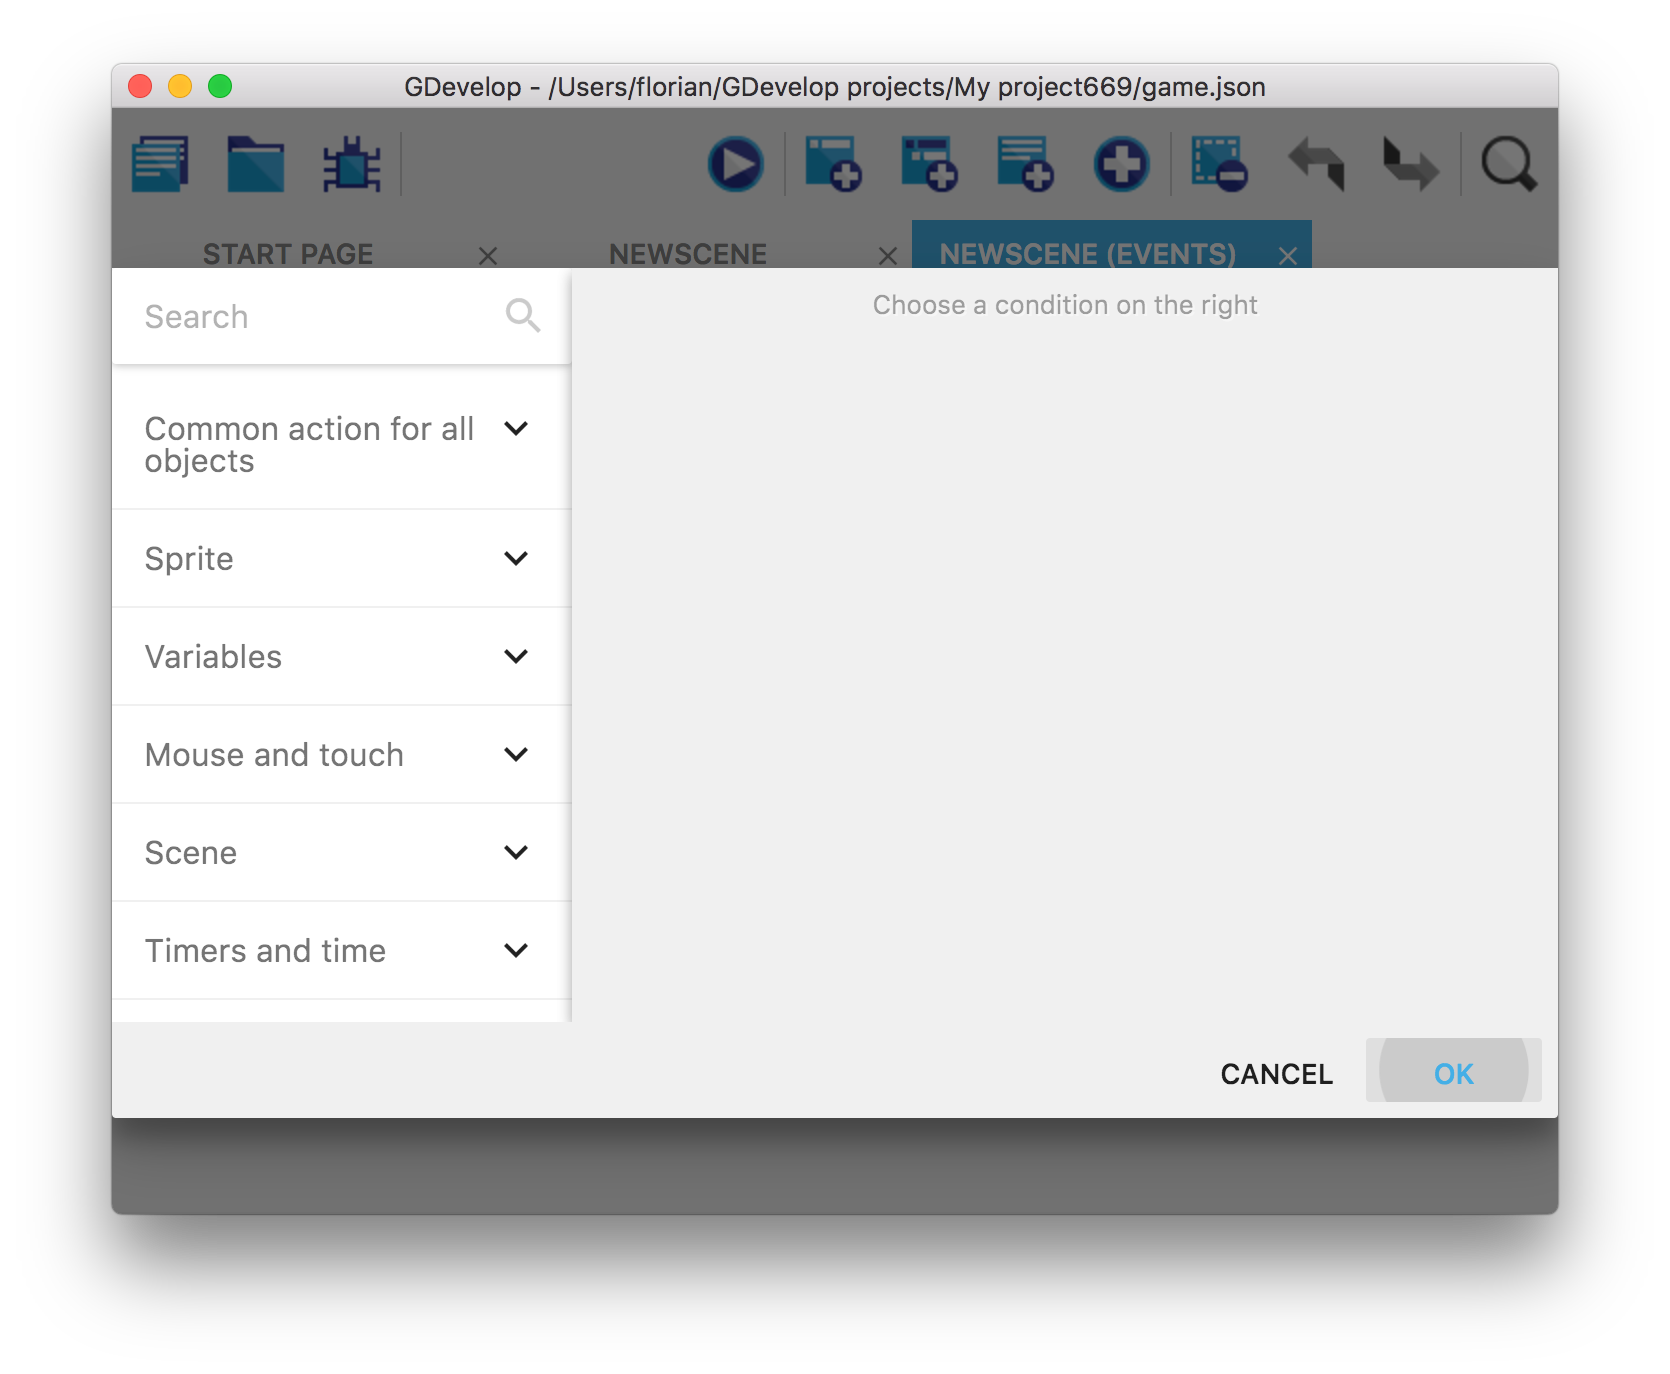
Let's now add the action to change the Player animation when the character is jumping. Click on Add action.
The window opened is similar, but now displaying all the actions available:
We're going to change the animation of the Player, which is a Sprite object. Open the Sprite category, then Animations and finally choose Change the animation (by name).
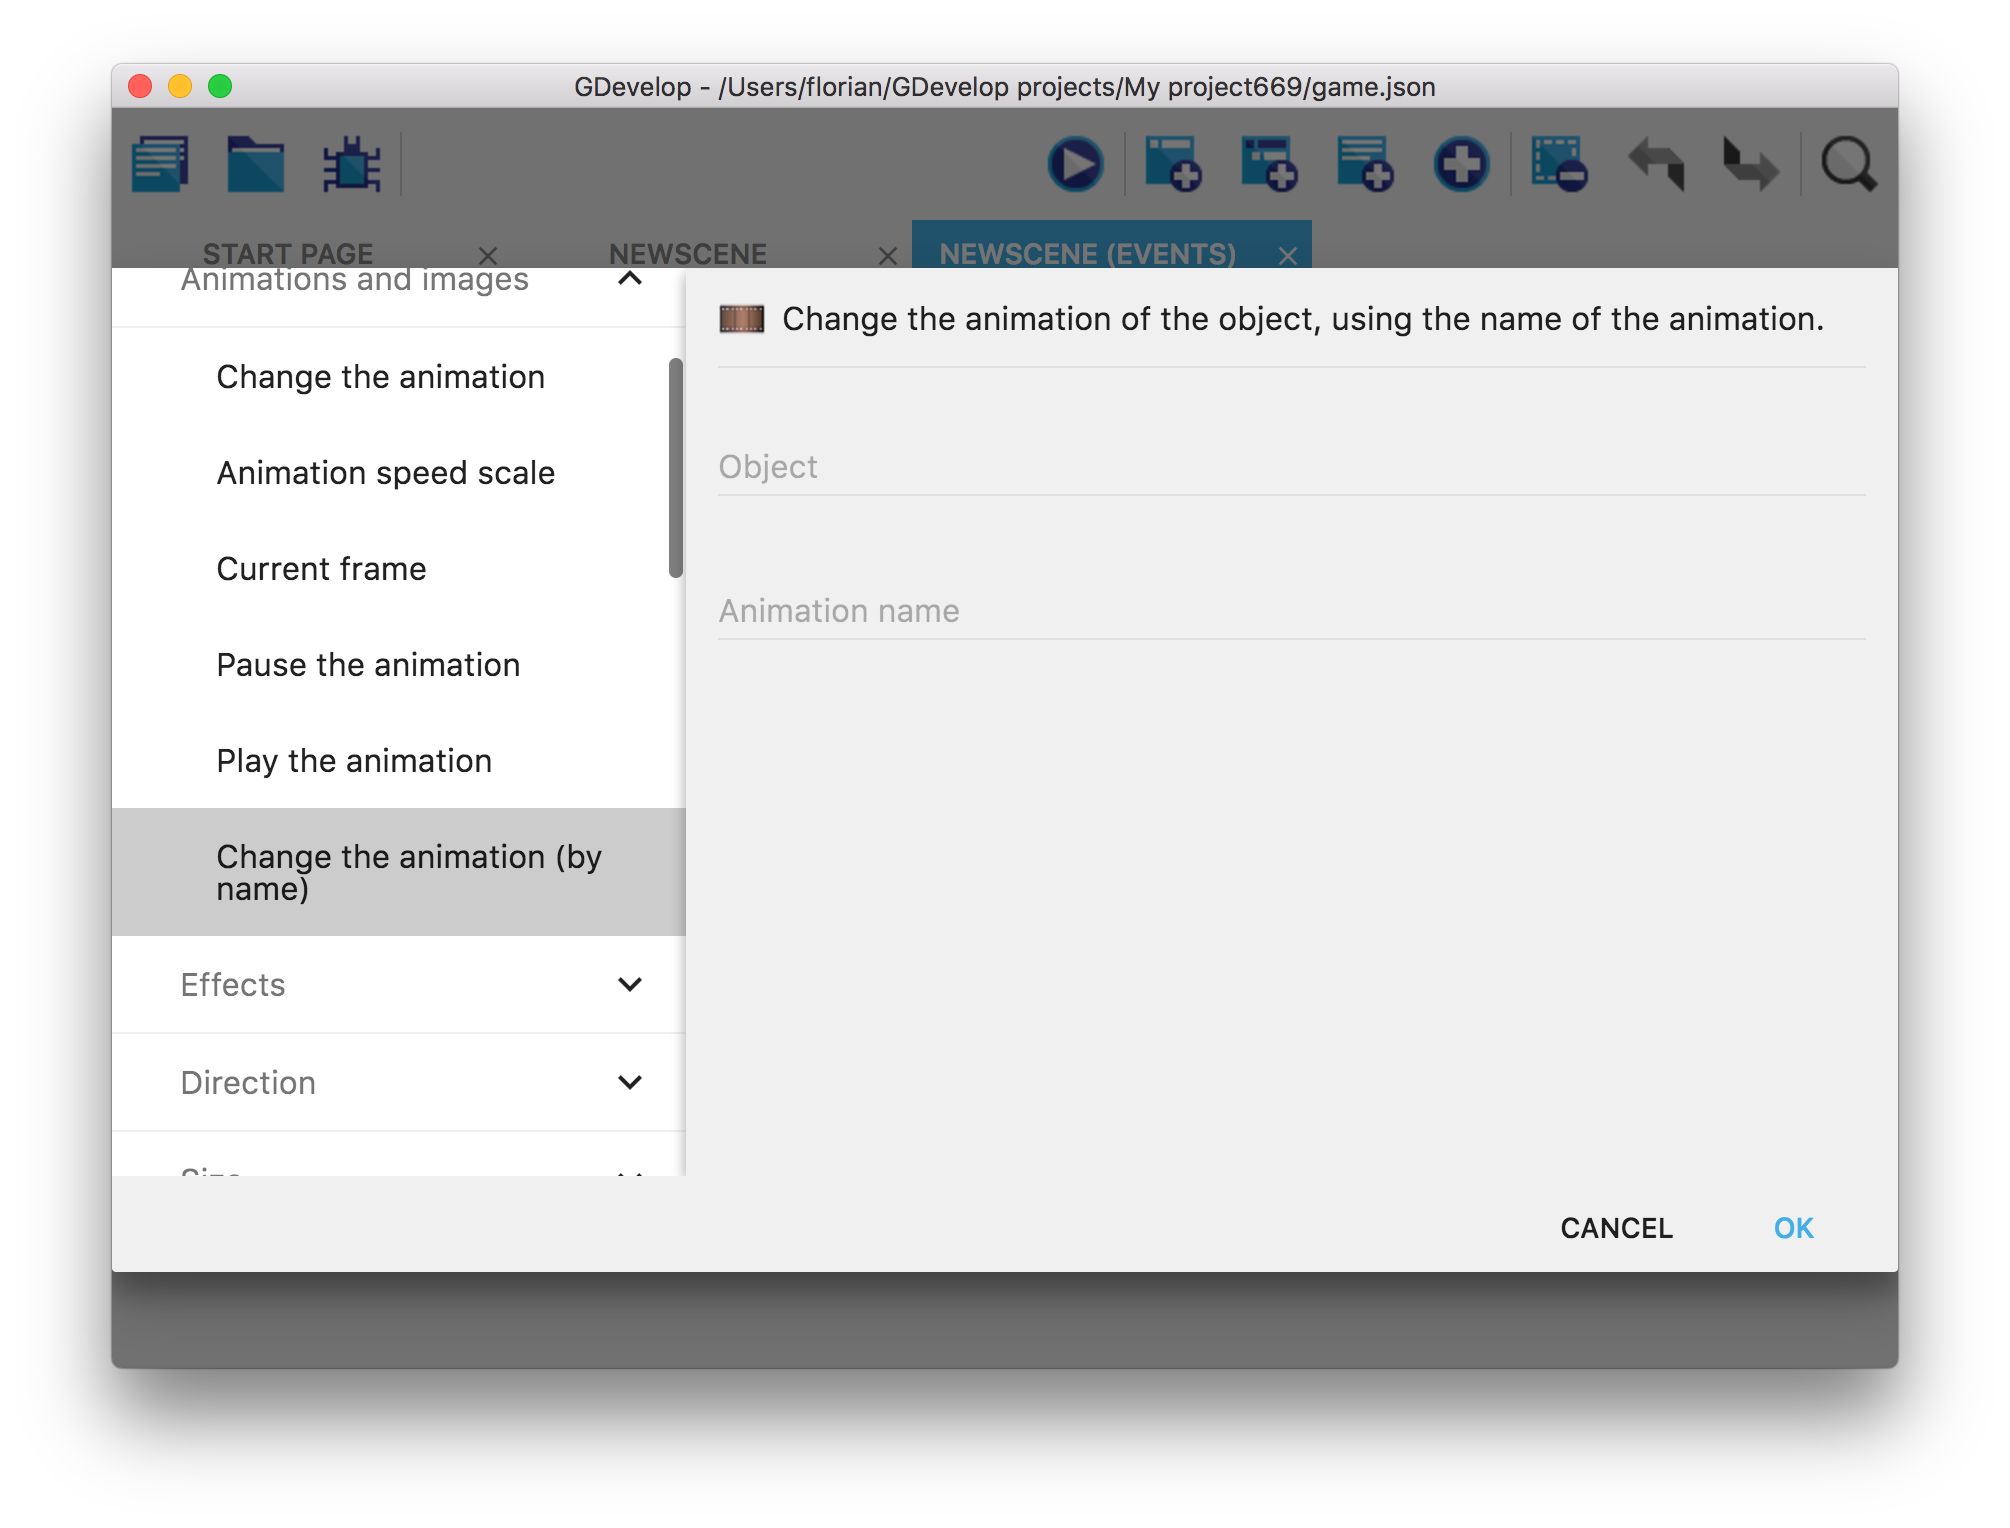
Select the Player object for the first parameter, and write "Jumping" in the second field. Beware, you have to write the double quotes as any text in GDevelop actions or conditions can also be generated using a formula, so it's necessary to use double quotes to tell GDevelop that this is a text:
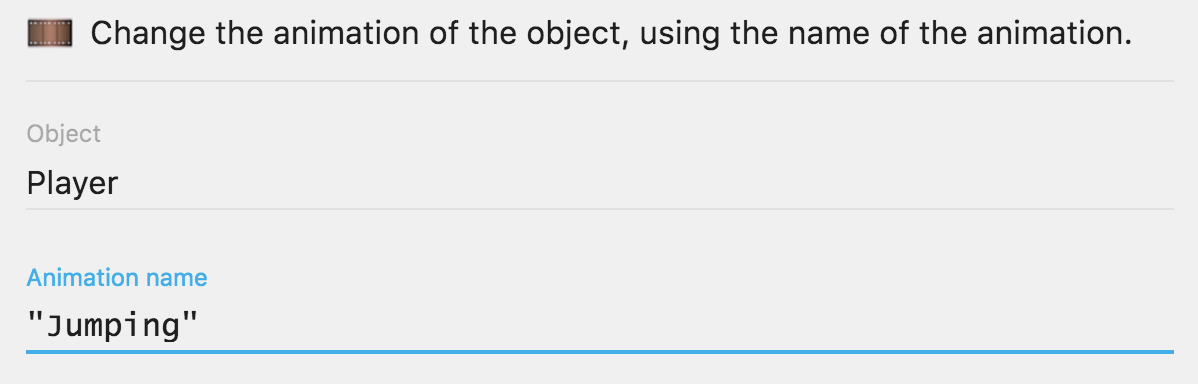
When it's done, click on Ok in the bottom right corner. The first event is ready!

Let's take a look at the result
Click on the Play button in the toolbar to launch a preview. When you jump, see the player animation changes!
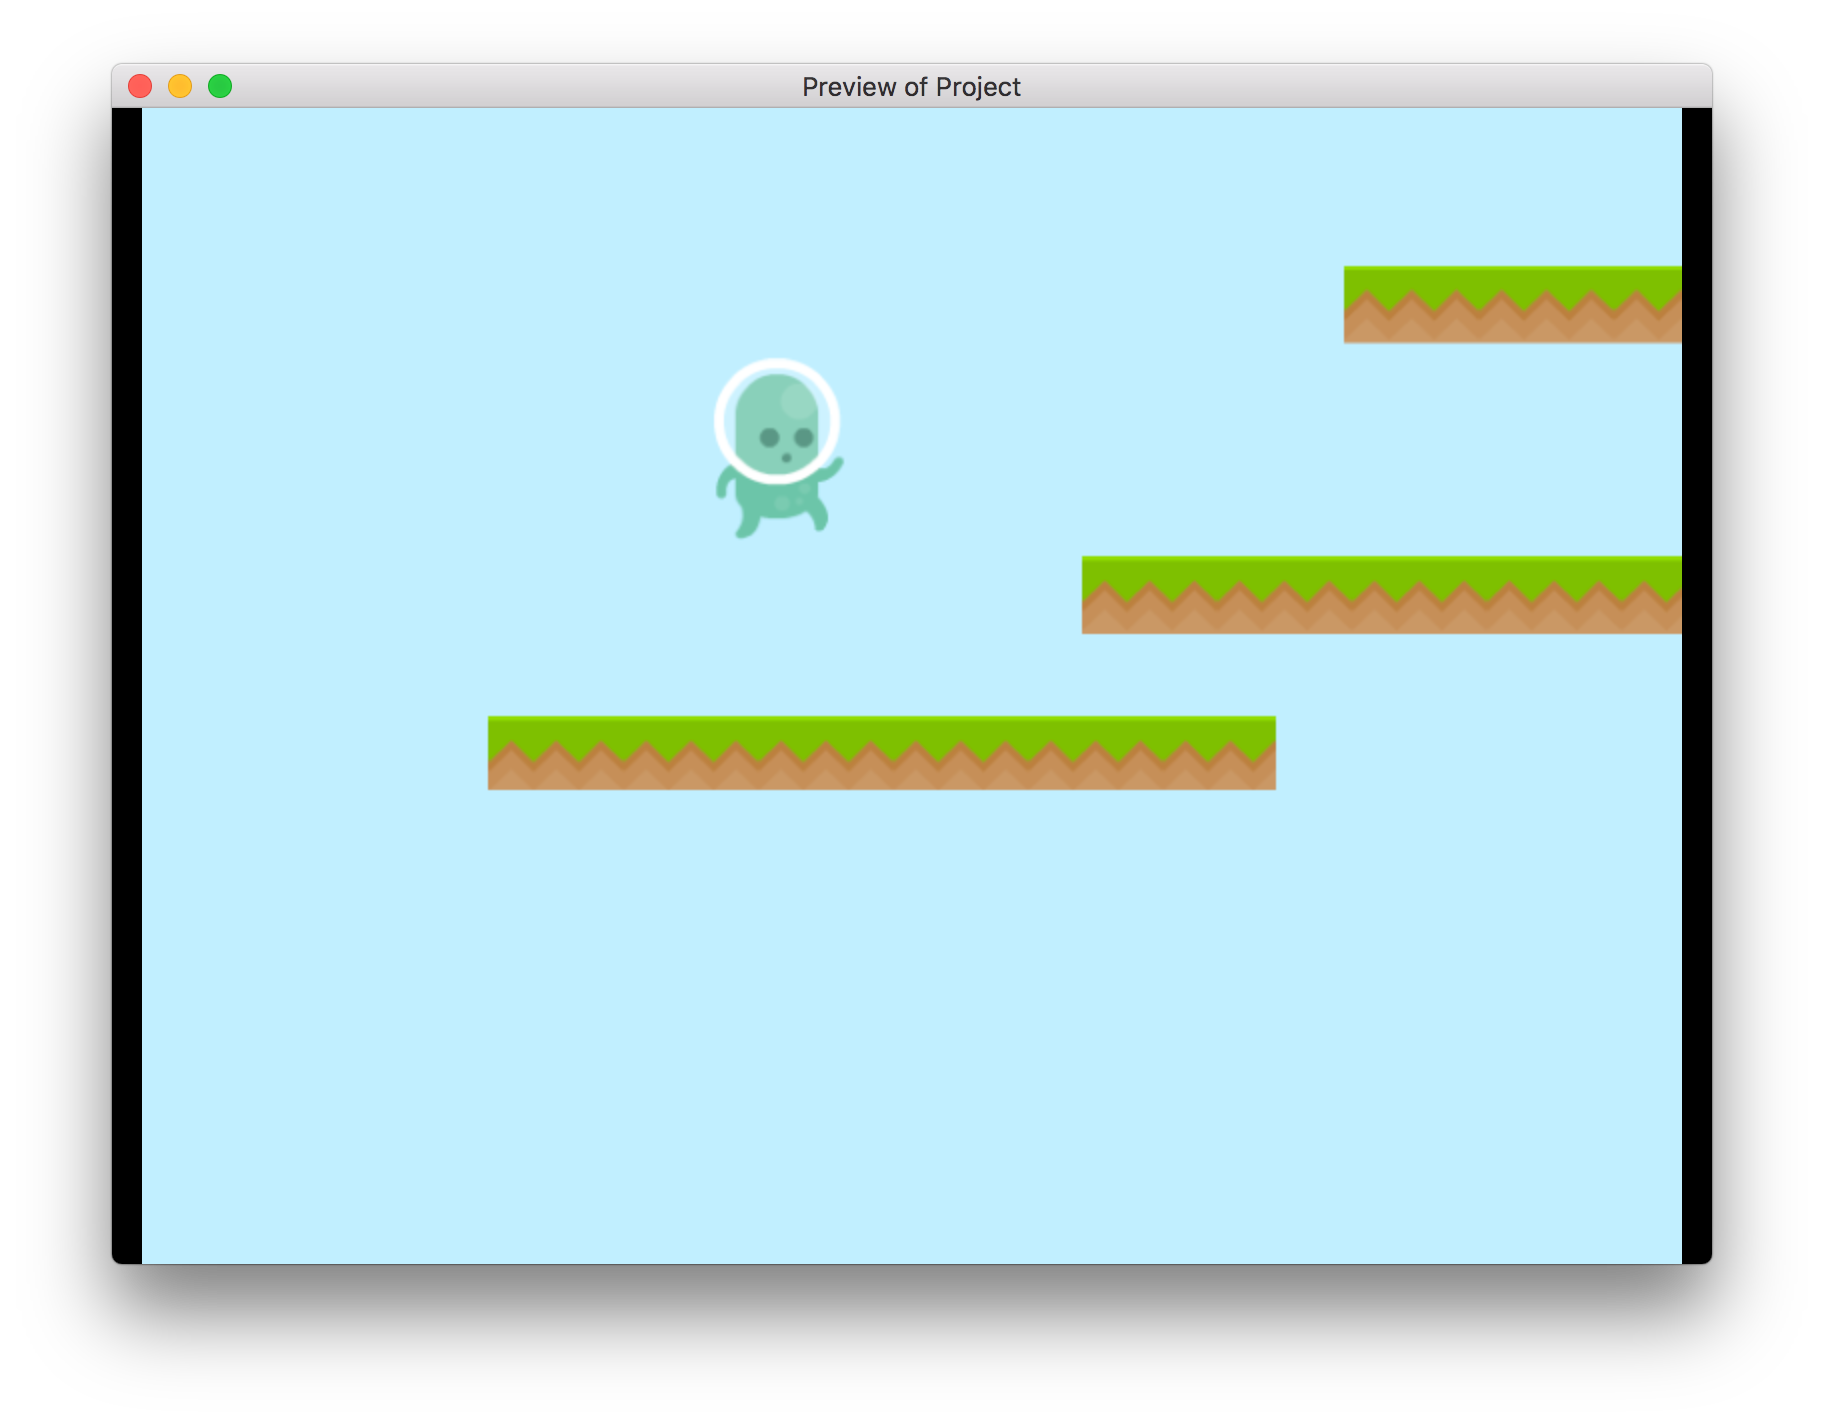
But when the Player is back on the floor, you can see that the animation is not set back to the Idle animation. This is simply because we never told GDevelop to do so! Let's add another event to fix this.
Idle and running animation
Let add a new blank event. Click on 'Add condition' and this time select the condition 'Is on floor' inside the Platformer behavior category. Note that you can use the search box on the top to quickly find a condition when you know its name!
Fill the first parameter by choosing the Player object:
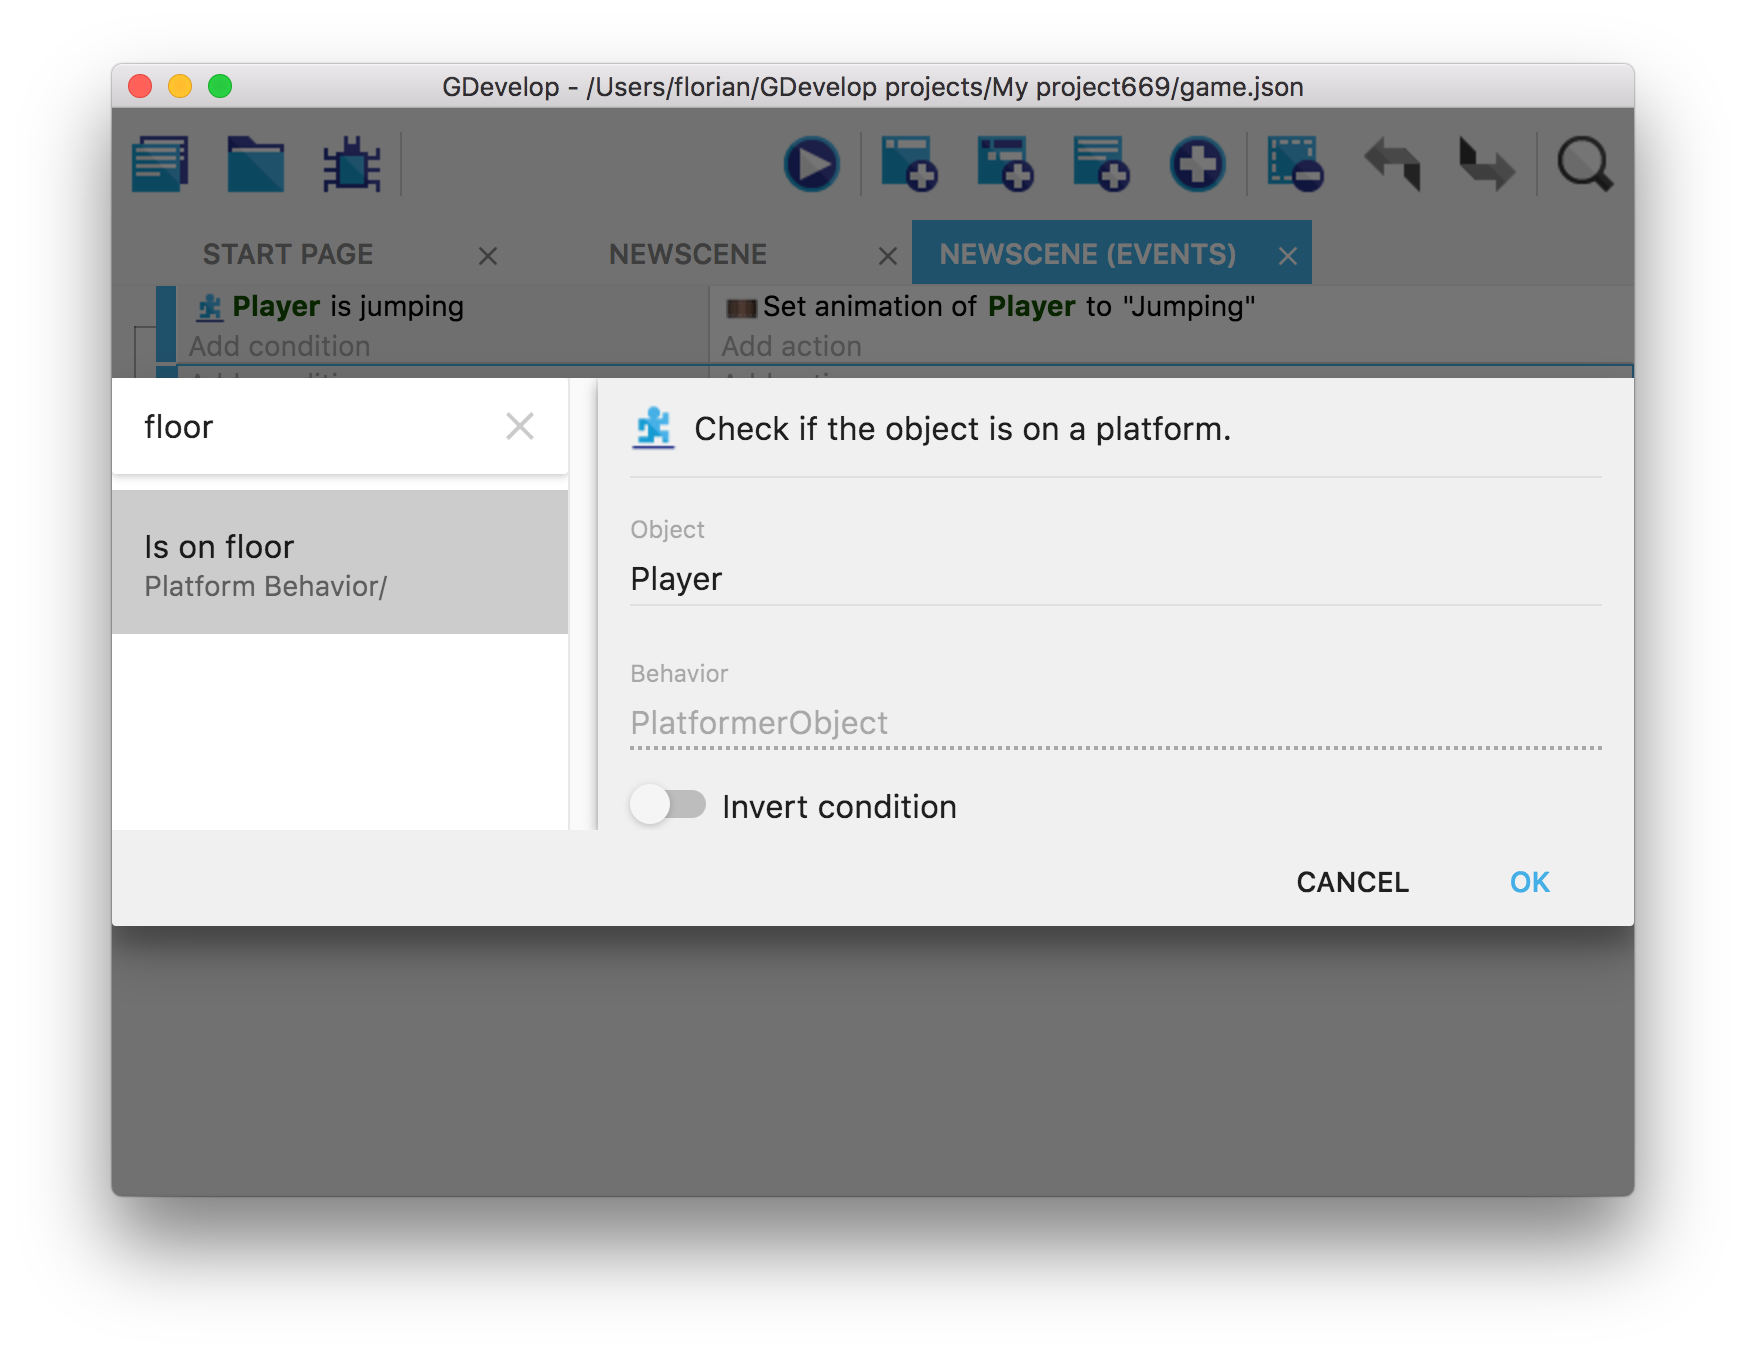
Click on Ok to validate the condition:

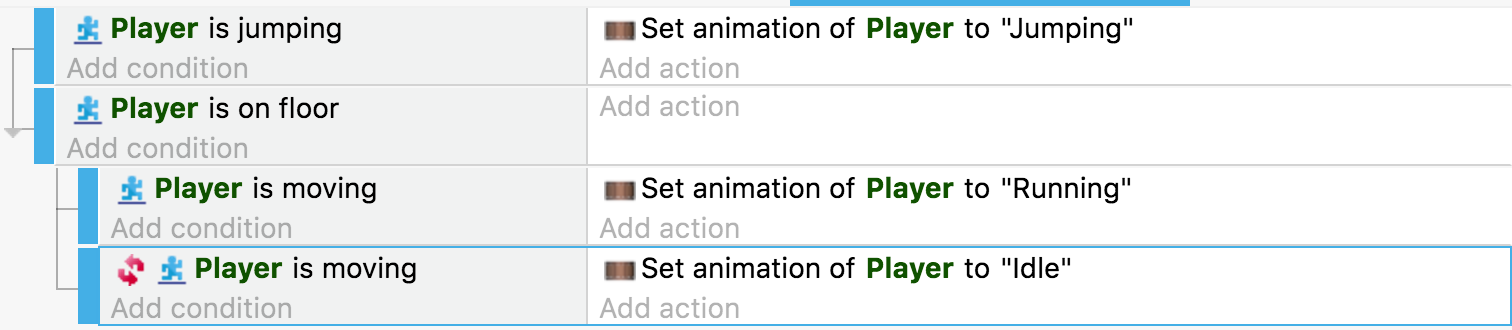
In fact, it's a good opportunity to make our character displaying not only the idle and jumping but also the running animation too:
We could add two events, with two conditions and an action in each event:
 * When the player is on the ground *and* not running, the Idle animation must be shown.
 * When the player is on the ground *and* running, the Running animation must be shown.
Instead, we can use sub-events, to only have the condition checking if the player on the ground one time.
Select the event we created by clicking on an empty area near Add condition or Add action:

Then, click twice on the button to add a sub-event:

Two "child" events are added under the event which is considered the parent event now. There is some added margin on the left of the events and a line between them to visually confirm that they are connected:

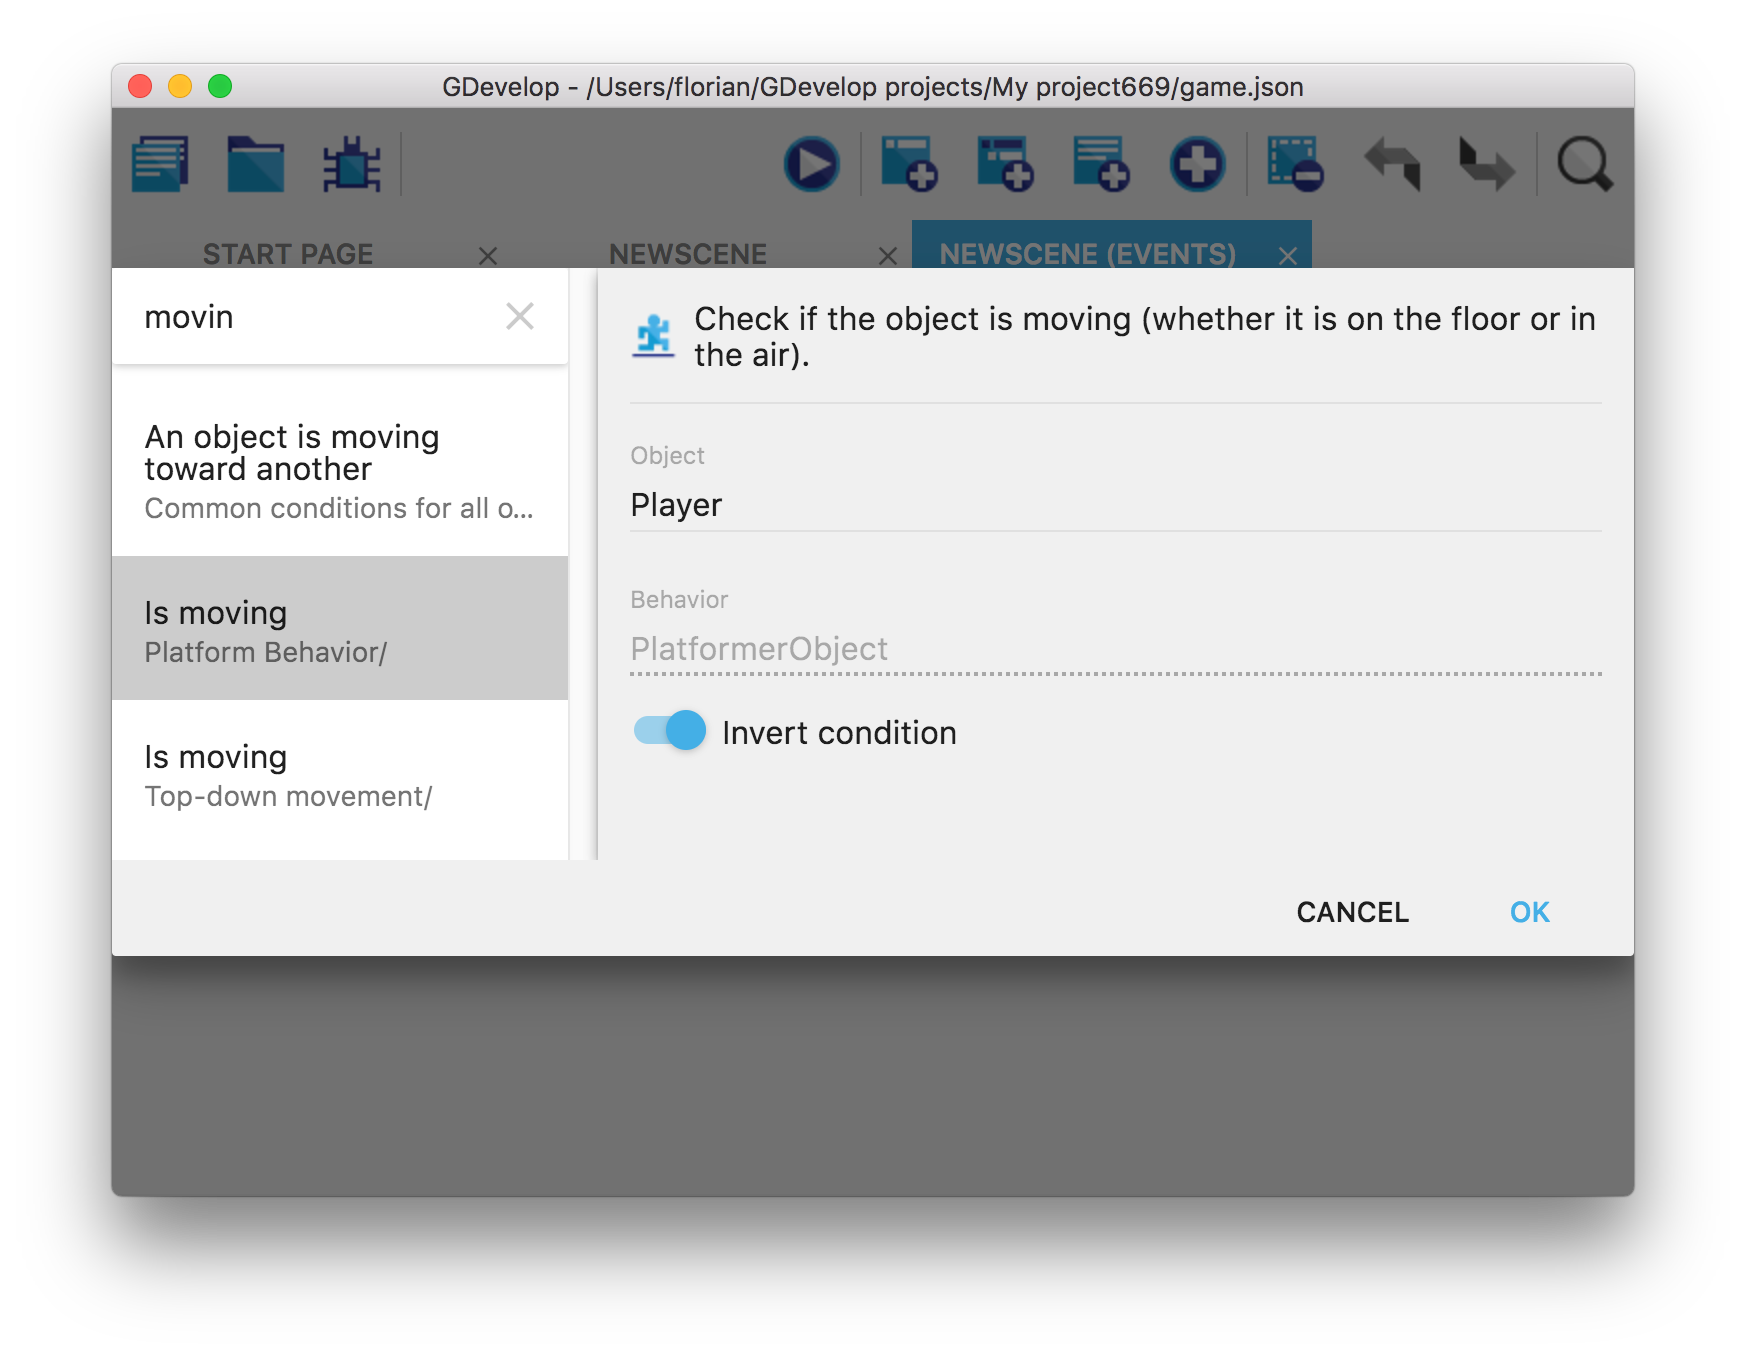
You can now add conditions inside these events! For the first, add a condition to check if the player is running:

For the second one, add the same condition, but check the Invert condition toggle. This way, the actions of the event will be launched when the Player object is NOT moving:
Here are our events so far:
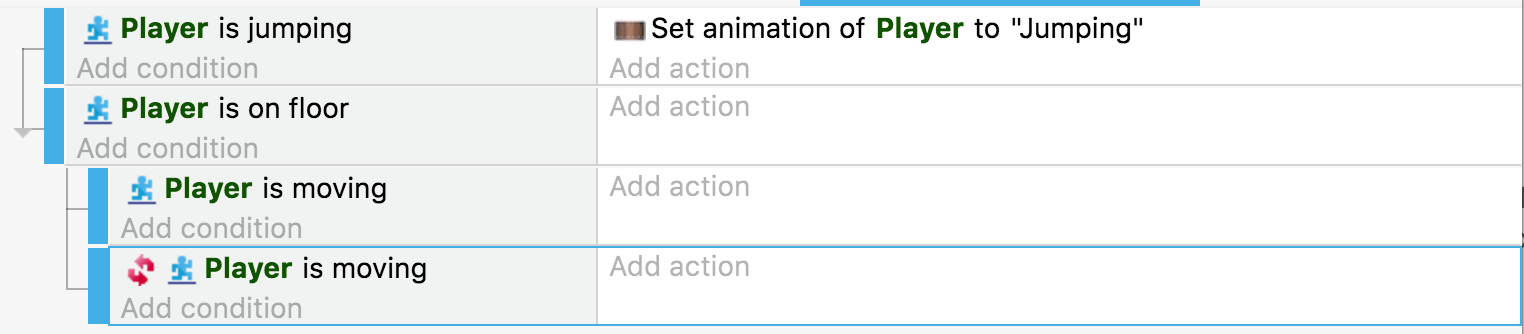
We're almost done, let's finish by adding the required actions to each event. Use the first event to set the animation of the character to "Running" and the second event to set the animation of the character to "Idle".
You can add these actions the same way we did before for the jumping animation. Don't forget the quotes (" ") when you enter the animation names.
Time to preview (and save)
You can launch a preview of your game and see that the player animation is changing while running and jumping!
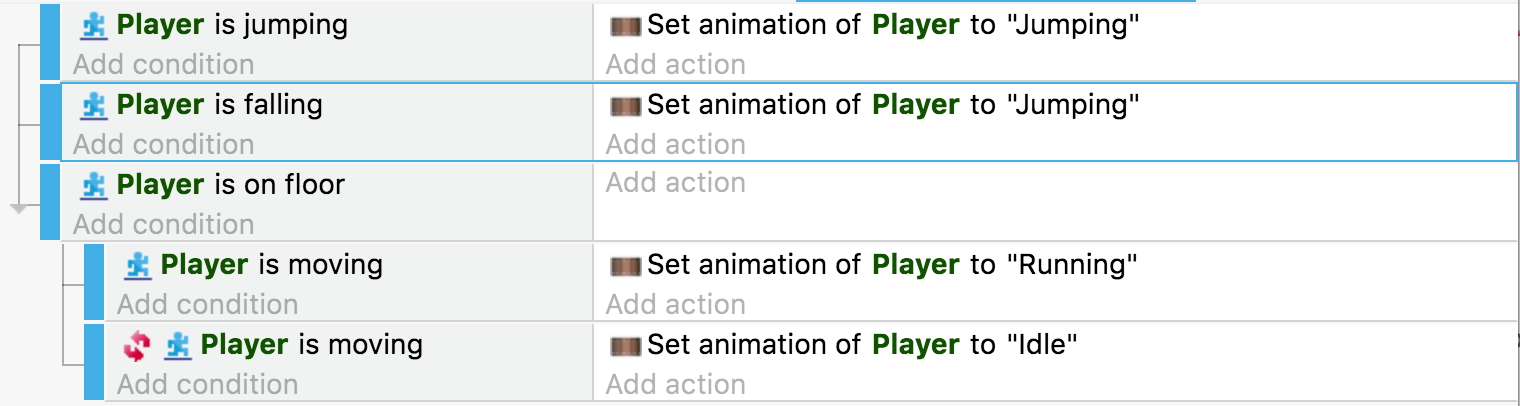
A small improvement we can do is to set the animation to Jumping when the player is falling too (otherwise the Running animation keeps playing when the player reaches the end of a platform).
Next step: have the camera follow the player
For now, it's hard to build a large level to explore because the player can quickly walk outside of the screen! The next part of the tutorial will show how to make the camera follow the player. It's really simple, a single event will be enough!
➡️ Read the next part of the tutorial here!